Automatic Tracking
Calculating tracks automatically uses the controls in the Properties panel to determine the direction and range of frames to track. Tracking forwards and backwards can produce a better track than going forwards if the pattern is clearly visible later in the clip.
To help avoid clutter in the Viewer, you can enable or disable the C_Tracker overlay by right-clicking in the Viewer and selecting Overlay, or by pressing Q to toggle between the available states:
• overlay off
• overlay on
• overlay on, no animation path
Masking Out Regions of the Image
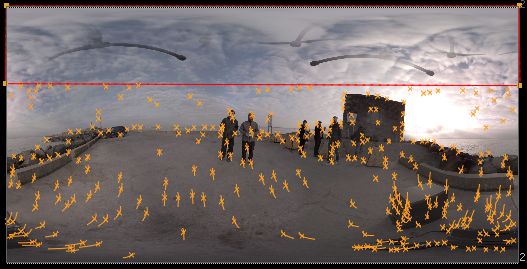
Tracking works best on fixed, rigid parts of the scene. The solver uses these points to work out the camera path. Moving elements and rigs should be masked out before tracking.
To mask regions of your sequence, attach a matte to the Mask input to define image regions that should not be tracked. You can also use the source input’s alpha channel as a matte.
| 1. | If you want to use a separate matte for masking, connect a Roto node to the Mask input. |
| 2. | Scrub through the sequence and keyframe the roto shapes to cover the areas you don't want to track. |
You don't have to be too accurate with the mask, it's only intended to cover areas that are likely to cause C_Tracker problems. For example, in the image shown, the drone rig is masked.
| 3. | In the Properties panel, set Mask to the component you want to use as a mask: |
• None - track features in the whole image.
• Source Alpha - use the alpha channel of the source clip to define which areas to ignore.
• Source Inverted Alpha - use the inverted alpha channel of the source clip to define which areas to ignore.
• Mask Luminance - use the luminance of the mask input to define which areas to ignore.
• Mask Inverted Luminance - use the inverted luminance of the mask input to define which areas to ignore.
• Mask Alpha - use the mask input alpha channel to define which areas to ignore.
• Mask Inverted Alpha - use the inverted mask input alpha channel to define which areas to ignore.
| 4. | Track as normal using the automated Auto Analysis Track button. See Auto-Tracking for more information. |
Note: There is no need to mask areas of the image when tracking manually - you specify where User Tracks are placed.
Auto-Tracking
To calculate auto-tracks:
| 1. | Render out a preview stitch from C_CameraSolver or C_GlobalWarp to work on. This step cuts down processing overheads considerably. |
| 2. | Mask out any regions of the image you don't need. See Masking Out Regions of the Image for more information. |
| 3. | Use the Frame Range dropdown to determine which frames are analyzed: |
• Input - the default value, sets the frame range to the length of the sequence attached to the src input.
• Global - sets the tracking frame range to the range set in the Project Settings > frame range controls.
If no frame range is defined, the frame range of the first image you read in is used as the Global frame range.
• Custom - sets a tracking range of frames described by the startFrame and endFrame fields.
| 4. | Click Track to begin analysing the image and seeding tracks. |
When tracking is complete, you can solve the camera and then use the results for stabilsing or match-moving. See Solving Cameras for more information.
If there appears to be too few tracks, or the distribution looks poor, see Troubleshooting Auto-Tracks for help with improving the results.