Search is based on keyword.
Ex: "Procedures"
Do not search with natural language
Ex: "How do I write a new procedure?"
Exporting UV Maps from Modo to Colorway
You can switch between the available UV maps exported for a part in Colorway on a per material or per-texture basis, as you might have different textures that require different looks. This video shows you how to export UV maps from your parts in Modo, to your .dci in Colorway.
In the video:
• You can export multiple UV maps for each part from Modo to Colorway.
• You can export up to seven UV maps for a part.
Exporting Multiple UV Maps From Modo to Colorway
| 1. | In the Parts tab of the Colorway kit UI, tag the part you want to render. |
| 2. | Under the UV Map column, click the part's UV map. |
| 3. | From the dropdown menu, toggle the part's available UV maps you want to export. |
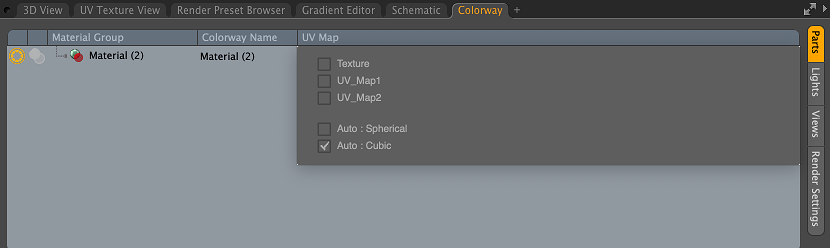
The Colorway Modo kit UV Map menu.
Note: Colorway allows up to seven UV maps per part.
| 4. | Select the Render Settings tab and click Render. |
Using Multiple UV Maps Inside Colorway
Once your .lxo is rendered and exported from Modo as a .dci file using the Colorway Kit for Modo:
| 1. | In the Items Tree select the part that was rendered with multiple UV maps. |
| 2. | Assign a material to the part through the Material Library, or apply a texture to your part through the Texture menu. |
See Material Libraries and Adding Textures for more information.
| 3. | Select the material or texture underneath your part in the Items Tree. |
| 4. | In the Material properties panel, select one of the available UV maps from the Mapping dropdown menu. |
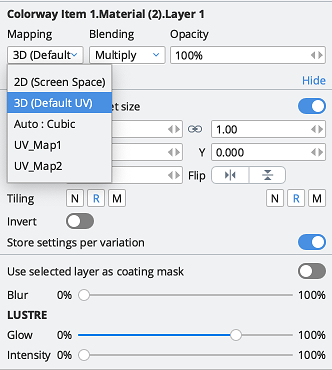
The Colorway Mapping dropdown menu inside the Texture panel. See Adding Textures for more information about the Textures panel.
Sorry you didn't find this helpful
Why wasn't this helpful? (check all that apply)
Thanks for your feedback.
If you can't find what you're looking for or you have a workflow question, please try Foundry Support.
If you have any thoughts on how we can improve our learning content, please email the Documentation team using the button below.
Thanks for taking time to give us feedback.