Search is based on keyword.
Ex: "Procedures"
Do not search with natural language
Ex: "How do I write a new procedure?"
Adding Textures and Decals to a Part
You can apply most image types as textures to individual parts of a 3D item. The textures will organically wrap around the 3D part to create photorealistic effects.
In the video:
• Textures and decals can wrap to a 3D surface.
• Select the part of the item to texture. Use the Configuring Texture Layers tab to add a new texture layer.
• You can have up to eight different layers that blend and wrap to the part.
• Textures can be adjusted using the Textures Property panel. See the image below.
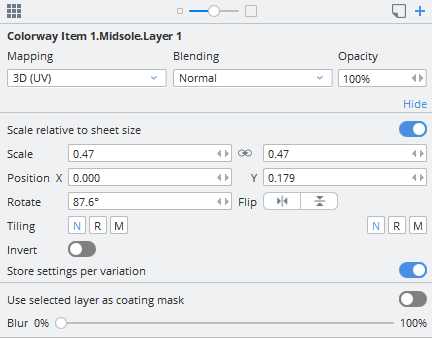
• Textures can also be adjusted by selecting the part with the texture applied on the sheet, and using the texture widget tool to rotate, scale, and position the texture. See the image below.
• You can also control tiling and image inversion.
• Colors can be added to blend to the image.
• Instead of wrapping in 3D, textures can be projected in 2D. This provides a bounding box to control the image in 2D screen space.
• You can also flip the image horizontally and vertically using the Flip buttons.

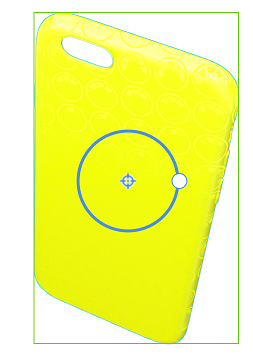
Using the Texture Widget Tool
The texture widget tool makes it easier to position, rotate, and scale your applied graphics by manipulating them directly on the part on the sheet.
Note: The texture widget tool works in the selected parts UV space. If you have 2D Screenspace selected as the Mapping for the texture, the widget will not appear, and a green bounding box can be used instead to move the texture.
| 1. | Select a part on the sheet with a graphic applied to the UVs, or select a texture in the Items List. |
The texture widget tool appears on the part on the sheet.
| 2. | Drag the texture widget tool to move the position of the graphic. |
| 3. | Drag the white circle on the widget to simultaneously scale and rotate the graphic. |
Note: The white handle turns red if it is moved outside the parts boundaries.
| 4. | Reposition the location of the widget by holding Alt/Option+Left Click. |
Copying and Pasting Colors and Textures
You can copy and paste colors and textures from one part of an item and paste them onto another part of the same item or a different item. The texture settings are also copied.
In the video:
• Click on the part, right-click and select Copy Colors and Textures.
• Click on the DCI target item, right-click and select Paste Colors and Textures.
Sorry you didn't find this helpful
Why wasn't this helpful? (check all that apply)
Thanks for your feedback.
If you can't find what you're looking for or you have a workflow question, please try Foundry Support.
If you have any thoughts on how we can improve our learning content, please email the Documentation team using the button below.
Thanks for taking time to give us feedback.