Search is based on keyword.
Ex: "Procedures"
Do not search with natural language
Ex: "How do I write a new procedure?"
Choosing Colors
Color Picker
Use the Color Picker to select and add colors to your color palettes. To open the Color Picker, click the ![]() button in the right menu.
button in the right menu.
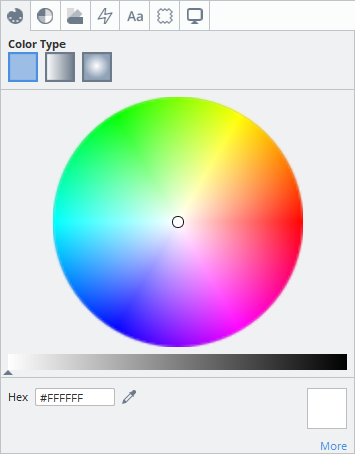
The Color Picker in the Colorway UI.
Tip: Click the More button to set the CMYK, HSV, and RGB values.
Selecting Colors in the Color Picker
| 1. | Choose Solid from the Color Type options. |
This specifies you want to create a solid color with no gradient.
See Creating Gradients for more information on the Linear and Radial color types.
| 2. | To pick a color you can: |
Click on the color slider to select a color value, then click on the color wheel to select a color hue.
OR
Use the eyedropper tool ![]() to pick an on-screen color in either Colorway or outside Colorway.
to pick an on-screen color in either Colorway or outside Colorway.
OR
Type a specific Hex code into the Hex field, for example: #FFFFFF.
OR
Specify values in the CMYK, HSV, or RGB fields.
Tip: Click the More button to expand the CMYK, HSV, and RGB values. Click the Hide button to hide them.
Once you've selected a color, the square color swatch updates with the selected color.
| 3. | To apply the selected swatch to an item: |
Click and drag the color swatch onto an item or part on the sheet or item tree.
Tip: If your part has materials or textures applied, hover the swatch over the part to see more options for applying the swatch to specific material layer and texture layers.
OR
With an item or part already selected, left-click the swatch.
Tip: You can see live updates to colors on your parts by enabling the Live update assigned color option in the Colorway Preferences.
Adding Colors in the Color Picker to Palettes
There are several methods for adding color swatches into your color palettes:
• Right-click the color swatch, choose Add Color To... and select the palette you want to add the swatch to.
• With a color palette already selected, double-click the color swatch.
• With a color palette undocked, drag and drop the color swatch into the palette.
Tip: See Working with Palettes for more information on selecting, creating, and undocking palettes.
Creating Gradients
Colorway supports the creation and application of color gradients, which can be stored in your color palettes and applied to your materials and items. You can create linear and radial gradients.
Note: You can import and export gradient swatches to and from .cpl and .jpl palettes, however you can't import or export gradient swatches to and from .ase palettes, as gradients are not supported in the .ase format.
Creating a Linear Gradient
The following steps show you how to create a linear gradient, however the same steps apply when you want to create a radial gradient, just select Radial from the Color Type options.
| 1. | Open the Color Picker by clicking the |
| 2. | Select Linear from the Color Type options. |
A New Gradient panel appears above the color picker, containing a gradient viewer and a gradient slider.
Note: If the ![]() icon in the New Gradient panel is not highlighted in blue, click it to begin editing your gradient.
icon in the New Gradient panel is not highlighted in blue, click it to begin editing your gradient.
| 3. | Hover your cursor over the gradient viewer. |
The available gradient handles appear in the viewer.
The larger handle is the start handle of the gradient, and the smaller handle is the end handle of the gradient.
| 4. | Click the start handle. |
| 5. | Choose a color and opacity from the Color Picker for the start of the gradient. |
See Selecting Colors in the Color Picker for more information.
| 6. | Click the end handle. |
| 7. | Choose a color and opacity from the Color Picker for the end of the gradient. |
| 8. | Click and drag the |
| 9. | Click along the gradient slider to add new interval points along the gradient. |
Tip: Interval points can be added along the handles within the gradient viewer too.
Once you are happy with your gradient, you can rename it by double-clicking New Gradient, typing a new name and hitting the Return key. Add it to your color palette by clicking the ![]() button.
button.
Tip: If you want to export the color palette containing your gradients, see Working with Palettes to learn more.
Sorry you didn't find this helpful
Why wasn't this helpful? (check all that apply)
Thanks for your feedback.
If you can't find what you're looking for or you have a workflow question, please try Foundry Support.
If you have any thoughts on how we can improve our learning content, please email the Documentation team using the button below.
Thanks for taking time to give us feedback.