Search is based on keyword.
Ex: "Procedures"
Do not search with natural language
Ex: "How do I write a new procedure?"
Flix for Editorial
Flix allows for roundtripping with your editorial department. This means an editor can make timing changes, rearrange shots, add camera moves and audio to the Flix sequence, as well as adding in external media such as Adobe After Effects compositions or a Maya playblast. All these changes to the sequence can then be imported back to Flix and will appear as a new Revision.
Setting up Flix with Adobe Premiere
| 1. | Make sure Premiere is your default Editorial Tool. For more information, see Third-Party Apps in the Preferences page. |
| 2. | In the General tab, go to the Editorial Tool dropdown menu and select Adobe Premiere. |
| 3. | Enter the Publish Directory path or click Browse and then select a folder. For example, T:\flix_publishes[show_tracking_code][sequence_tracking_code] |
| 4. | In the Adobe Premiere tab, set your preferences for exporting .xml files to Premiere. See the table below for details. |
| Adobe Premiere | |
| Marker Type | Choose whether Flix sends Timeline or Clip markers to Premiere. Article: Have a look at this Using Premiere Markers in Flix Knowledge Base article for more information on how markers are used in Flix. |
| Highlight New Panels | Sets whether new panels appear as highlighted clips in your Premiere sequence. |
Setting up Flix with Avid Media Composer
| 1. | Make sure Media Composer is your default Editorial Tool. For more information, see Third-Party Apps in the Preferences page. |
| 2. | In the General tab, go to the Editorial Tool dropdown menu and select Avid Media Composer. |
| 3. | Enter the Publish Directory path or click Browse and then select a folder. For example, T:\flix_publishes[show_tracking_code][sequence_tracking_code] |
| 4. | In the Avid Media Composer tab, set your preferences for exporting .aaf files to Media Composer. See the table below for details. |
| Avid Media Composer | |
| Avid Clip Name | Specifies the naming convention of the embedded clips in AAFs exported for Media Composer. Note: The chips located under the Avid Clip Name preference show what information type you can include in the filename format. Click a chip to add it to your filename convention. |
| Codec | Specifies the type of Avid video codec used for exporting to Media Composer. Choose between DNxHD 36 for smaller file size and DNxHD 115 for higher bitrate, larger files. |
| Clip Duration | Specifies the default duration for clips sent to Media Composer in frames. (For example, 480 frames or 20 seconds for a 24fps show). |
| Use Flix Timing | Toggle ON to send every panel as a clip retaining its duration set within Flix. This is useful to retain the timing established by a recorded pitch. |
| Enable Mark In | Toggle ON to include a Mark In point on each clip. |
| Mark In | Sets the frame on which to set the Mark In point. The default is 120 (5s in for a 24 fps show). |
| Enable Mark Out | Toggle ON to include a Mark Out point on each clip. |
| Mark Out | Frame on which to set the Mark Out point. The default is 360 (15s in for a 24fps show). Warning: Setting your Mark Out point to a value lower than the Mark In point may create an unreadable AAF. |
Publishing a Sequence to Editorial
The following steps apply to both Adobe Premiere and Avid Media Composer. Publishing to Premiere creates .xml files and publishing to Media Composer creates .aaf files.
| 1. | On the main toolbar of your Revision, click the Publish to Editorial button. |
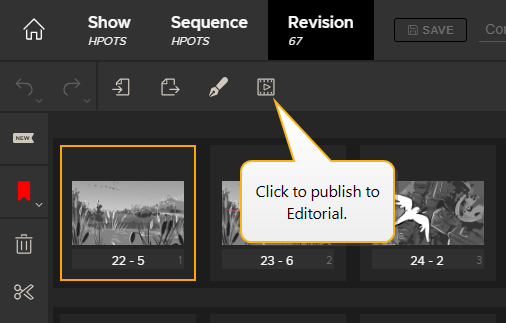
The Publish to Editorial dialog appears.
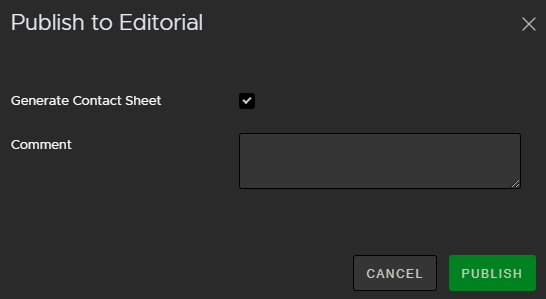
| 2. | Specify if you want to generate a Contact Sheet of the panels in your Revision. This is saved as a .pdf file. |
| 3. | Enter a Comment if needed. This appears in the email notification. |
| 4. | Click Publish. |
The directory to which your .pdf and .xml/.aaf files have been published opens.
• <filename>_all.xml/.aaf - This file contains the panel information of your entire sequence as well as any new or existing audio.
• <filename>_new.pdf - This file (Contact Sheet) contains the panel thumbnails of your entire sequence with New labels on panels that have been added or edited since the last publish. The Contact Sheet also contains dialogue. This is only created if you enabled Generate Contact Sheet.
• <filename>_new.xml/.aaf - This file contains only information and audio of panels that have been added or edited since the last publish.
Note: If no new changes have been made to the sequence revision, clicking the Publish to Editorial button gives you the option to open the directory of your last publish.
Note: If a Publish fails, it may be because Flix Server needs access to a font. Check Asset Storage for more information.
Filtering a Sequence by Published/Unpublished Panels
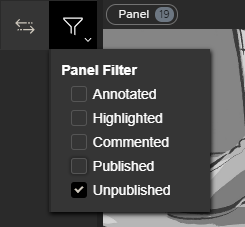
To check which panels have previously been included or excluded from publishes to editorial:
| 1. | Click on the |
| 2. | Either: |
• Check the Published option to see only panels that have been included in a previous publish to editorial.
OR
• Check the Unpublished option to see only panels that have not been published to editorial previously.
Importing Your Sequence to Adobe Premiere
| 1. | Open an existing project or create a new one. |
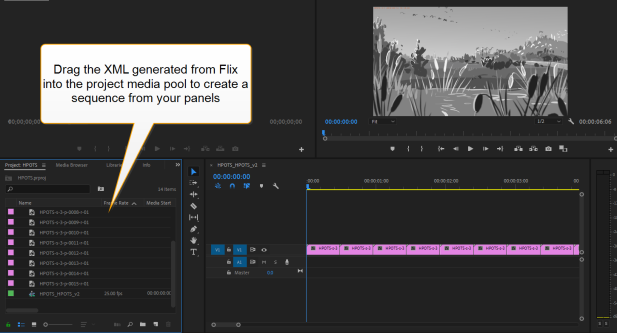
| 2. | Drag the .xml file into your project window. |
A sequence is automatically created using the imported clips. Any new panels are highlighted in your sequence if you have set the Highlight New Panels preference in Preferences > Third Party Apps > Adobe Premiere.
Note: Recorded pitches embed shot duration metadata in the .xml file, so panels appear in the sequence with their recorded timings.
Note: Animated panels originating from Storyboard Pro are sent to Premiere with the keyframe information intact, so they can be adjusted further in Premiere's effect editor.
Importing Your Sequence to Avid Media Composer
| 1. | Open an existing project or create a new one. |
Note: If you're creating a new project, make sure your media creation settings match the AAF export setting in Flix. For example, DNxHD 36.
| 2. | Drag either the all.aaf or the new.aaf file into a bin. |
If you choose the all.aaf, every panel is in the generated sequence. If you choose the new.aaf file, only new Flix panels will appear in your bin. New clips are highlighted green and a sequence is automatically created using the imported clips.
Note: AAFs generated by Flix only contain new media. This is to avoid duplicate media files from previously imported AAFs. If you import an all.aaf of a sequence you have worked on previously, Media Composer displays an alert saying some of the embedded media failed to import. This is expected and only the new panels appear in your bin. The other clips appear as offline media which can be relinked using Media Composer's relink tool.
Sending a Sequence Revision back to Flix from Editorial
Exporting Your Sequence Revision from Adobe Premiere
Flix requires both a .xml file and a .mov reference movie file to update your Sequence with a new Revision incorporating the changes made by editorial.
• To create the .xml:
| 1. | Select your sequence and click File > Export > Final Cut Pro XML. |
| 2. | Choose a location to save your file. |
| 3. | Click Save. |
• To create the .mov:
| 1. | Click File > Export > Media. |
| 2. | Select a codec that uses QuickTime, such as Apple ProRes. |
Warning: Check that the framerate and aspect ratio of your export matches those of your Show in Flix, otherwise your sequence will not be imported.
| 3. | Choose a location to save your file. |
| 4. | Click Save, then Export. |
Article: Have a look at this Using Premiere Markers in Flix Knowledge Base article for more information on how markers are used in Flix.
Exporting Your Sequence Revision from Avid Media Composer
To export an AAF of your edit back to Flix:
| 1. | Right-click on your sequence and select Output > Export to File or right-click on the Sequence Viewer and select Export... |
A Save dialog opens.
| 2. | Click Options to open the Export Settings window. |
Set the Video/Data Details first.
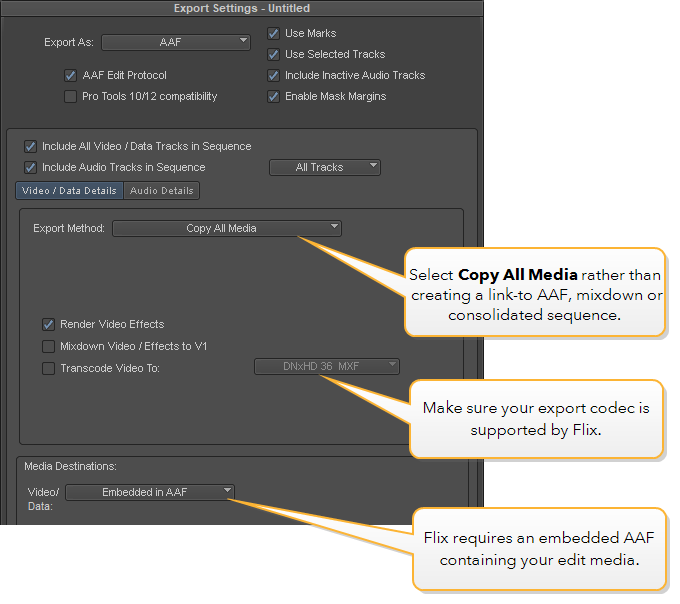
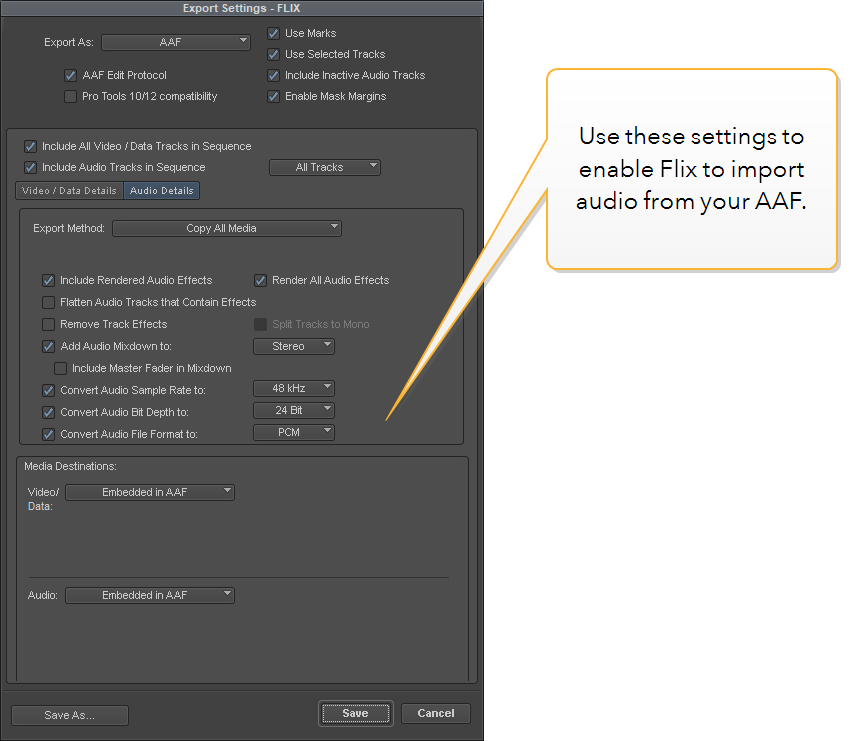
| 3. | Click on the Audio Details tab. |
See below for the required settings to embed audio in your AAF.
| 4. | Click Save. |
| 5. | Choose a location to save your file. |
| 6. | Click Save. |
Updating your Sequence in Flix
| 1. | In the breadcrumb, click Sequence. |
This takes you to the Revisions level.
| 2. | Click the Editorial button. |
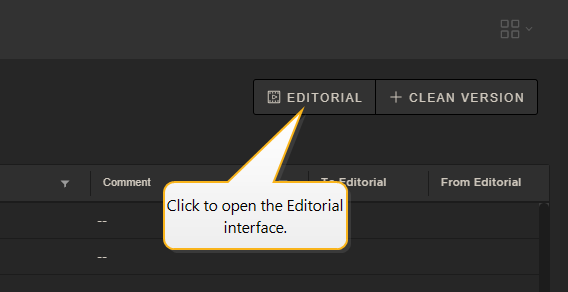
This opens the Editorial Interface.

| 3. | If you're using Adobe Premiere: |
• Browse to your .xml and .mov files to populate the Movie Path and XML Path. You can select both files at the same time in your file browser.
If using Avid Media Composer:
• Browse to your .aaf file to enter the AAF Path.
| 4. | Select the Effects from the dropdown menu: |
• Ignore Effects - (Fastest) - Flix reconforms the entire sequence without any effects.
• Hold Middle/First Frame - (Faster) - Flix renders only one frame per panel and holds it for the duration of the clip. This renders faster, however the actual full effect in Flix cannot be seen, for instance, a camera move. Watch the reference QuickTime movie from Editorial to see the full effect. The reference movie contains all the panels created when publishing back from Editorial.
• Render All Frames - Flix renders every single frame. This is slower to render but more accurate since the full animation can be seen.
| 5. | Enter a Comment if required and click Import. The comment appears on the sequence revision in the Revisions list. |
The import details appear in the Import History, Last Import Summary, and Import Logs tabs so you can check what's changed on a panel by panel basis.
| 6. | Go to the Revisions level to open the newly-imported sequence revision. |
Sorry you didn't find this helpful
Why wasn't this helpful? (check all that apply)
Thanks for your feedback.
If you can't find what you're looking for or you have a workflow question, please try Foundry Support.
If you have any thoughts on how we can improve our learning content, please email the Documentation team using the button below.
Thanks for taking time to give us feedback.