Search is based on keyword.
Ex: "Procedures"
Do not search with natural language
Ex: "How do I write a new procedure?"
Node Parameter Basics
Default Parameters Tab Icons
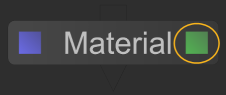
Nodes displayed in the Parameters tab have a number of default icons.
![]()
| 1. | Open/Close the node grouping. |
| 2. | The name of the node, which can be changed in the parameters or by clicking on the name. |
| 3. | The type of node selected. |
| 4. | Toggle the node tooltip. |
| 5. | Toggle the node shelf. |
| 6. | Toggle the graph state variables window. |
| 7. | Toggle user comments for the node. |
| 8. | Toggle the parameters menu. |
| 9. | Toggle the parameter search window. |
Opening and Closing a Node’s Parameters
Once a node’s parameters are visible within the Parameter tab they are grouped with the node type and name at the top. This can be opened and closed with the ![]() /
/![]() icons next to the node type.
icons next to the node type.
Note: If the Parameter tab is not visible you can either, add it to a pane by clicking the ![]() icon on the relevant pane and selecting Parameters, or create a new floating pane, by clicking Tabs > Parameters.
icon on the relevant pane and selecting Parameters, or create a new floating pane, by clicking Tabs > Parameters.
Accessing a Node’s Parameters
To edit a node’s parameters, they need to be in the Parameters tab. To do this, select the node(s) whose parameters you want to edit, then:
• In the Node Graph, select Edit > Edit Selected Nodes (or press Alt+E).
• Hover the mouse pointer over the node you wish to edit and press E .
• Click within the faint square to the right of a node.
• Double-click on a node. This also sets the current scene graph view to that node. See Using the Scene Graph for more information.
A node that has its parameters in the Parameters tab has a green square on the right-hand side.
Editing a Node’s Parameters
Each node has parameters that alter how the node behaves within the recipe. These parameters can be changed within the Parameters tab.
A parameter’s value comes from one of three things:
• A constant.
For example: 9, test, or /root/world/cam/camera
• An expression.
For example: 16-3, scenegraphLocationFromNode(getNode(’CameraCreate’)), or getNode(’CameraCreate’).fov. Please refer to the Developer Guide for more information.
• A curve: only available for numeric inputs. See Animation for more information.
Each parameter type has a control associated with it, and listed below are a few ways you can change the common parameter types.
Changing a Numeric Value
You can change a numeric value by:
• Double-clicking in the field to select the whole value and entering a new value in the input field.
Note: Positive and negative numbers are supported. You can also enter integers (12345), Floating/Double points (12.345), scientific notations (1e2345), and hexadecimal numbers (0x9abcd).
Tip: Katana also allows you to enter formulas into fields, making it easy to do quick calculations. For example, if you wanted to halve a value of 378, you could simply type 378/2 into a field and press Enter to get 189.
You can increment or decrement field values by hundreds, tens, tenths, hundredths, and so on. The magnitude of change depends on the initial position of your cursor. For example if you wanted to increment the initial value of 20.51 by ones, you would insert your cursor before the 0.
To increment or decrement a field value:
• Click to insert the cursor just prior to the digit you want to increment or decrement and press the up arrow to increment by one unit, or the down arrow to decrement by one unit.
Tip: You can also increment and decrement values using the mouse wheel (if available).
• Click and drag on the parameter name, also known as scrubbing. Dragging to the left decreases the value, and dragging to the right increases.
Note: If the stickyDrag option has been enabled in the nodegraph preferences, you can click on the parameter label and move the mouse left to decrease the value or right to increase it.
To access the Preferences dialog, either select Edit > Preferences from the main menu bar or select Edit > Preferences from the Node Graph tab's menu bar.
Tip: To make the changes coarser, hold down the Shift key while scrubbing, to make them finer, hold down the Ctrl key. Pressing Shift with the up and down arrows makes the change coarser, or pressing Ctrl makes it finer. Also, to change the increment and decrement amount, right-click and select the sensitivity from the Sensitivity menu.
Changing a Color Value
Use the color picker or the pixel probe to change the color.
Changing the Value of a Dropdown Menu
To change the value in a dropdown menu:
| 1. | Click on the dropdown menu. |
| 2. | Then, either: |
• Click on the new value from the list.
• Use the Up and Down Arrow keys to highlight the new value and press the Return key.
Changing a Text String
A string can be used to represent a texture name, scene graph location, node name, or whatever a plug-in may need. Depending on what it is representing it can be displayed in a number of ways. These can be:
• a plain text input field,
• a scene graph location, or
• a filename.
Manipulating a Scene Graph Location Parameter
Scene graph location parameters are used to either point to where a new location is inserted into the scene graph or to reference an existing location.
When the node creates a new location within the Scene Graph tab, the ![]() icon presents you with common path prefixes to aid in placing the new location. When the node modifies an existing location, the
icon presents you with common path prefixes to aid in placing the new location. When the node modifies an existing location, the ![]() icon allows you to get the path from either:
icon allows you to get the path from either:
• the current Scene Graph tab selection, or
• the current Node Graph node selection.
If you choose the second option, Katana creates an expression that points to the scene graph location created by the selected node.
To find the location that the parameter references and select it within the Scene Graph tab, click ![]() and select Select In Scenegraph.
and select Select In Scenegraph.
Note: Some nodes that create scene graph locations can be linked to a parameter via an expression so whatever scene graph location is created by the node becomes the value of the parameter. To generate the link Shift+middle-click and drag from the node to the parameter.
Assigning Locations to a CEL Parameter
CEL parameters can be made up of one or more statements. Each statement can be one of three things:
• a path,
• a collection (a CEL statement stored on a scene graph location), or
• a custom CEL statement.
Sorry you didn't find this helpful
Why wasn't this helpful? (check all that apply)
Thanks for your feedback.
If you can't find what you're looking for or you have a workflow question, please try Foundry Support.
If you have any thoughts on how we can improve our learning content, please email the Documentation team using the button below.
Thanks for taking time to give us feedback.