Search is based on keyword.
Ex: "Procedures"
Do not search with natural language
Ex: "How do I write a new procedure?"
Subdividing Objects
Subdividing the surface of an object smooths the surface of a low polygon mesh to create a smoother surface with many more faces, and is usually divided into either quadrilaterals (quads) or triangles. Mari uses OpenSubdiv to create static subdivided surfaces, as well as to load and work with subdivided geometry. You can determine the Level of subdivision you want to apply from a choice of levels 1-3. The levels represent the number of quads or triangles into which your mesh is divided for each level, and the exact number is dependent on the subdivision Scheme you choose. For example, a Catmull-Clark method at level 1 may produce more quads or triangles after subdivision than a Bilinear method at level 2.
Note: If you instruct Mari to calculate the subdivision using a background process, you need to manually select the Level to apply once the calculation is complete.
The manner in which the surface is smoothed is calculated based on a subdivision method. Mari offers three methods: Catmull-Clark, Loop, and Bilinear. What method you choose may be, in part, determined by whether your mesh is comprised of quads or triangles, as some methods, such as Loop, only works correctly with meshes comprised of a certain type of polygon. In the instance of the Loop method, the polygon type is triangle.
Note: For more information, see http://graphics.pixar.com/opensubdiv/docs/subdivision_surfaces.html.
Warning: Subdivision increases the number of polygons exponentially to the subdivision level, which means that if a geometry is already quite dense and you attempt to subdivide it to a high level (2 or 3), Mari may become slow or unresponsive.
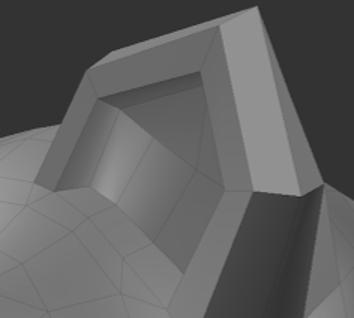
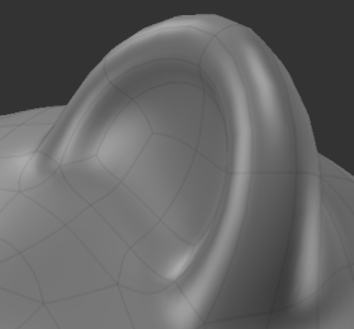
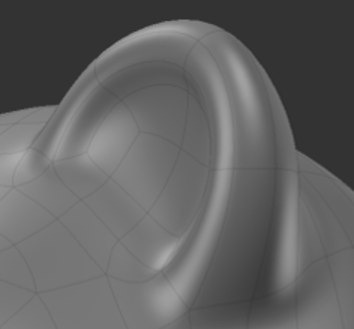
Below are examples of the subdivision levels on an un-subdivided mesh:
|
|
|
|
No subdivision applied (level 0) |
Level 1 subdivision applied using the |
|
|
|
|
|
|
|
Level 2 subdivision applied using the |
Level 3 subdivision applied using the |

After subdivided geometry is calculated in Mari, the subdivided data is cached in the project. Whenever the subdivision level is changed, Mari loads the cached subdivided data and renders it. When subdivision is re-calculated, the cached data is deleted and the new data, with new subdivision settings, is cached.
Warning: If you have already created masks on an un-subdivided model and then choose any level of subdivision, the masks appear offset from where they did on the un-subdivided model. This is due to the nature of subdivision and the way it "distorts" the UV layout from that of the original model because the UV shells are also subdivided with the 3D mesh.
To subdivide an object in your project:
| 1. | Select the object in the Objects palette. |
| 2. | In the Subdivide section, click Subdivide. |
Right-click and select Subdivide from the context menu.
OR
From the menubar , select Objects > Subdivide.
The Subdivide dialog displays.
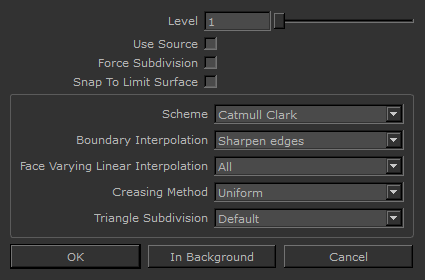
| 3. | Choose the Level of subdivision applied to your object. You can choose from levels 1-3. |
| 4. | Enable the Snap To Limit Surface checkbox to snap the last level of subdivision to the limit surface, if required. |
| 5. | Enable the Use Source checkbox if you want to use the subdivision options from the source geometry file. |
| 6. | Enable whether to use Force Subdivision or not. |
When enabled, Mari forces subdivision the geometry no matter how the subdivision flags are set.
| 7. | Choose the Subdivision Scheme to determine how you want the object to be subdivided: |
• Catmull-Clark - a subdivision model that creates a new mesh that consists of only quadrilaterals.
• Loop - a subdivision model that supports meshes consisting of only triangles, and divides each triangle into four smaller ones.
• Bilinear - a subdivision model that creates quadrilaterals with non-planar vertices.
| 8. | Choose how Mari handles the Boundary Interpolation (for boundary edges and vertices): |
• None - no boundary edge interpolation should occur, instead boundary faces are tagged as holes so that the boundary edge-chain continues to support adjacent interior faces but is not considered to be part of the refined surface.
• Sharpen edges - all the boundary edge-chains are sharp creases, boundary vertices are not affected.
• Sharpen edges and corners - all the boundary edge-chains are sharp creases and boundary vertices with exactly one incident face are sharp corners.
| 9. | Select which Face Varying Interpolation to use: |
• None - smooths everywhere the mesh is smooth.
• Corners only - sharpens (linearly interpolate) corners only.
• Corners plus1 - Corners only + sharpening of junctions of 3 or more regions.
• Corners plus2 - Corners plus1 + sharpening of darts and concave corners.
• Boundaries - linear interpolation along the boundary edges and corners
• All - linear interpolation of everywhere (boundaries and interior).
| 10. | Choose how Mari interpolates the sharpness of incident edges by setting the Creasing option: |
• Uniform - applies regular semi-sharp crease rules.
• Chaikin - applies Chaikin semi-sharp crease rules. Chaikin's curve subdivision algorithm improves the appearance of multi-edge semi-sharp creases with varying weights.
| 11. | Set the Triangle Subdivision option: |
• Default - default Catmull-Clark scheme weights.
• Smooth - smooths triangle weights.
| 12. | Once you've determined how you want Mari to subdivide the selected object, choose whether Mari calculates the subdivision in the foreground or background: |
• OK - a progress bar displays as Mari calculates the subdivision. Once complete, the level of subdivision specified is applied to the object immediately.
• In Background - the subdivision calculation is submitted to a background process and no progress bar is displayed. The subdivision Level must be applied manually in the Objects palette when the "running man" ![]() icon disappears from the status bar.
icon disappears from the status bar.
Go back to the Objects palette and, with the subdivided object selected, click Subdivision > Level in the object properties pane and choose the level of subdivision you want to apply.
Note: When the level of subdivision you chose in the Subdivide dialog has completed, it appears in the Level dropdown and you can select it at any time. If you chose the highest level of subdivision for the object, you can select any lower level of subdivision from the dropdown as well.
The object is subdivided and both the object on the canvas and the object properties in the Objects palette are updated to reflect this.
Note: Mari detects whether to subdivide each Alembic geometry piece, based on subdivision flags set in the file.
You can also force the subdivision of Alembic geometry pieces no matter how the subdivision flags are set, see Subdivide Dialog.
Sorry you didn't find this helpful
Why wasn't this helpful? (check all that apply)
Thanks for your feedback.
If you can't find what you're looking for or you have a workflow question, please try Foundry Support.
If you have any thoughts on how we can improve our learning content, please email the Documentation team using the button below.
Thanks for taking time to give us feedback.