Matching Colors Across All Cameras
To color correct across all cameras in a rig:
| 1. | Add a C_ColourMatcher node to the Node Graph and connect it to the output of the C_CameraSolver node. |
| 2. | CaraVR automatically adds a single keyframe at the current frame, but you can add keyframes manually by either: |
• scrubbing in the Viewer and then clicking Add Key (![]() ) to add a keyframe at the current frame, or
) to add a keyframe at the current frame, or
• clicking Key All to add keyframes throughout the sequence at the Step interval.
• clicking Import and selecting the node from which you want to import keyframes. You can import keyframes from any instance of C_CameraSolver, C_Stitcher, or C_ColourMatcher in the script.
Note: C_Stitcher only computes optical flow camera warps at designated keyframes, it ignores upstream animation that does not fall on the same keyframes. Use the Import button to copy over all keyframes from C_CameraSolver. This way, any additional per-camera, manual keyframes added in the Cameras tab are also copied.
You can add keys on multiple frames to attempt to match a range of colors as part of the solving process.
Note: C_ColourMatcher can not calculate time variant corrections, such as color shifts over time due to camera movement. You can, however, use multiple passes of the node for the different time ranges.
| 3. | In the Analysis section, select Exposure or Exposure and Colour from the Match dropdown, depending on your requirements. |
| 4. | Click Analyse to match exposure and color across the cameras in the rig. |
CaraVR calculates the required gain per camera and displays the results in the Properties panel.
|
|
|
|
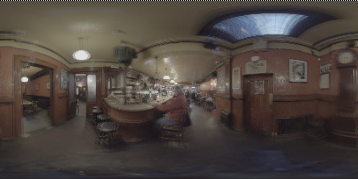
The original image. |
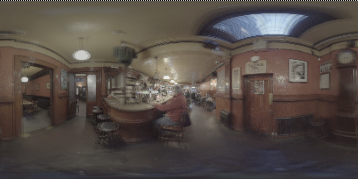
The same image after exposure and color correction. |
| 5. | Adjust the global Exposure control to adjust all the cameras in the rig simultaneously. |
If you notice banding in the areas between adjacent cameras, try switching the C_Stitcher's Blend mode to Multi-Band or Spherical Multi-Band blending.
| 6. | If you're using a spherical camera layout, you can adjust the Converge control to alter the depth at which the cameras overlap, allowing you to bring particular areas in the scene into focus. If you've adjusted this value upstream, make sure you set the Converge control accordingly. |
See Troubleshooting Matches and Solves for more information.
| 7. | Once the correction is complete, you can either: |
• export the correction to Grade and Exposure nodes so that you can make minor adjustments to the result, or
• export the correction to OCIO CDL Transform nodes for use elsewhere in the script.
See Exporting to Preset Nodes for more information.