Selecting What to Output
To select what to output:
| 1. | In the DepthGenerator properties, use Depth Output to select the type of depth map you want to generate: |
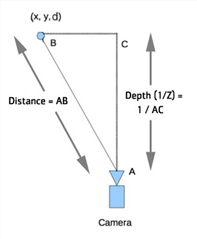
• Depth (1/Z) - output 1/Z where Z is the distance along the Z axis for the camera. This matches the depth output of the ScanlineRender node.
This mode also allows you to later create a Group node with a Card positioned in 3D space and displaced according to the depth channel.
• Distance - output the distance along the ray from the camera center to the 3D surface point.
In the figure below, each pixel forms a ray, and AB measures the physical distance from the camera to the 3D point, whereas AC measures the distance along the Z axis for the camera.
|
|
| Calculating the depth. |
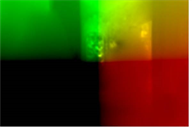
| 2. | If you also want to output depth as a position pass, set Surface Point to the channels where you want to store this (for example, you could create a new layer called ppass, which contains the channels X, Y, and Z). |
The position pass includes the X, Y, and Z coordinates for each pixel in the image. You can use it with the Relight node, or with the PositionToPoints node to visualize depth as a point cloud.
|
|
| A position pass. |
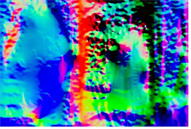
| 3. | Similarly, to output depth as a normals pass, set Surface Normal to the channels where you want to store the normals pass (for example, create a new layer called npass, which contains the channels X, Y, and Z). |
The normals pass contains three vectors of information for each pixel in the image: X direction, Y direction, and Z direction. In other words, it stores the direction in which each point in the image is facing. You can use a normals pass with the Relight node.
|
|
| A normals pass. |
| 4. | Proceed to Analyzing Depth below. |