Search is based on keyword.
Ex: "Procedures"
Do not search with natural language
Ex: "How do I write a new procedure?"
Material Libraries
Colorway allows you to manage a large number of materials using material libraries. A material library references a .csv file containing information about the materials. Each material has a unique ID, which Colorway uses to populate the project with information about the material. You can store multiple material libraries.
The Material Library Spreadsheet
Colorway uses a .csv file to reference material information.
Some of the columns in the spreadsheet are required for Colorway to populate the library, and some are arbitrary and customizable.
The following columns are required for Colorway to display material information correctly.
| Name | Description |
|---|---|
| #id | The material ID. The # marks the beginning of a header row and should not be removed. |
| Category | |
| Sub-category | |
| Name |
• #id - The material ID. The # marks the beginning of a header row and should not be removed.
• Category
• Sub-category
• Name
• T0_file to T7_file - The images used in the material. T0 is the image at the bottom, and T7 is the one at the top. If your material is made up of only one image, place it in the T0_file column. With multiple images, start at T0 and move up to T7.
Note: It's good practice to keep the images used for the materials in the same folder as the spreadsheet. If you have the images at a different location, you have to specify the entire file path in the column, not just the file name.
Scaling Images
You can influence how your image is applied to the item in Colorway in the spreadsheet. Here's how you can scale an image:
Add a scaleX and scaleY column to the image you want to modify. For example, if you want to scale the image in T0_file, add a T0_scaleX and T0_scaleY to the spreadsheet, for the horizontal and vertical scales respectively. For the image to appear in its original size, enter '1'. To decrease the size of the image, increase the value. For instance, to scale the image to 50%, enter '2'.
Applying a Material to a DCI item
You can apply materials to your DCI items in the same way as applying colors.
First, you'll need to make sure that Colorway is linked to a material library.
To link a material library:
| 1. | Click on the Materials & Textures |
The following message appears: Add a material library from Preferences.
| 2. | Click on Preferences. |
The Colorway Preferences window opens on the Material Library tab.
Note: You can also access this menu under Edit > Preferences > Material Library on Windows, or Colorway > Preferences > Material Library on Mac.
| 3. | In the Library Folder Location section, click Choose. |
A window opens. Navigate to the folder in which your material library is stored.
| 4. | Click Select Folder. |
| 5. | Click Apply. |
Colorway presents a preview of the materials referenced in the library file. You can change whether these thumbnails appear inside Colorway as 3D spheres or 2D flat images.
Use the Values dropdown menu to define which information is displayed next to each material thumbnail in the right hand dock. See example below.
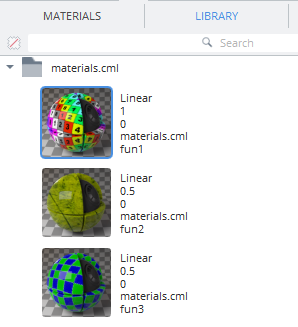
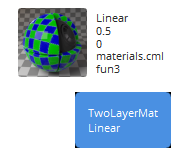
Use the Tooltip Values drop down menu to define which information is displayed in a tooltip when hovering over a material thumbnail (if Hints are enabled). See example below. To toggle Hints on or off, see Hints Bar and Tooltips.
| 6. | Click OK to apply your settings. |
To apply a material to a DCI item:
| 1. | Click on the Materials & Textures |
| 2. | Click on the Library tab |
| 3. | Drag a material onto a part. |
The material appears under the part to which it has been applied in the item list. If you drag more materials onto that part, they will stack in the item list. Only the material at the top of the list is displayed. See example below.
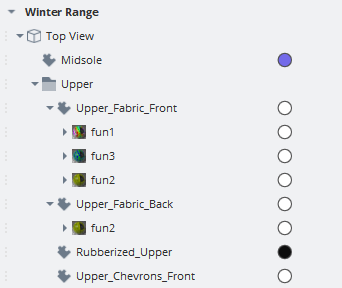
Note: Materials, like colors, apply to individual variations. To apply a material to all variations, right-click on the part you've applied the material to and select Apply Material to all Variations.
Tip: To replace a material on a part, hold Ctrl/Cmd and drag it onto the part.
No Swatch Labels in Dynamic Tables
If no color is applied to a material, it will be represented in a Dynamic Table with the label "[no swatch]". You can remove this label by unchecking the Show [no swatch] labels option under Edit > Preferences > General on Windows, or Colorway > Preferences > General on Mac.
Material Palettes
Just like adding colors to color palettes, you can also create palettes of materials.
If you haven't linked to a material library file, see Applying a Material to a DCI item for information on how to link one.
To add a material to a palette:
| 1. | Click on the |
| 2. | Click on the Library tab. |
Thumbnails of the materials in your linked material library file are listed here.
| 3. | Right-click on a material. |
| 4. | Select Add Material to... |
The following options appear:
• New palette - Creates a new palette and adds the selected material to it.
• All palettes - Adds the selected material to any palettes you have already created.
• "Palette name" - Names of existing palettes are listed here. Click on one to add the selected material to it.
| 5. | Click on the Materials tab. |
Any existing or newly-created palettes are listed here. Right-click and select Remove or click on the![]() button to the right of the material to delete it from the palette.
button to the right of the material to delete it from the palette.
Dynamic Material Palettes
A dynamic material palette displays all materials used in either the sheet or an item.
To add a dynamic palette:
| 1. | In the right dock, select the Palette |
| 2. | Draw an area on the sheet in which to drop your palette. |
Your palette defaults to displaying swatches from the currently selected palette.
| 3. | Select the dynamic tool |
| 4. | On the right hand dock, in the Data Type drop down menu, select Materials. |
The swatches are replaced by any materials that are used by the item.
For more information on Dynamic Palette settings, see Working with Palettes
Sorry you didn't find this helpful
Why wasn't this helpful? (check all that apply)
Thanks for your feedback.
If you can't find what you're looking for or you have a workflow question, please try Foundry Support.
If you have any thoughts on how we can improve our learning content, please email the Documentation team using the button below.
Thanks for taking time to give us feedback.