Dynamic Callouts
Colorway allows you to label your .dci or .svg item's parts in a simple way using dynamic callouts.
To add callouts to an item, click the Callout ![]() button in the right dock menu, then click your item on the canvas, or in the item list.
button in the right dock menu, then click your item on the canvas, or in the item list.
Note: The Callout tool is also available by pressing the C key, or in the menu bar, under Edit > Tools > Callout Tool.
Callouts are added to the item, labeling the parts that were set up in the 2D or 3D application.
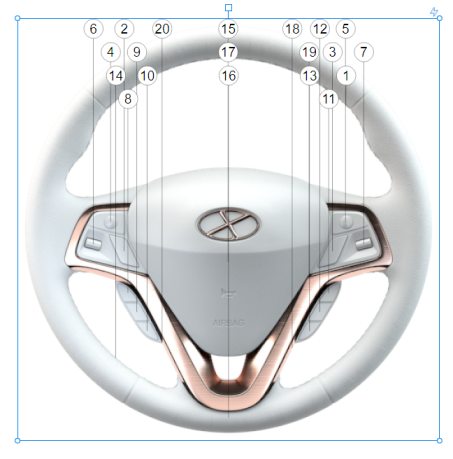
Note: If you re-size the bounding box, the callouts are automatically re-positioned. When you move your item on the sheet, the callouts move along with it.
After adding callouts, you can customize their appearance in the right dock by clicking the Callout ![]() properties tab.
properties tab.
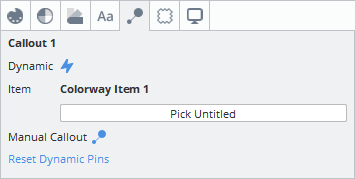
The Callout panel.
The tab has the following main sections:
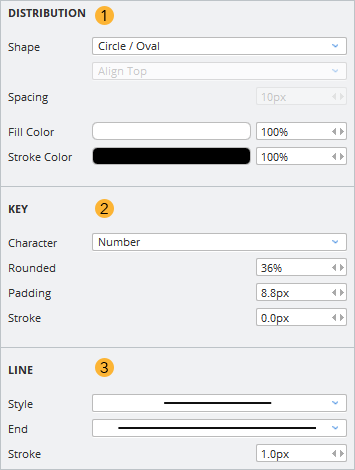
- Distribution - Here you can modify the shape the callouts are arranged in and the spacing between them.
Tip: You can modify the position of the callouts independently for each variation. To do this, select the callout item and enable Store bounding box position per variation in the Display
 properties.
 - Key - Change the layout of the keys, including fill color, opacity, and stroke. Rounded allows you to change the rounding of the keys. In Character, you can choose to use arabic or latin numbers, letters, or the part name as labels.
- Line - Change the style, color, opacity, and stroke type of the lines. You can use End to modify the end point of the line. The options are dot, circle, or arrow.
Tip: Colorway preserves your settings and applies them to the next callout you create.
The following video walks you through creating and customizing callouts for a .dci item.
Adding Callouts Manually
In addition to callouts automatically added by Colorway, you can also add callouts to any item on your sheet manually.
To add callouts to a .dci or .svg item that already has dynamic callouts:
| 1. | Select the existing callouts on your sheet by clicking one of the keys. |
The callout properties appear in the right dock.
| 2. | In the Callout Properties tab, click the Manual Callout button or press the C key. |

| 3. | Click the part to which you want to add the callout. Alternatively, you can click the part and drag on your sheet to define the line. Release to place the callout. |
Colorway adds a new callout to the part and selects it. You can also see it in the Item Tree on the left, under the callout item. It is named Manual Pin by default. You can begin typing to enter a new name for this callout.
Note: You can use duplicate names for callouts. For example, you can have two manual pins named "Leopard Print Material".
Tip: If the pin of your callout touches a .dci or .svg part, the manual pin is automatically renamed after the part ID it is pinned to.
| 4. | Click the Manual Callout button or press either Esc or the C key again to deselect the manual callout tool. |
Note: You may need to expand the callout item in the Item Tree to see the individual pins. To do this, click the arrow in front of the callout item's name.
This video walks you through adding callouts manually.
To add callouts to any other item type:
| 1. | Click the Callout |
The tool's properties appear on the right.
| 2. | Click the Manual call-out button, or press the C key, then click the area you want the callout to point to and drag to define the line. Release where you want the key to appear. |
Colorway adds a callout to the selected area and selects it in the Item Tree.
| 3. | Turn on the Store position per variation option if you want to store this manual position to the Variation, then update your current Variation. |
Note: To reposition a manual or dynamic callout, click and drag either end of it. Make sure that the Manual call-outs button is still active in the Callout Properties tab. To reset a dynamic callout position, click Reset Dynamic Pins.
Note: To delete a callout you added manually, select it in the Item Tree, then click the delete ![]() button in the bottom-right corner. Dynamic callouts cannot be removed individually.
button in the bottom-right corner. Dynamic callouts cannot be removed individually.
Hiding Callouts
You can hide individual callouts using the Item Tree in the left dock.
When you create a callout on your sheet, a callout item is added to the Item Tree. Click the arrow in front of its name to expand it and reveal a list of the parts.
Note: Make sure you have the correct sheet selected in the Item Tree.
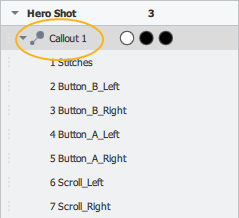
When you hover over the name of a part in the tree, a Visibility ![]() button appears on the right. Click this to hide the corresponding callout from the sheet.
button appears on the right. Click this to hide the corresponding callout from the sheet.
Note: This only hides the callout from the sheet. If a dynamic table references the part associated with the callout, it remains visible in the table.
Callouts in Dynamic Tables
You can use dynamic tables and callouts together to display information about your items. In addition to labeling the parts, you can display the part numbers of your item in a dynamic table. For more information on how to use dynamic tables, see Dynamic Tables.
The following video shows you how you can work with dynamic callouts in conjunction with dynamic tables.