LiveSources
LiveSources serve as a way to get a large amount of data into Colorway quickly and conveniently. A LiveSource is essentially a library of multiple assets.
To create a LiveSource, you need to specify a folder on your disk in Colorway. Colorway then imports the content of the folder to your project. The files become available variants. You can easily switch between them and see your assets update on the sheet. Colorway also tracks any changes made to the folder on disk and updates your project with the modifications. For instance, if you specified a folder of image files as a LiveSource and later add new files to it, the new images appear in Colorway as possible variants for that asset.
You can create a LiveSource from a folder containing any of the valid asset types in Colorway. If you try to use a folder with a mixture of asset types, you need to specify what type of LiveSource you'd like to create. Colorway then only shows the qualifying files in the folder as available variants. For example, if you have a folder of image files and .txt files, and you choose to create an image item, Colorway only displays the images in the folder as variants.
Local and Global LiveSources
You can use two types of LiveSources in Colorway: local and global LiveSources. They work almost the same way, but there are some fundamental differences in how they behave in a project.
The following table highlights the differences between the two types:
|
Local LiveSources |
Global LiveSources |
|---|---|
|
• The default LiveSource type. • Available in the current project only. • Not preserved between sessions of Colorway. |
• You can convert a local LiveSource to global. • Available in all projects. • Preserved between sessions of Colorway. |
The Source Browser
The Source Browser gives you an overview of the available LiveSources in your project, and you can also specify new ones. To open it, select LiveSources > Source Browser, or Ctrl/Cmd + '.
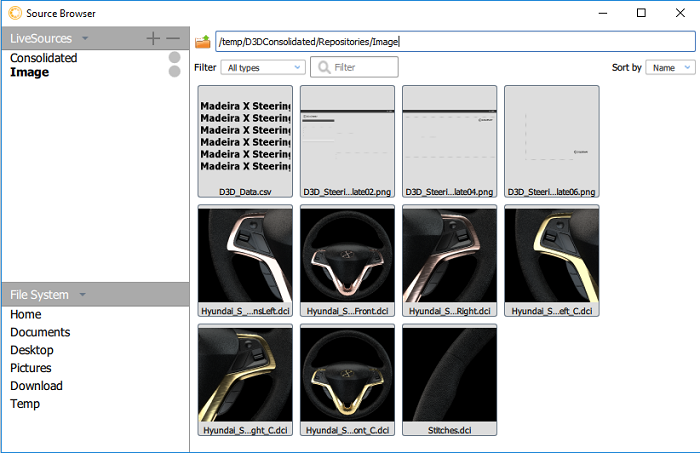
At the top of the dialog, you can filter which asset types you would like to see. By default, it is set to All types. To display only a certain asset type, click the small arrow on the right of the field and select the source type you need.
You can see the folders in the top-left panel.
You can give your LiveSources custom names to more easily identify them. To do this, double-click on the name in the left-hand panel and enter a new one in the field.
Tip: You can create quick links to your most frequently used sources under File System for easy access. To do this, navigate to the source and click the ![]() (star) icon next to the file path at the top.
(star) icon next to the file path at the top.
Tip: You can convert a local LiveSource to a global one and the other way around. To do this, click the circle next to the source. It turns blue, signifying that the source is now global. If you try to convert a global LiveSource to a local one, Colorway displays a warning that other projects may be using the LiveSource. Click OK to continue or Cancel to stop the conversion.
To specify a folder as a local LiveSource, navigate to it and click ![]() at the top of the panel.
at the top of the panel.
To remove a folder from your list of LiveSources, click ![]() at the top of the panel.
at the top of the panel.
Note: When you're trying to remove a global LiveSource, Colorway displays a warning that other projects may be using it.
The Live Sources Tab
The Live Sources tab can be used to add a quick-access folder of Live Sources.
| 1. | Click on the |
| 2. | Click on the Select Folder icon. |
A window opens for you to specify a folder of assets.
| 3. | Navigate to a folder of DCI files, image files or other assets you want to access frequently. |
| 4. | Click Select Folder. |
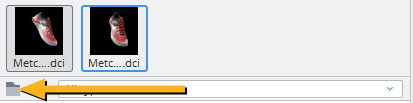
The Live Sources tab displays thumbnails of the assets stored within this folder. Assets can easily be dragged from the Live Sources tab and dropped onto your sheets.
Tip: Use the drop down menu next to the Select Folder icon to filter the displayed assets by type, such as Image files.
Note: The search bar at the bottom of the Live Sources tab can be used to locate specific assets within the active Live Sources folder.
Adding LiveSources to Your Sheet
You can add a LiveSource of multiple items to your sheet similarly to adding any item, but instead of selecting a single file, you specify a folder of files.
| 1. | Open a file browser in one of the following ways: |
• Press I on the keyboard,
OR
• Click the Place![]() tool in the right menu, click on your sheet and draw a bounding box.
tool in the right menu, click on your sheet and draw a bounding box.
| 2. | Navigate to the folder you'd like to add and click Select. |
Tip: You can also drag-and-drop a folder to your sheet.
Colorway creates a new item on your sheet and displays the first valid variant in the folder.
Note: When you are trying to add a folder containing a mixture of asset types, Colorway displays a dialog, where you can select the type of item you'd like to create. According to what type you select, only the qualifying assets from the folder become available as variants.
Relinking Missing LiveSources
If an asset has moved or been deleted from your LiveSources directory, when you select it a symbol appears on the bounding box in which it was displayed. Asymbol also appears next to the asset in the Variants panel on the right hand dock.
To relink a missing LiveSource:
| 1. | Click on the symbol where the asset was displayed or go to LiveSources > Manage Broken LiveSources. |
A window appears, showing a list of missing Live Sources.
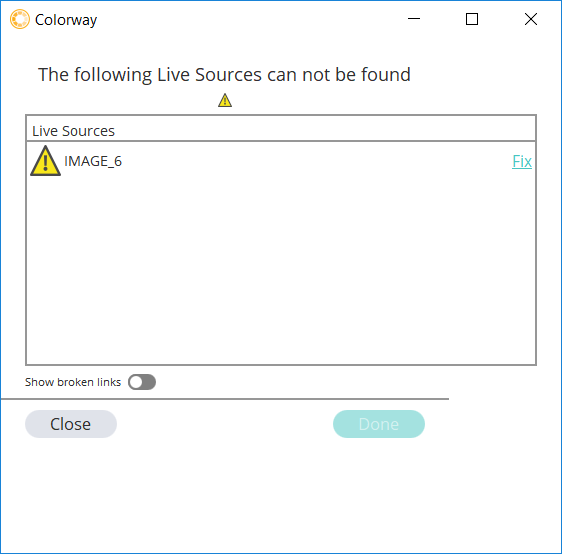
| 2. | Click Fix next to the missing asset. |
The Source Browser opens.
| 3. | Navigate to the location of the missing asset and click on it. |
| 4. | Click Select. |
The Source Browser will display green ticks next to assets that have been relinked.
| 5. | Click Done. |
Note: Each time you open Colorway it will check that the LiveSources you are using are available. If any are no longer linked, a notification window will appear in which you can relink the assets.
Cleaning up Assets in Your Project
You can clean up unused assets, or broken links in your projects using the Cleanup Unused Assets on Save, Cleanup Unused Assets Now, or Remove Broken Links options in the LiveSources menu.
|
Option |
Description |
|
Cleanup Unused Assets on Save |
A checkbox that when enabled removes all unused assets from the project folders on the next project Save or Save As. An unused asset is one that is not referenced at all throughout the project. |
|
Cleanup Unused Assets Now |
Immediately removes all unused assets from the project folders in memory. You need to press Save or Save As to commit those changes to disk. An unused asset is one that is not referenced at all throughout the project. |
|
Remove Broken Links |
If there are any broken links to LiveSources in the project, these links are removed once Remove Broken Links is clicked. Note: You are informed of any broken links in your project during project load. |