User Preferences
This video presents the user preferences and how to use them.
In the video:
• To edit the user preferences, navigate to Edit > Preferences on Windows or Colorway > Preferences on Mac:
- Highlight Swatches
- Hide bounding box when item is locked
- Refer to textures as
- Enable auto save
- Display renders in selected color space
- Show color picker
- Show master palettes
- Show swatch index
- Master palettes location
- Supersampling level
- Cache size
Exporting a Preferences File
You can save your Colorway preferences settings as a file for use in a different project or so a different user can import your settings to their project.
To export your preferences settings:
| 1. | Go to Edit > Preferences on Windows or Colorway > Preferences on Mac |
| 2. | Click Export settings |
A window opens.
| 3. | Give your file a name. For example "Sam_Settings.conf" |
| 4. | Navigate to where you want your file saved. |
| 5. | Click Save |
A dialog box reports that your settings have been successfully exported.
| 6. | Click Okay |
Importing a Preferences File
To import a preferences settings file:
| 1. | Go to Edit > Preferences on Windows or Colorway > Preferences on Mac |
| 2. | Click Import settings |
A window opens.
| 3. | Locate the settings file you want to import. |
| 4. | Click Open |
A dialog box reports that your settings have been successfully imported.
| 5. | Click Okay |
These new settings take immediate effect.
Note: Saving your Colorway project retains the active preferences settings, even if they were imported from a file.
Event Log
The Event Log allows you to create a file which can be uploaded to Foundry's Support team in the case of any bugs or errors in Colorway. The log file is used to identify where any issues in the application might be occurring.
To configure the Event Log:
| 1. | Go to Edit > Preferences on Windows or Colorway > Preferences on Mac. |
| 2. | Click on the Event Log tab. |
| 3. | Next to the Log file field, click Choose. |
| 4. | Navigate to a folder in which you want your log file to be saved and click Select Folder. |
The file path to your folder is displayed in the Log file field.

Warning: Changing the Log pattern is recommended only for users with programming experience. The default Log pattern is suitable for most users.
You can now configure which categories to include in your Log file and to which logging level they are set. For example, you may set the UI.Qt category to Trace for debugging any issues with Colorway's user interface.
| 5. | Select a Category in the list. Hold Shift to select consecutive categories, or Ctrl/Cmd to select multiple categories. |
| 6. | Open the Log level for selected categories drop down menu. |
| 7. | Select between the following options: Same as Root, Off, Fatal, Error, Warn, Info, Debug, Trace. |
The log level is displayed alongside each corresponding category in the list.
The table below shows a description of each log level. The higher the log level, the more information is included in the log.
| Log Level | Description |
| Same as Root | Uses the same log level as the root node of the category tree. |
| Off | Disables logging for the selected category. |
| Fatal | Logs only fatal errors. |
| Error | Log errors of all types. |
| Warn | Logs both errors and warnings. |
| Info | Logs errors, warnings and additional information such as available memory. This is the default log level. |
| Debug | Logs at all the above levels, plus includes additional debugging information. |
| Trace | Logs at all the above levels, plus includes extended debugging information. This may reduce performance, but can be critical for debugging some issues. |
Note: Setting all categories (root) to Trace, to track issues such as application crashes, may affect Colorway's performance.
Changing Units in Colorway
Along the bottom of your workspace, you can now change the units of measurement you want to use in Colorway. The options are pixels (px), inches (in), centimeters (cm), millimeters (mm), meters (m), and points (pt). Selecting a unit type changes the units type displayed throughout the application.
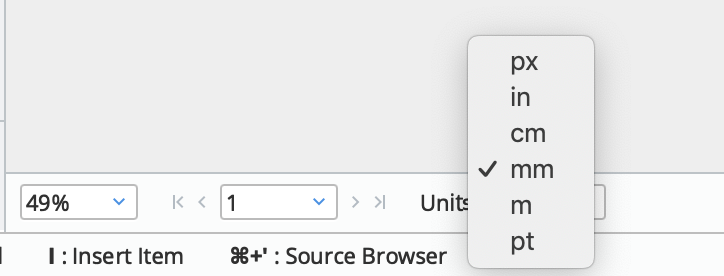
The unit type selector.