Creating and Adding Gradients to Your Parts
Colorway supports the creation and application of color gradients, which can be stored in your color palettes and applied to your materials and items. You can create linear and radial gradients.
Note: You can import and export gradient swatches to and from .cpl and .jpl palettes, however you can't import or export gradient swatches to and from .ase palettes, as gradients are not supported in the .ase format.
Creating a Linear Gradient
The following steps show you how to create a linear gradient, however the same steps apply when you want to create a radial gradient, just select Radial from the Color Type options.
| 1. | Open the Color Picker by clicking the |
| 2. | Select Linear from the Color Type options. |
A New Gradient panel appears above the color picker, containing a gradient viewer and a gradient slider.
Note: If the ![]() icon in the New Gradient panel is not highlighted in blue, click it to begin editing your gradient.
icon in the New Gradient panel is not highlighted in blue, click it to begin editing your gradient.
| 3. | Hover your cursor over the gradient viewer. |
The available gradient handles appear in the viewer.
The larger handle is the start handle of the gradient, and the smaller handle is the end handle of the gradient.
| 4. | Click the start handle. |
| 5. | Choose a color and opacity from the Color Picker for the start of the gradient. |
Tip: Colors can also be added to gradient stops by dragging a swatch from the Color Libraries palette or Items Tree and then dropping it on to a gradient stop, or by selecting the stop and then clicking a color swatch in the Color Libraries palette.
Tip: To remove focus from selected gradient stops, click in the viewport or in the gradient window to deselect the stop.
| 6. | Click the end handle. |
| 7. | Choose a color and opacity from the Color Picker for the end of the gradient. |
| 8. | Click and drag the |
| 9. | Click along the gradient slider to add new interval points along the gradient. |
Tip: Interval points can be added along the handles within the gradient viewer too.
Once you are happy with your gradient, you can rename it by double-clicking New Gradient, typing a new name and hitting the Return key. Add it to your color palette by clicking the ![]() button.
button.
You can create additional gradient stops by clicking on the gradient slider and then assigning the new stop a color. New stops can be manipulated in the same way as the default start and end stops, and additional ![]() buttons are created whenever a new stop is made, allowing you to blend the gradient between multiple colors. You can delete additional stops from your gradient by clicking on the stop and then pressing Backspace or Delete on your keyboard.
buttons are created whenever a new stop is made, allowing you to blend the gradient between multiple colors. You can delete additional stops from your gradient by clicking on the stop and then pressing Backspace or Delete on your keyboard.
You can individually name the colors within a gradient by clicking the edit gradient ![]() icon, double-clicking on the name of the swatch that you want to set, typing in a new name and hitting Return. Swatches taken from a color library automatically have their name assigned.
icon, double-clicking on the name of the swatch that you want to set, typing in a new name and hitting Return. Swatches taken from a color library automatically have their name assigned.
Tip: If you want to export the color palette containing your gradients, see Working with Palettes to learn more.
Similarly to textures, gradients can be mapped to a 3D (UV) space, or a 2D Screen Space by selecting an option in the Mapping dropdown. If you're mapping to a 3D space, specify the UV set to which the gradient is applied. For more information on mapping textures or gradients, see Textures Properties.
Note: The DCI part containing the UV set you want to draw a gradient on must be selected for the UV Set Selection to be active if assigning a gradient to a specific UV set.
Viewing Gradients in Dynamic Tables
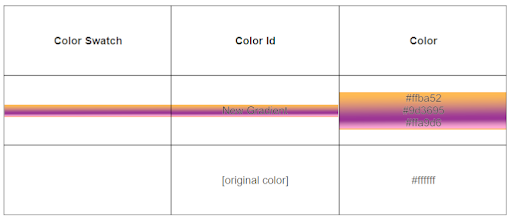
You can view gradients within a dynamic table in two ways. The first way is to collapse the gradient. Viewing the gradient as collapsed allows you to ignore data such as color names and IDs and shows a thumbnail view of the gradient instead. While collapsed, the name of the gradient is overlaid on top of the gradient within the table cell.
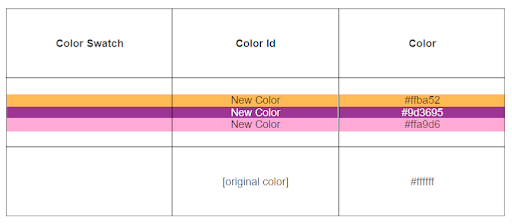
Expanding the gradient within a table cell allows you to separate swatches within a gradient. While expanded, the color swatches that make up the gradient are separated and listed within their table cells. Additional data, such as color names and IDs, are overlaid over the top of their respective swatches.
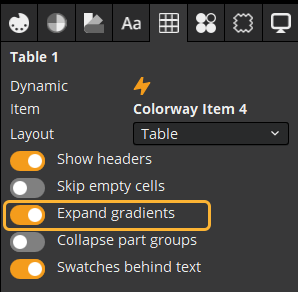
Gradients are expanded or collapsed by toggling the Expand Gradients switch in the Dynamic Table panel.
Note: For more information on Dynamic Tables in Colorway, see Dynamic Tables.
|
|
|
|
Collapsed gradient within a dynamic table |
Expanded gradient within a dynamic table. |