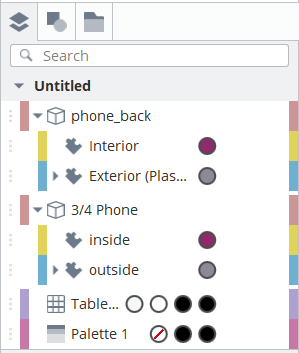
Sheets and Item Tree
This video presents the Sheet and Item Tree.
In the video:
• The Sheets and Item tree is in the left dock.
• Use Ctrl/Cmd + 1 to display it.
• Each sheet contains items.
• Each item is represented by different icons, such as images, palettes, text, and so on.
• Clicking an item in the workspace highlights it in the Item Tree.
• Hover over items to:
- Hide items
- Lock items
- Lock items' movement only
• How to group several items.
• How to export the current or selected sheets, and the entire project.
• How to create a new sheet.
• How to remove individual items and sheets from the Item Tree.
Adding Sheets
You can add as many sheets as you need to your project. You can use either the menu bar at the top of your workspace, or press Ctrl/Cmd+Shift+N on the keyboard.
| 1. | Click Sheet > Add Sheet. |
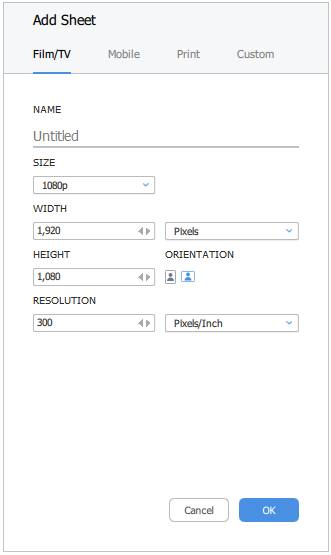
| 2. | Choose a preset, name your sheet, specify the size and resolution, then click OK. |
| 3. | The sheet is added to the stack in the left menu. |
Tip: If you have multiple sheets, you can toggle through them using the Shift+[ and Shift+] keyboard shortcuts.
Tip: You can lock any of your sheets from editing by clicking the lock ![]() icon next to the sheet name.
icon next to the sheet name.
Duplicating Sheets
You may need to create several variations that are similar to each other. In such cases, it may be useful to duplicate the sheet with your existing layout, then make your changes to the new sheet.
To do this, select the sheet, the select Sheet > Duplicate Current Sheet. This adds a copy of the currently active sheet to your project.
Removing Sheets
To remove a sheet, (in selection mode) select it in your workspace, right-click and seleect Delete.
You can also remove a sheet in the menu bar by clicking Sheet > Delete Current Sheet. This removes the currently-active sheet.
Note: If you only have one sheet, the Delete Current Sheet command is not available.
Navigating Sheets
To pan:
• right-click and drag on the sheet, or
• hold Space and left-click drag on the sheet, or
• Select the Pan tool  from the right menu and left-click drag on the sheet.
To zoom:
• middle-click and drag on the sheet, or
• scroll the mouse wheel, or
• Select a preset zoom amount from the zoom selector at the bottom of the workspace.
Hiding Sheets
You can show and hide sheets in the viewport by disabling the visibility icon ![]() next to the sheet name in the Item Tree. A hidden sheet displays the invisible icon
next to the sheet name in the Item Tree. A hidden sheet displays the invisible icon ![]() .
.
Once a sheet is hidden, all the items on that sheet are hidden in the Item List as well as the Canvas.
Note: Clicking Previous Sheet / Next Sheet inside the Sheet menu skips hidden sheets.
Note: Hidden sheets are not exported by default when using the Export actions. You can export hidden sheets during export by enabling the Export hidden sheets option in the export dialog.
Color-coding Items in the Items Tree
Items listed in the Items Tree can be color-coded, making it easier to delegate tasks to individuals that may be collaborating on a task. For example, you could be asked to work on parts that are color-coded as blue, while parts that don’t require any further adjustments could be color-coded as red.
Color-coding can also be applied to sheets, callouts, and anything else that may be present in the items tree.
To color-code items in the Items Tree:
-
Right-click the item you want to color-code in the items tree and navigate to Editor Color
-
Select the color you want your item to be tagged with from the dropdown menu.
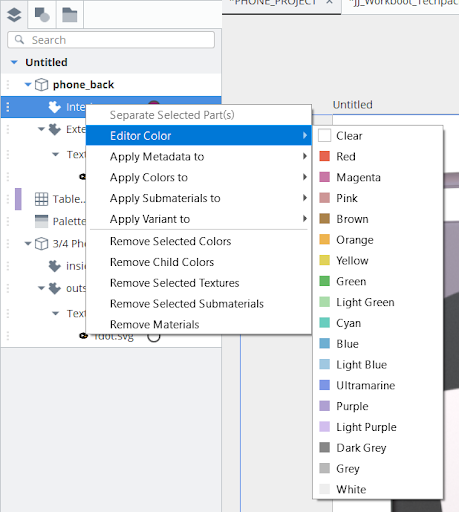
Colors that have been assigned to an item are visible as a colored bar next to the item’s name. Parts that are nested within a group, or are a part of a larger DCI, can also be color-coded independently of their parent item.