Manipulating Items
Tip: For information on the item list see UI Overview.
Colorway items with multiple parts have their parts listed in the Items List in addition to the parent item. To reveal them, click the arrow in front of the item's name.
Once expanded, all parts and part groups embedded in the active variant of that Colorway asset are displayed. The circle on the right of an item or part's name indicates the color assigned to it. You can drag and drop colors to items, parts, or groups in the Items List to assign a color to them.
To rename an item, double-click its name in the list. The field becomes editable and you can enter a new name. Press Enter once you've entered the name.
There are two controls on the right:
|
Icon |
Description |
|---|---|
|
|
Lock your item, part, or group from editing. This allows you to maintain control over what can be changed in your project to create different looks. When a part or a group has been locked, the icon appears like a closed padlock and highlights dark gray. |
|
|
Hide your item, so that it isn't displayed on the sheet. |
Tip: When you select an item on the sheet, you can bring it into focus by pressing F on the keyboard. The view is fitted to the selected item. Press F again to return to normal view.
Transforming Items
You can move, scale, and rotate any item on a sheet either directly or by editing its properties.
Move an Item
To move an item:
• Click the asset and drag it to the required place on the sheet.
• Select your item and use the arrow keys on the keyboard to adjust its position.
• Go to ![]() the Display contextual menu and adjust the X and Y position values.
the Display contextual menu and adjust the X and Y position values.
Rotate an Item
To rotate, select the item and drag the small white square on top of its bounding box. The rotating item snaps to position at 10 degree increments.
Tip: To rotate freely, hold Shift when rotating the item.
Scale an Item
You can scale your item by dragging on the corners of its bounding box, or by editing the Display properties.
To scale directly on the sheet, select your item, then click-and-drag any of the circle corner handles of the bounding box. The item is scaled uniformly.
Tip: To scale the asset without preserving its aspect ratio, hold Shift while dragging.
Grouping and Ungrouping Items
To group multiple items, do either of the following:
• Select your items on the sheet or in the Items List, then in the menu bar click Items > Group Items.
• Select your items on the sheet or in the Items List and press Ctrl/Cmd+G.
• Select your items in the Items List and click the group ![]() button at the bottom-left of the list.
button at the bottom-left of the list.
In the Items List you can see the new group with the assets in it. You can rename the group by double-clicking its name in the list, and entering a new name. You can also hide and lock a group using the respective buttons.
To ungroup items, do either of the following:
• Select your group on the sheet or in the Items List, in the menu bar, click Items > Ungroup Items.
• Select your group in the Items List and click the ungroup ![]() button at the bottom-left of the list.
button at the bottom-left of the list.
Linked Items Groups
When working with multiple Colorway assets, you might like to cascade the changes you've made to one item to others, without having to redo them several times. Colorway allows you to link your assets, so that if you make color or texture updates to one item, the changes are synchronized across all members of a group.
You can control how changes are synced between multiple Colorway assets in your project using the Linked Items panel. To open it, select Items > Linked Items....
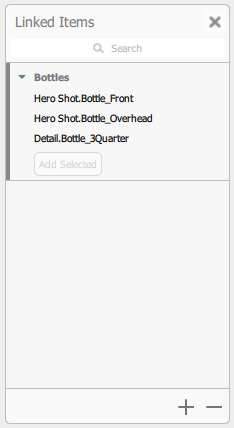
In this panel, you can create groups as a way to link items together. When you make a color, texture, or lighting change to any of the items, the change affects the other items in the group. The changes that are synced within the group are the following:
• Assigning swatches
• Assigning textures
• Changing the parameters of a texture
• Changing the active lighting setup
Note: When changing the lighting setup on an item in a Linked Items Group, if a matching lighting setup isn't found on any of the items, the change does not occur and the lighting setup remains the same.
Creating Linked Item Groups
| 1. | Select the items you would like to add to the group |
| 2. | Click the Add |
A new group is created, called Linked Group # by default, containing your items. You can rename it by double-clicking its name in the panel.
You can add additional items to the group by selecting them and clicking the Add Selected button. If the button is not visible, click the small arrow in front of the name of the group to expand it.
To remove an element from the group, hover the cursor over the element in the Linked Items panel, then click the minus sign that appears. To remove the whole group, select your group in the panel and click the minus sign at the bottom of the panel.
Snapping
Colorway helps you place your items on the sheet by showing grid lines you can snap your asset to. When you start dragging an item around, blue lines display on the sheet, depending on how snapping is set up.
By default, snapping to Sheet Bounds and Item Centers is enabled. You can turn snapping on and off, and adjust the settings in the menu bar, under View:
• Snapping Enabled - snapping is enabled by default. To disable it, deselect this checkbox.
• Snap to... - you can choose which grid lines appear when you move your item. Options are Sheet Bounds, Item Centers, and Item Corners.
Note: To temporarily disable snapping, hold Shift while moving your item.
Undocking Palettes
You can detach color and material palettes from the right hand dock so you can arrange them together on the canvas while you work with other tools. To undock a palette:
| 1. | Hover over a palette's name to reveal the |
| 2. | Click the Undock palette button |
A duplicate of the palette detaches from the right hand dock. It remains visible on your workspace if you switch to another contextual menu.
Note: Any changes you make to the undocked palette are reflected in the docked palette.
Click the Undock palette button again to duplicate the undocked palette. You can snap multiple palettes together in a group.
Tip: You can move a group of palettes that are snapped together by holding Shift and clicking on one of the palette's names.
Aligning and Distributing Items
You can easily align multiple items on your sheet horizontally or vertically by selecting the items, right-clicking, and selecting Align/Distribute. Alternatively, you can use the menu bar commands under Sheet > Align/Distribute.
To arrange your items in a row, select your items, and in the menu bar, click Sheet > Align/Distribute > To Row. Colorway arranges your items in a single row that is vertically centered in the current sheet, and fits the width of the sheet perfectly.
To arrange your items in a column, select your items, and in the menu bar, click Sheet > Align/Distribute > To Column. Colorway arranges those items in a single column that is horizontally centered in the current sheet, and fits the height of the sheet perfectly.
You can also arrange multiple items into a contact sheet layout based on the bounding box. Select the items you need and in the menu bar, click Sheet > Align/Distribute > Layout To Contact Sheet, or press L on the keyboard. The selected items fill the sheet in a grid formation based on their bounding box.
Colorway makes it easy for you to place your items so that they are all equal distance apart along a horizontal or vertical axis. To distribute several items on your sheet horizontally or vertically, select your items and in the right-click menu, select Align/Distribute > Distribute Horizontal or Distribute Vertical. Alternatively, you can use the menu bar commands under Sheet > Align/Distribute.
Arranging Items in a Stack
When you are creating a layout, you may need certain items to overlap and for some items to be placed in front of others. By default, Colorway places the most recently-added item to the front.
To change the default stacking order, right-click on the item you'd like to move, and select one of the following options:
• Move Forward - Moves the selected item forward past the next item.
• Move Backward - Moves the selected item backward past the last item.
• Move to Front - Moves the item to the front of the stack.
• Move to Back - Moves the item to the back of the stack.
Duplicating Items
You can duplicate your items and groups of items both on the same sheet and between sheets.
To duplicate your item on the same sheet, select your item/group, right-click on it and click Duplicate in the dropdown menu.
You can also copy and paste your item or group to the same sheet or to a new sheet.
| 1. | Select the item/group that you'd like to duplicate and press Ctrl/Cmd+C or in the menu bar, click Edit > Copy. |
| 2. | Press Ctrl/Cmd+V, or select Edit > Paste to paste the item. To paste the item on a different sheet, select the required sheet in the sheet list before pasting. |
Tip: You can copy a sheet item by holding Alt and selecting it.