Search is based on keyword.
Ex: "Procedures"
Do not search with natural language
Ex: "How do I write a new procedure?"
Contact Support
Shots
Renaming Shots
By default, the shots are given a 3 digit name, for instance 001, but you can rename them. To rename a shot, do the following:
| 1. | Click on any panel of the shot. |
The Shot Label field appears under the Viewer.
| 2. | Change the existing name by entering a new name for the shot in the Shot Label field. |
| 3. | Press Enter to apply the name change. |
The shot label is now updated. It is displayed at the top-left of the shot, above the first panel.
Note: You can use alphanumeric characters to name shots.
Managing Shot Status
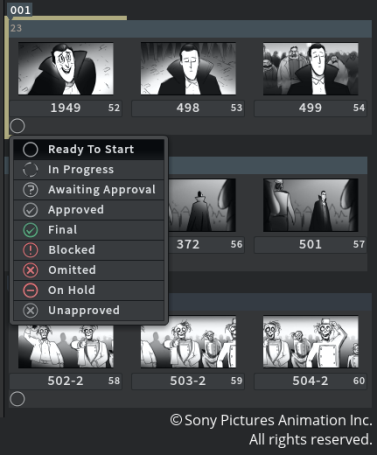
You can change the status of your shots to have a better visibility on the edit progress. You can set one of the following statuses:
|
Status icon |
Status description |
|---|---|
|
|
Ready To Start |
|
|
In progress |
|
|
Awaiting Approval |
|
|
Approved |
|
|
Final |
|
|
Blocked |
|
|
Omitted |
|
|
On Hold |
|
|
Unapproved |


Choosing Panel Indices Display
You can choose whether to display panel indices based on their position in the sequence or their position in the shots.
Note: By default, panels indices are displayed based on their position in the sequence.
To display panel indices as per their position in the shots, in the Edit workspace, right-click and select Turn Panel Index based on Markers On. The panel indices are displayed as per their position in the shots.
Changing Shot Status
To change the status of a shot, do the following:
| 1. | Click on the first panel of the shot. |
| 2. | Click on the Ready To Start  button to reveal the dropdown menu with the status options. button to reveal the dropdown menu with the status options. |
| 3. | Select a status from the list. |
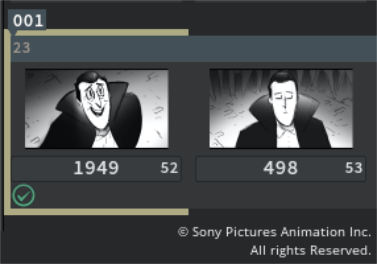
The shot status is now changed and the status icon is displayed.
Moving Shots
After you've indicated where the shots start and end by adding markers on panels, you can move the shots in the sequence to re-order them. You can move shots forward and backward in a sequence.
To move shots, do the following:
| 1. | Select the entire shot by clicking above any of the panels of the shot, and make sure you did not select just one panel or the marker of the shot. |
The entire shot is highlighted in beige indicating that it is selected.
| 2. | Click and hold the shot you want to move and drag it where you want to move it in the sequence. |
The shot is now placed where you dragged it in the sequence.
Note: You can move the shot anywhere in the sequence, even in the middle of another shot. You can move only one shot at a time.
Duplicating Shots
To duplicate shots, do the following:
| 1. | Select the entire shot by clicking above any of the panels of the shot, and make sure you did not select just one panel or the marker of the shot. |
The entire shot is highlighted in beige indicating that it is selected.
| 2. | Click the Duplicate |
The shot is now duplicated and is placed directly after the shot you duplicated it from.
Note: You can duplicate as many shots as you need at once. Simply Ctrl/Cmd+click on as many shots as you want to duplicate, and click on the Duplicate ![]() button in the menu bar.
button in the menu bar.
Deleting Shots
To delete the shots in a sequence, do the following:
| 1. | Select the entire shot by clicking above any of the panels of the shot, and make sure you did not select just one panel or the marker of the shot. |
The entire shot is highlighted in beige indicating that it is selected.
| 2. | Click on the Delete |
The shot is now deleted from the sequence.
Note: You can delete as many shots as you need at once. Simply Ctrl/Cmd+click on as many shots as you want to delete and click on the Delete ![]() button in the menu bar.
button in the menu bar.