Search is based on keyword.
Ex: "Procedures"
Do not search with natural language
Ex: "How do I write a new procedure?"
User Management
Flix provides three ways to authenticate users: LDAP (Lightweight Directory Access Protocol) , OAuth and the Flix User Management system. Managing users is restricted to users who have an admin account.
Note: The first time the Flix Server is run, it automatically creates an admin user with the username and password both set to admin, which you can use to log in to Flix for the first time. It is recommended that you change the default password after the first log in. In case the admin user login details are lost, you can reset the admin account username and password to back to admin using the -reset-admin flag.
LDAP (Lightweight Directory Access Protocol)
LDAP Authentication allows Flix users to log in using their supplied credentials for your LDAP/AD. Once configured, users will be able to log in and use Flix with their network credentials. The first time a user logs in, Flix will obtain their groups from AD and associate them with the user in Flix. This allows system administrators to add permissions in Flix based on groups from your active directory.
Example of LDAP:
ldap:
use_ldap: true
base: dc=example,dc=co,dc=uk
host: auth.example.co.uk
use_ssl: false
bind_pass: bind_password
bind_user: bind.user
user_search:
dn: ou=People,dc=example,dc=co,dc=uk
filter: (objectClass=organizationalPerson)
user_attr: uid
name_attr: displayName
group_search:
dn: ou=Groups,dc=example,dc=co,dc=uk
filter: (objectClass=posixGroup)
user_attr: uid
group_attr: member
name_attr: displayName
group_prefix: flix_
group_suffix: _flix
use_ldap - This turns on or off the LDAP authentication method for this server. Values: true or false.
base - The base dn is the point from where a server will search for users in your AD. You must supply at least the Domain Component (DC).
host - The hostname of your LDAP/AD server.
use_ssl -This indicates whether or not to use SSL/TLS when connecting to your LDAP server. Values: true or false.
bind_user - This should be a read only account for doing the bind. For example "my-readonly-username".
bind_pass - The password for the name provided in bind_user.
self_auth - If this is set, bind_user and bind_pass will be ignored. Instead Flix will attempt to use the username and password from the user to bind.
User Search
dn (optional) - DN from where to start the search from. If this value is not set the 'base' will be used.
filter - Filter to apply when searching the directory. Specify the objectClass for your users. The default value is: '(objectClass=organizationalPerson)'
user_attr - The attribute to use for the username matching for the authentication.
name_attr (optional) - The attribute to return from the user for its full name. Usually 'displayName' or 'givenName'.
Group Search
dn (optional) - DN from where to start the search from. If this value is not set the 'base' will be used.
filter - Filter to apply when searching the directory. The default value is '(objectClass=groupofName)'.
user_attr - The attribute to return from the user search to search for groups.
group_attr - The attribute in the returned groups to link to the user. For example "memberUid".
name_attr - The attribute to return from the group for its name. Usually 'displayName' or title.
group_prefix - Only groups that start with this string will be added to Flix when a user logs in.
group_suffix - Only groups that end with this string will be added to Flix when a user logs in.
OAuth
The OAuth configuration allows users to log in to Flix using their credentials provided by an OAuth service. Using the example below, configure your Flix server config file to use OAuth. Once the configuration is enabled, restart your Flix Server, and users should now be able to log in using the Sign In with Google button.
Example of OAuth:
use_oauth: true
domain: my_domain.com
providers:
use_oauth - This determines whether to use OAuth authentication or not.
domain - This specifies the domain name for your OAuth provided credentials.
providers - This specifies the OAuth provider.
Note: Please be certain not to have LDAP and OAuth both enabled.
OAuth doesn't currently obtain the user groups from Google like it does for LDAP, so group management for project access needs to be done using Flix's built-in Group Management.
Note: Currently the only OAuth provider supported is Google.
Flix User Management
Creating a User Account
As an administrator using the Flix User Management system you can create user accounts and assign them to specific groups. Only admin users can create or edit users and groups.
To create a user account:
| 1. | Navigate to File > Management Console. |
| 2. | In the User Management tab, in the Create user section, fill in the User name, Email address, Password, Confirm password and Groups fields. |
Note: To create a group, see Creating, Editing and Deleting a User Group.
| 3. | Select whether you want to give the user an Admin status. |
The toggle turns green to indicate the admin permissions.
| 4. | Click Create. |
The new user account is added to the User Management table.
Editing and Deleting User Accounts
To make modifications to existing user accounts:
| 1. | Navigate to File > Management Console. |
| 2. | In the User Management tab, select the user account in the table. |
The selected user account is highlighted in yellow. To deselect a group click it again.
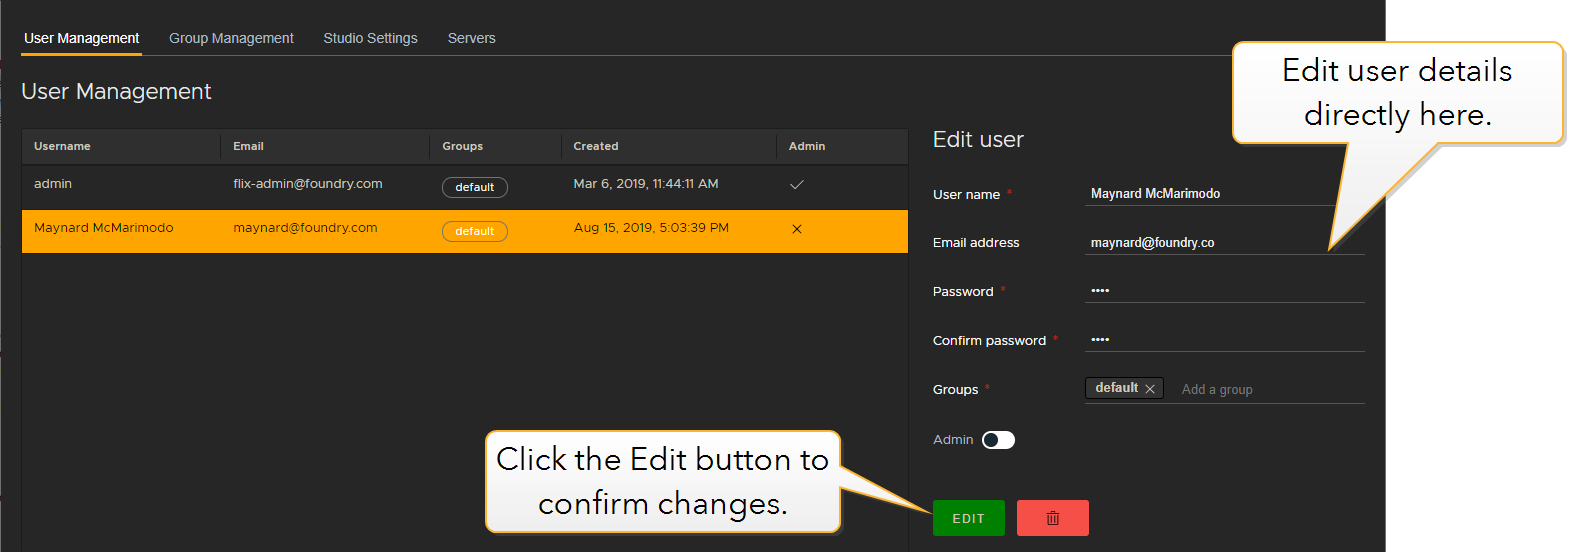
| 3. | To edit a user's details, enter changes directly into the Edit user section. |
The Edit button turns green to show that it has become active.
Note: Only Admin users can edit user details or make accounts Admin accounts.
| 4. | Click the Edit button to confirm the changes. |
The user account is updated with your edits.
To delete a user account:
| 1. | Navigate to File > Management Console. |
| 2. | In the User Management tab, select the user account in the table. |
The selected user account is highlighted in yellow.
| 3. | In the Edit user section, click the Trash button. |
The user account is deleted.
Creating, Editing and Deleting a User Group
You can use groups to allow users to access certain shows.
| 1. | Navigate to File > Management Console. |
| 2. | In the Group Management tab, in the Create Group section, fill in the Group Title field and click Create. |
To edit a user group:
| 1. | Select the group in the table. |
The selected group is highlighted in yellow. To deselect a group click it again.
| 2. | Edit its Title in the Edit Group section. |
| 3. | Click Edit. |
The group is updated.
To delete a user group, select the group in the table and click the Trash button.
Sorry you didn't find this helpful
Why wasn't this helpful? (check all that apply)
Thanks for your feedback.
If you can't find what you're looking for or you have a workflow question, please try Foundry Support.
If you have any thoughts on how we can improve our learning content, please email the Documentation team using the button below.
Thanks for taking time to give us feedback.