Setting Up User Authentication
Flix provides three ways to authenticate users: LDAP (Lightweight Directory Access Protocol), OAuth and Control User Access with Group and Role Permissions.
Note: The first time the Flix Server is run, it automatically creates an admin user with the username and password both set to admin, which you can use to log in to Flix for the first time. It is recommended that you change the default password after the first log in. In case the admin user login details are lost, you can reset the admin account username and password to back to admin using the -reset-admin flag.
LDAP (Lightweight Directory Access Protocol)
LDAP/AD (Active Directory) Authentication allows Flix users to log in using their LDAP/AD credentials. The first time a user logs in, Flix obtains the group names they belong to in LDAP/AD and associate those groups with the user in Flix. This allows Flix administrators to add permissions in Flix based on which groups a user belongs to in LDAP/AD.
Article: For more information on setting up LDAP and for troubleshooting tips, please refer to Knowledge Base article Q100563.
Flix reads all configuration options, including LDAP authentication, from a config.yml file, stored in the same directory as the Flix Server install by default. See Installing Flix Server for more information. For guidance on formatting, please refer to the example at the end of this section.
The following config.yml attributes are available:
use_ldap (optional) - This turns on or off the LDAP authentication method for this server. Values: true or false.
base - The base dn is the point from where a server searches for users in your LDAP/AD. You must supply at least the Domain Component (DC).
host - The hostname or IP address of your LDAP/AD server.
port (optional) - The port number to be used when connecting to the LDAP/AD server.
use_ssl (optional) -This indicates whether or not to use SSL/TLS when connecting to your LDAP/AD server. Values: true or false.
bind_user (optional) - This is an account that binds to the LDAP server and performs user and group searches. It can be a read-only account. Make sure the bind user you want to use has permissions to search through the desired paths. The value of this setting can be in one of the following formats:
username
cn=username,dc=domain,dc=com
username@domain
bind_pass (optional) - The password for the name provided in bind_user. If you don't use bind_user, or if it does not require a password, you don't need to set this.
self_auth (optional) - If this is set, bind_user and bind_pass are ignored. Instead, Flix attempts to use the username and password from the user logging in to bind.
User Search
dn (optional) - DN from where to start the search from. If this value is not set the base will be used.
filter (optional) - Filter to apply when searching the directory. Specify the objectClass for your users. The default value is: (objectClass=organizationalPerson)
user_attr - The attribute to use for the username matching for the authentication. On most AD servers, the default setting is - sAMAccountName.
name_attr (optional) - The attribute used to return the user's full name. On most AD servers, the default setting is - displayName.
email_attr - Defines a custom attribute for the user email address to be retrieved from, other than the default 'mail' attribute. This might be useful in cases when the mail field is used for personal email addresses and the cn field for company email addresses.
Note: It is not currently possible to specify which users/groups should be notified upon Editorial publishes. However, the email_attr option does make it possible to retrieve a different mail attribute for users, which can remain blank in LDAP for those who don’t wish to receive notifications for Editorial publishes.
Group Search
dn (optional) - DN from where to start the search from. If this value is not set the 'base' will be used.
filter (optional) - Filter to apply when searching the directory. The default value is empty.
user_attr - The name of the attribute from the user search which can be found in a group attribute such as member. Common values are distingishedName, uid, sAMAccountName.
group_attr - The group attribute that has the same value as the user attribute set above. On most AD servers the default setting is 'member'.
name_attr (optional) - The name of the group. On most AD servers the default setting is either 'name', 'cn' or even 'description'.
group_prefix (optional) - Only groups that start with this string will be added to Flix when a user logs in.
group_suffix (optional) - Only groups that end with this string will be added to Flix when a user logs in.
Auto-assign Group-Role Pairs
LDAP groups can be used to automatically assign group-role pairs. This is done by a new YAML section within the LDAP section roles. See Example LDAP Flix Config File for more information..
Additionally, four optional fields have been added:
allowed_users - an explicit list of LDAP usernames which are permitted to log into Flix (cannot be set if blocked_users is set).
blocked_users - an explicit list of LDAP usernames which are not permitted to log into Flix (cannot be set if allowed_users is set).
required_groups - a list of groups users must have to be permitted to log into Flix, users must have all groups in this list. Cannot be set if forbidden_groups is set.
forbidden_groups - a list of groups which if a user has any of, that user will not be permitted to log into Flix. Cannot be set if required_groups is set.
Example LDAP Flix Config File
Note: This example is for illustration purposes. The entry preceding the ':' is a key that Flix reads, which needs to be named as in the example, but the entry following the ':' follows the exact naming of the attribute name in your AD.
ldap:
  use_ldap: true
  base: dc=flix,dc=ad
  host: 10.10.10.10
  port: 385
  use_ssl: false
  self_auth: false
  bind_user: CN=Flix,OU=Flix-Users,DC=flix,DC=ad
  bind_pass: PASSWORD
  user_search:
    dn: OU=Flix-Users,DC=flix,DC=ad
    filter: (objectClass=organizationalPerson)
    user_attr: sAMAccountName
    name_attr: displayName
    email_attr: description
  group_search:
    dn: OU=Groups,DC=flix,DC=ad
    filter: (objectClass=group)
    user_attr: distinguishedName
    name_attr: name
    group_attr: member
    group_prefix: flix-
    group_suffix: -flix
  roles:
    - role: Show manager
      group_suffix: "Manager"
    - role: View only
      group_suffix: "Readonly"
    - role: Regular user
      group_prefix: "Flix"
    - role: View only # fallback role
OAuth
The OAuth configuration allows users to log in to Flix using their credentials provided by an OAuth service. Using the example below, configure your Flix server config file to use OAuth. Once the configuration is enabled, restart your Flix Server, and users should now be able to log in using the Sign In with Google button.
use_oauth - This determines whether to use OAuth authentication or not.
username - This determines whether artists are authenticated by 'username' or 'email' address and is used to create their Flix username. Setting the username parameter to email forces Flix to create unique usernames.
Note: If the username parameter is blank, misspelled, or omitted, authentication defaults to 'username'.
domain - This specifies the domain name for your OAuth provided credentials.
providers - This specifies the OAuth provider.
Example of OAuth:
oauth:
  use_oauth: true
  username: email
  domain: my_domain.com
  providers:
    - Google
Warning: Please be certain not to have LDAP and OAuth both enabled.
OAuth doesn't currently obtain the user groups from Google like it does for LDAP, so group management for project access needs to be done using Flix's built-in Group Management.
Warning: OAuth is not supported when using HTTPS. Due to the design of OAuth, it requires making a HTTP callback to the Flix Server. With HTTPS enabled, this callback would also need to be via HTTPS, however without external access to your certificate authority, this request would fail. Currently this limitation prevents OAuth and HTTPS from being used at the same time.
Note: Currently the only OAuth provider supported is Google.
Control User Access with Group and Role Permissions
Flix allows you to control who can access shows and functionality using group and role permissions, rather than splitting permissions using admins and regular users. Flix can handle remote artists and collaboration between multiple studios on the same shows, while still providing security for all intellectual property.
Note: You can make admin users with full access to all shows and functionality, but we recommend limiting the number of admin users you create. Using group and role permissions gives you fine-grained control over who can access what in Flix.
Creating a User Account
As an administrator or a user that has specifically granted permissions you can create user accounts and assign them to specific groups and roles.
To create a user account:
Note: Only administrators and users that are specifically granted permissions can create user accounts.
- Navigate to File > Management Console.
- In the User Management tab, click +New User.
- Fill in the Username, Email address, Password, and Confirm Password fields.
- Select whether you want to give the user an Admin permissions.
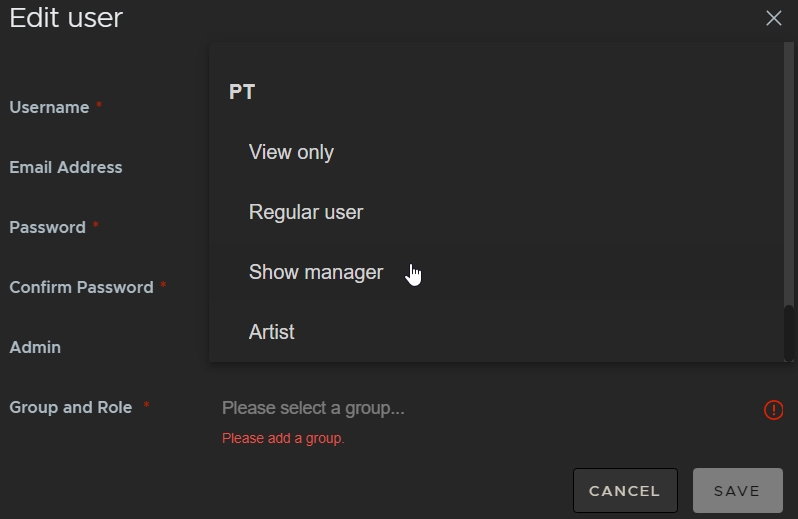
- Select a Group and Role within the group to assign permissions to the new user. In this example, PT is the group name and Show manager is the role name.
- Click Create.
The toggle turns green to indicate the admin permissions.
Note: Only accounts with administrator permissions can create new admins.
You can add as many groups and roles as you like to a user.
Note: To create a group, see Creating Groups and Assigning Roles to Manage Permissions.
The new user account is added to the User Management table.
Editing and Deleting User Accounts
To make modifications to existing user accounts:
Note: Only administrators and users that are specifically granted permissions can edit user details.
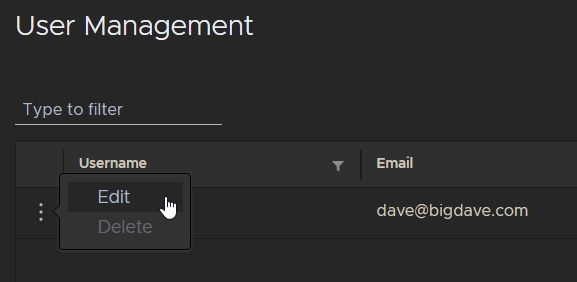
- Navigate to File > Management Console.
- In the User Management tab, click the more options
 button and select Edit.
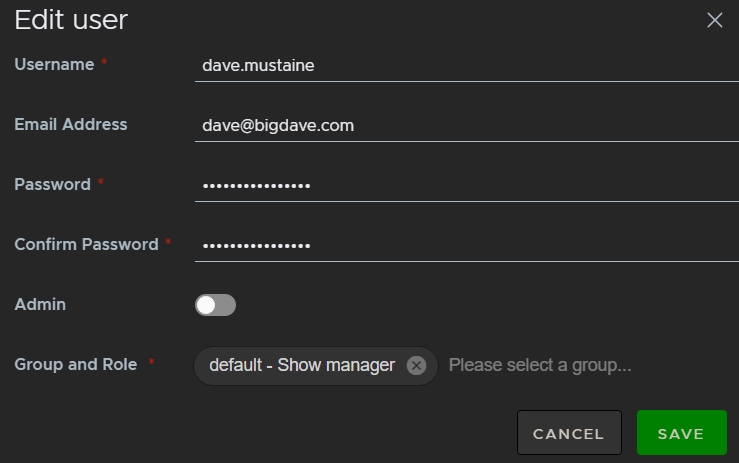
 - Make the required changes in the Edit user dialog.
- Click Save to apply the changes.
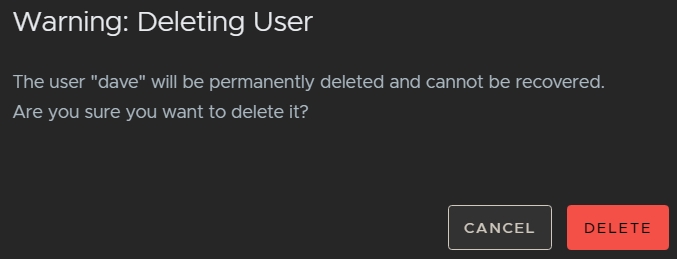
To delete a user account:
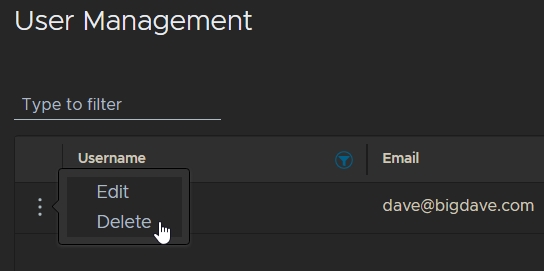
- Navigate to File > Management Console.
- In the User Management tab, click the more options button and select Delete.
- A warning is displayed because accounts are not recoverable if they are deleted.
- Click Delete to remove the account permanently.
Creating Groups and Assigning Roles to Manage Permissions
You can use groups and roles to limit access to shows. Only some groups can access shows and those groups include certain permissions assigned by roles. For example, you can create a group called Review with the role View only. You can then add the users responsible for sign off on a show's story.
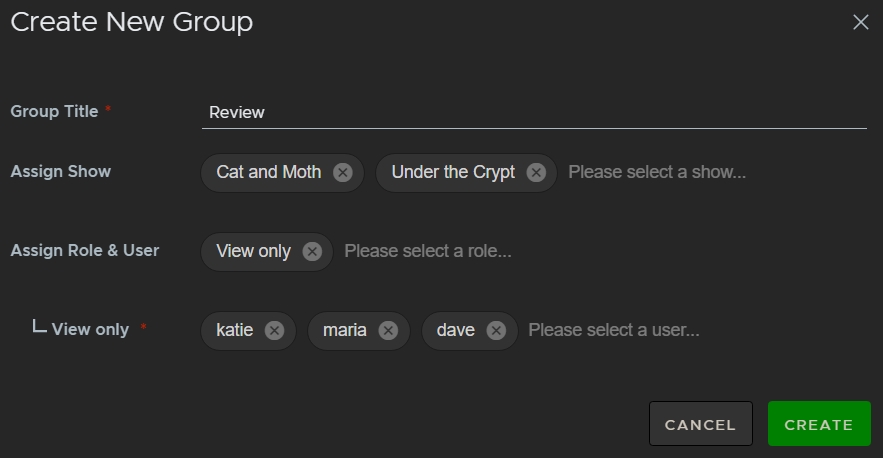
In the example, the Review group only has access to Cat and Moth and Under the Crypt with View only permissions and the group only contains three users: katie, maria, and dave. This way, only those three users can access the shows and they can't make any edits.
Assign Permissions to a Role
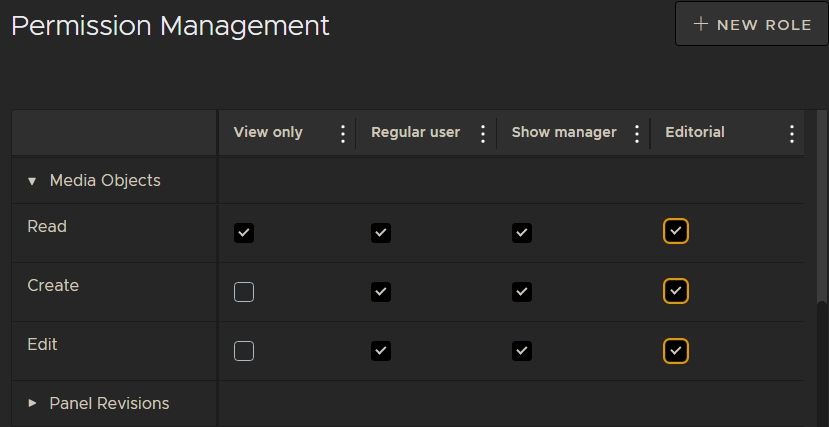
Role permissions determine the Flix functions that a role can access, such as Contact Sheets, Exports, and Group administration. Flix ships with three roles by default, but you can add your own as well. See Add Custom Roles for more information.
Note: Administrator can also be considered a role, but there is no entry in the Permissions Management table for admins because they have access to all shows and functionality. Administrator permissions are assigned as part of user creation and can only be created by other admins. See Creating a User Account for more information.
To assign permissions to a role:
Note: Only administrators and users that are specifically granted permissions can edit user permissions.
- Navigate to File > Management Console.
- Click the Permissions tab to display the default Flix roles: View only, Regular user, and Show manager.
- Click the more options button to edit the role name or delete a role.
- Click a dropdown on the left of the table to open up functions for that category. The permission categories determine what each role can access.
- To add or remove permissions to a certain function, toggle the checkbox on or off.
See Add Custom Roles for more details on creating your own roles.
For example, clicking the Contact Sheets category reveals the Create, Edit, and Delete functions and the roles that have permission to access those functions.

Add a New Group to Control Access
To add a group:
- Navigate to File > Management Console.
- In the Group Management tab, click +New Group.
- Enter a name for the group. The name can be anything you like, but a descriptive name helps other users understand a group's purpose.
- Click Please select a show to assign the new group to the shows you want users to access.
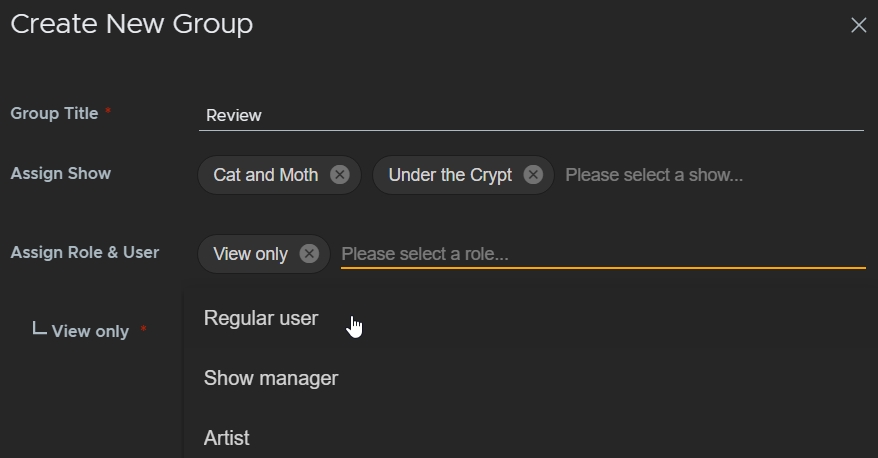
- Click Please select a role to assign roles to the new group. Flix ships with three roles by default, but you can add you own as well. See Add Custom Roles for more information.
- Click Please select a user to assign users to the new group.
- Click Create to save the new group in the Group Management table.
The Create New Group dialog is displayed.
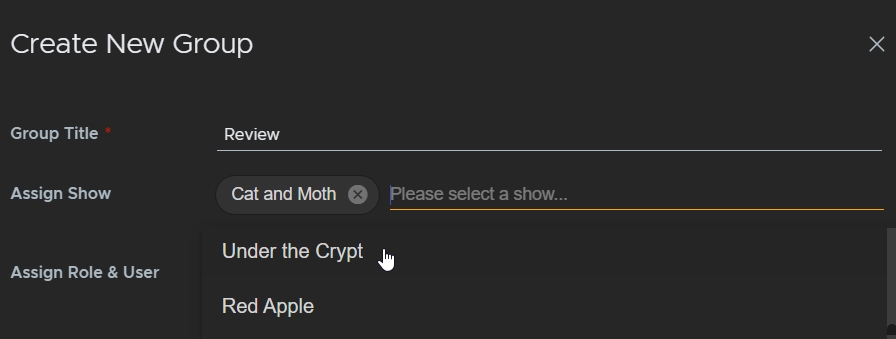
You can assign as many shows as you like to a group.
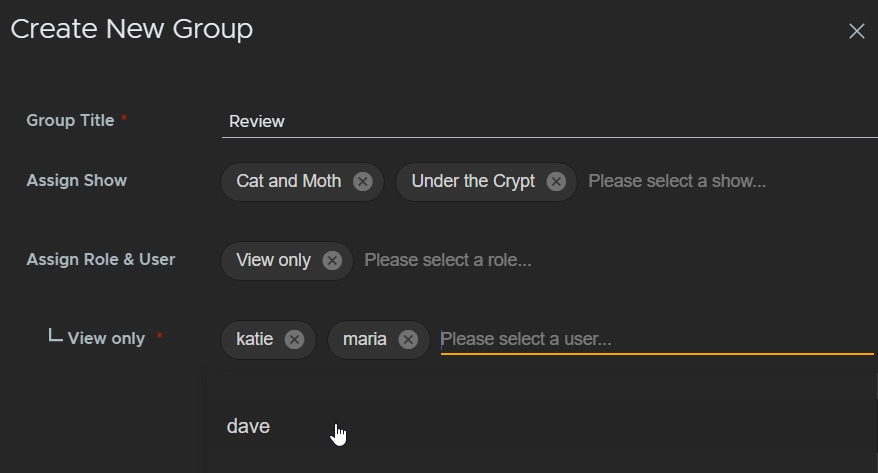
You can assign as many users as you like to a group.
In the example, the Review group only has access to Cat and Moth and Under the Crypt with View only permissions and the group only contains three users: katie, maria, and dave. This way, only those three users can access the shows and they can't make any edits.
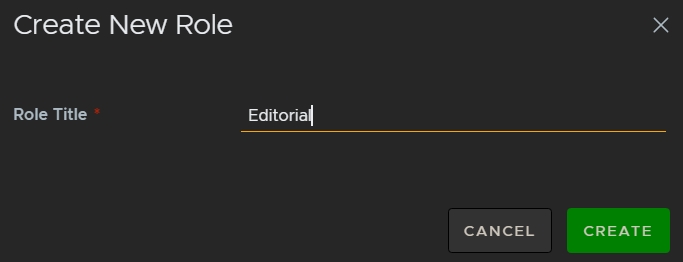
Add Custom Roles
You can create your own roles in addition to the defaults if you need more control over who can access what in Flix.
To add a role:
- Navigate to File > Management Console.
- In the Permissions tab, click +New Role.
- Enter a Role Title and click Create to save the new role.
- Click the permission categories you want to allow and check all the required boxes for the new role.
The Create New Role dialog is displayed.
The new role is added to the Permissions Management table.
You can now assign the new role to users. See Creating Groups and Assigning Roles to Manage Permissions for more information.