Flix for Story
Importing Panels into Flix
You can import panels and other file formats using the file browser or by dragging directly into Flix.
-
In the main toolbar, click the Import to Flix button.

This opens a file browser.
-
Select one or multiple files.
Note: You can import the following files: .png, .psd, .jpeg, .jpg, .mov, .mp3, .tiff and .wav.
-
Click Open.
OR
From your file browser, drag one or more files directly into the Flix Panel Browser. You can also drag folders into the Panel Browser for Flix to import their contents.
Your files are imported in the sequence.
When you drag a file (or files) into the Flix panel, a yellow bar will appear to indicate where in the sequence the new panels will appear once dropped.
Warning: Make sure that you click the  button when the import is complete or the new panels may
not be added to the sequence.
button when the import is complete or the new panels may
not be added to the sequence.
Note: Flix keeps track of every imported image and reuses an existing panel instead of creating a new one. In cases where you need to reimport images that have been worked on previously, Flix recognizes which images it's seen before and only processes the new ones.
When audio, such as .mp3 or .wav files are imported, Flix displays an audio icon in the Status bar.

Note: If you import a .mov file to the panel browser, any embedded audio contained in the file is not retained. Please see Flix for Editorial for details on importing movie files from editorial with audio.
Panel Versioning
There are multiple ways to version up your panels in Flix.
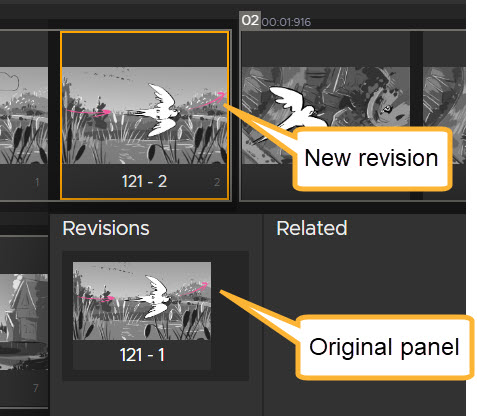
You can drag new artwork directly onto an existing panel to automatically version it up with the new artwork. Full panel history is maintained so you can easily access earlier versions of the panel.
To do this:
| 1. | Drag the new file over the current panel. |
| 2. | The Version up icon will appear. |
| 3. | Drop the new artwork onto the panel. The Arrow icon will fill in when the new artwork is loading. |
| 4. | The revised panel becomes the selected panel after the drop is completed. |
Note: If a panel is errored, you can still version it up by dropping a new file on top of it. This creates a new revision, and the errored panel remains part of the older revision history.
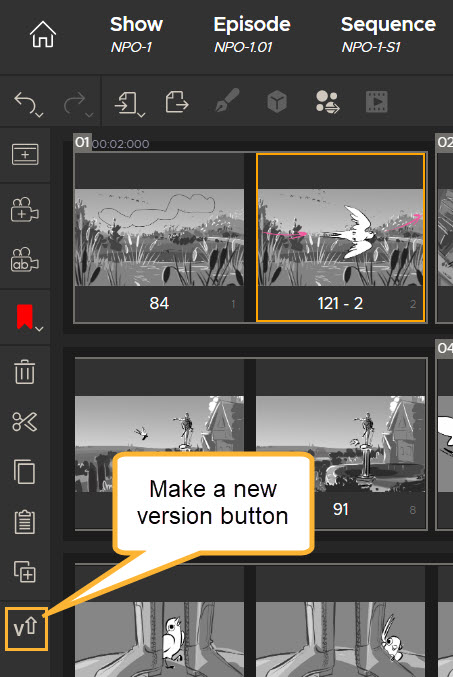
You can also use the Make a new version button, This will create a new version of your panel, based on the current version. This will duplicate your current panel to create a new revision.
Alternatively, you can version up panels by using the Import function to search and import your new panels:
| 1. | In your Revision, select the panels you want to version up. |
| 2. | Click and hold the Import icon ( ). ). |
| 3. | Select Import Panel Revisions. This will open a file path window. |
| 4. | Select the panels you want to import and click Open. |
| 5. | The Arrow icon will fill in when the new artwork is loading. |
| 6. | The revised panel becomes the selected panel after the drop is completed. |
You can version up multiple consecutive panels in a single action - they will update in parallel. If the panels are not sequential, new artwork addition and panel versioning will need to be performed in several separate actions.
When a panel is versioning-up, the versioning-up overlay image will animate to indicate import progress.
Note: Dragging a panel from the panel Library or from another Flix window will not display the version up option. You can only add as a new panel to your current sequence.
See Import Progress at a Glance in the Transfer Queue
The Flix file transfer system allows you to easily transfer files between Flix Server and Flix Client quickly and reliably. The transfer queue's interface provides up-to-date reporting of the transfer process and allows you to view and manage transfers more easily.
The Transfer Queue provides visual feedback of the files being imported into Flix. Regardless of the method you
currently use to import files, the transfer progress of those files is visible by clicking on the ![]() cloud icon at the bottom right of the Revision window.
cloud icon at the bottom right of the Revision window.

The Total Transfer progress is shown when the Transfer Queue is closed, giving you an overall picture of the state of your file transfers.

Clicking the ![]() cloud icon opens the queue
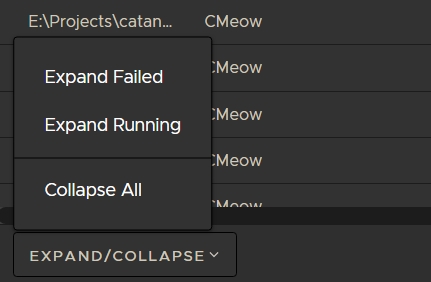
interface. At the bottom of the window, the Expand/Collapse allows you to quickly
check on the status of running and failed imports or collapse all entries in the queue.
cloud icon opens the queue
interface. At the bottom of the window, the Expand/Collapse allows you to quickly
check on the status of running and failed imports or collapse all entries in the queue.
Expanding entries displays detailed information on individual files in the transfer, such as Show, Panel ID, Progress, and Status.
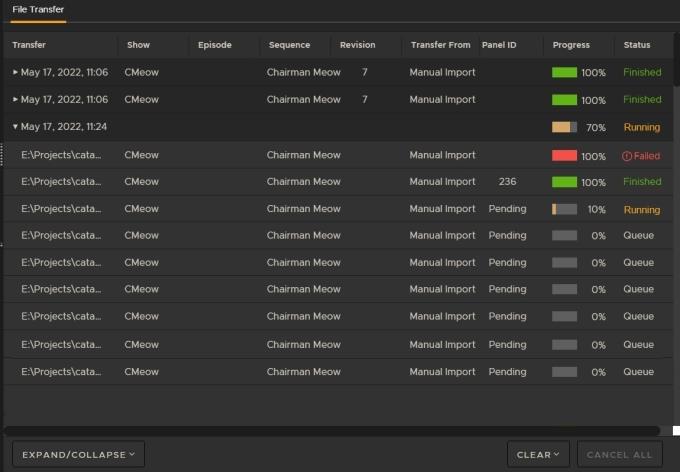
Tip: You can click the Clear button to remove Finished, Canceled, or Failed transfers or cancel any current transfers by clicking the Cancel All button.
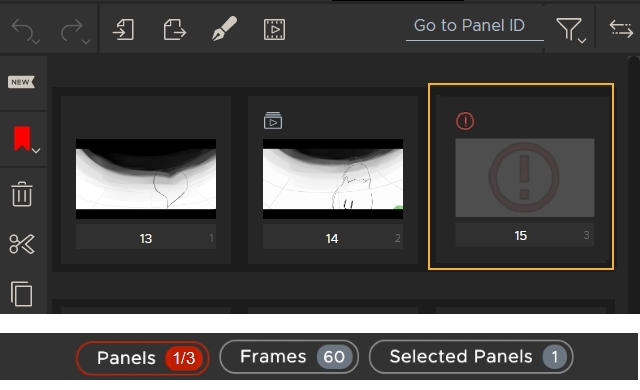
Transfers that display a Status of Finished may still need time to render the thumbnails associated with the file as this is the last step of the transfer process. Panels in the browser waiting for a thumbnail appear as follows:
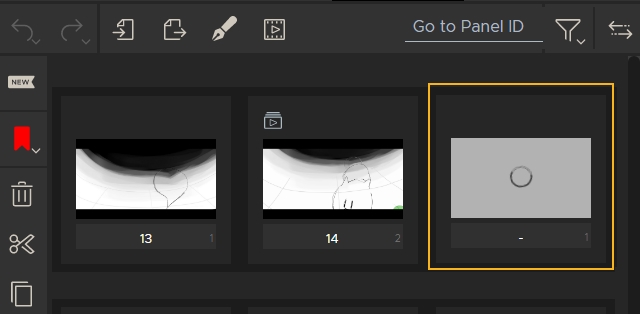
Transfers that display a Status of Failed are displayed in the panel browser with an exclamation point and are highlighted red in the Panels count at the bottom of the Flix Client.
If a panel fails to import correctly, you can delete the panel and restart the import or look at the logs to determine the cause of the failure. See Transfer Logs for more information.
Tip: You can use the ![]() filter button at the top of the Panel Browser to quickly select failed transfers, or
if the Panels button turns red to indicate failed transfers, click the button to
automatically display failed imports.
filter button at the top of the Panel Browser to quickly select failed transfers, or
if the Panels button turns red to indicate failed transfers, click the button to
automatically display failed imports.
Keep Working During File Transfers
The Flix transfer system gives you the freedom to do other tasks while the transfer is in progress. As files are imported in the background, you can continue to work, rather than having to wait for the import process to finish. The following functions are all still available during file transfer:
Workspace
|
Function |
Conditions |
|
Resizing, menu operation, Preferences, and so on |
Always enabled. |
Panel Browser
| Function | Conditions |
|---|---|
|
Reorder panels |
Always enabled. |
|
Add panels |
Always enabled. |
|
Shots |
Always enabled. |
|
Highlight panels |
Always enabled. |
|
Double click to open a panel in Photoshop |
Disabled until thumbnails are created on a per-panel basis, rather than per sequence. Note: Only available if Photoshop is set as the Sketching Tool in the Preferences. See Third-Party Apps for more details. |
|
Double click to send a sequence revision to Storyboard Pro |
Disabled until thumbnails are created on a per-panel basis, rather than per sequence. Note: Only available if Storybaord Pro is set as the Sketching Tool in the Preferences. See Third-Party Apps for more details. |
|
Delete panels |
For completed transfers: Enabled, but leaves orphan assets in the DB. For Incomplete transfers: The user can only delete panels when the ID is created. The delete action cannot be undone. Note: The incomplete transfer for deleted panels continues in the background. |
|
Cut panels |
Disabled until all panel IDs are created. |
|
Copy panels |
Disabled until all panel IDs are created. |
|
Paste panels |
Disabled until all panel IDs are created. |
|
Duplicate panels |
Disabled until all panel IDs are created. |
|
Create a new version |
Disabled until all panel IDs are created. |
Top Toolbar
| Function | Conditions |
|---|---|
|
Undo/Redo |
Disabled until the transfer batch is completed. Enabled for editing only. |
|
Import |
Enabled, the user can always add to the transfer queue. |
|
Export |
Disabled until all transfers are complete. |
|
Publish |
Disabled until all transfers are complete. |
|
Open in Sketching app |
Disabled until thumbnails are created on a per-panel basis, rather than per sequence. Tip: With multiple panel selections if one of the panels doesn't have the thumbnail yet, no panels open until all of the selected panels have thumbnails. |
|
Compare tool |
Disabled until panel IDs are created. |
|
Panel filter |
Always enabled. |
Viewer Tabs
| Function | Conditions |
|---|---|
|
Dialogue |
The input box is disabled until selected Panel ID is created. |
|
Comments |
The input box is disabled until selected Panel ID is created. |
|
Properties |
Trim animation is disabled until selected Panel ID is created and thumbnail generated. |
|
Library |
Always enabled. |
In addition to the Panel Browser functionality, Flix's transfer system allows you to leave the revision that is importing files and open other sequences or shows, ensuring there is no wasted downtime waiting for files to import. The File Transfer window is always available in any revision of any show that you are working on, and display any current and past imports that have not already been cleared from the queue.
Actions That Stop File Transfers
Canceling imports using the Cancel All button, stops transfers manually. There are also a number of actions that cancel transfers that aren't so obvious:
-
Closing the Flix Client window,
-
Logging out of Flix,
-
Exiting Flix,
-
Reloading the Revision to which files are being transferred, and
-
Flix closing unexpectedly due to an error.
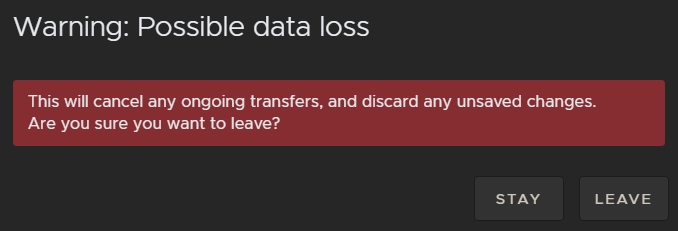
Note: Closing, logging out, and exiting Flix during a transfer displays a warning. Click Stay to avoid canceling transfers and possible data loss. If you select Leave, any ongoing transfers are stopped.
Preview Artwork and Movies from Panels in a Sequence
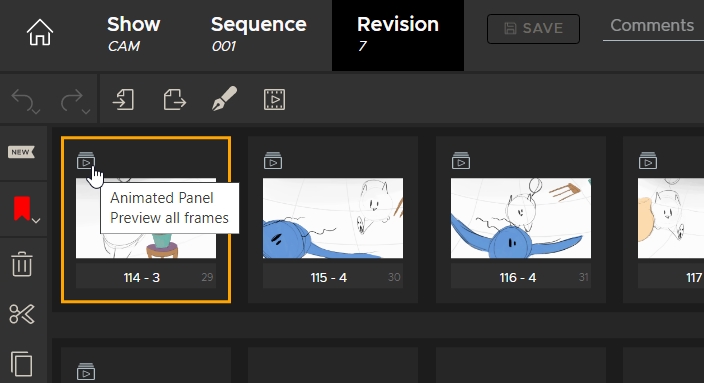
You can set the default preview setting in the Panel Browser section of preferences to show either the full animation or the first frame only. You can quickly change this setting on each individual panel without having to go back to preferences, but any panel you override in the browser is no longer affected by changes to the Animated Panels preference.
Animated panels are set to Preview all frames by default, but you can change the default behavior to Preview the first frame as follows:
-
On Windows, navigate to File > Preferences or press Ctrl+, (comma) to open the Preferences,
-
In the Preferences dialog, navigate to Panel Browser.
-
Set the default preview behavior for animated panels:
OR
On macOS, navigate to Flix > Preferences or press Cmd+, (comma) to open the Preferences.
Preview all frames - Animated panels show all available frames in the panel viewer.
Preview first frame - Animated panels only show the first frame in the panel viewer and the Trim Animation control is disabled.
To manually override a panel's preview settings:
In the Panel Browser, click the icon in the top left to select the preview mode for that panel.
-
 Preview all
frames - Animated panels show all available frames in the panel viewer.
Preview all
frames - Animated panels show all available frames in the panel viewer.
-
 Preview first
frame - Animated panels only show the first frame in the panel viewer and the Trim Animation control is disabled.
Preview first
frame - Animated panels only show the first frame in the panel viewer and the Trim Animation control is disabled.
Note: Changing the default preference does not affect individual panels that you have set manually.
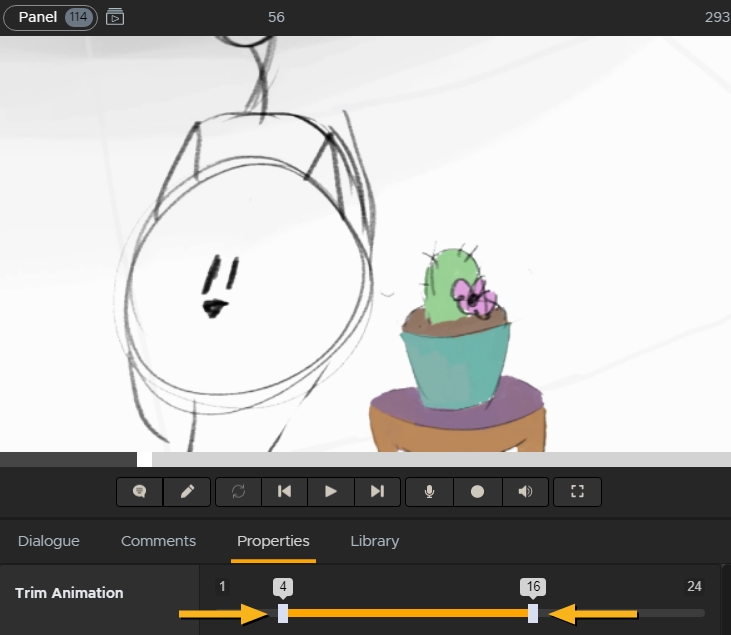
You can trim panels set to Preview all frames using the Trim Animation slider. Adjusting the in and out points causes the animation to play between only those frames.
|
|
|
This trimmed animated panel only plays between frames 4 and 16. |
Making Changes to the Edit
In Flix, you'll be working primarily in the Panel Browser. The following video gives a brief overview of how to navigate and work with your sequence in the Panel Browser.
Editing Actions:
-
• Importing panels. For more information, please refer to Importing Panels into Flix.
-
• Each panel displays a unique Panel ID and Index, or position number. If the panel has been updated, a new version is created and numbered.
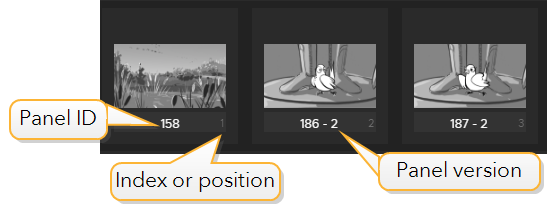
Note: You can swap the position of each panel's unique ID with its Index number. See Swap Panel ID with Index in Preferences.
-
Move panels around by selecting one or more, and dragging them where you want to place them. Hold Shift and click to select a sequence of panels, or Ctrl/Cmd and click to select individual panels.
-
Remove panels from your current edit by clicking the Trashcan icon in the Edit toolbar.
-
Hide panels by clicking on the panel and toggling Visibility in the Properties tab.
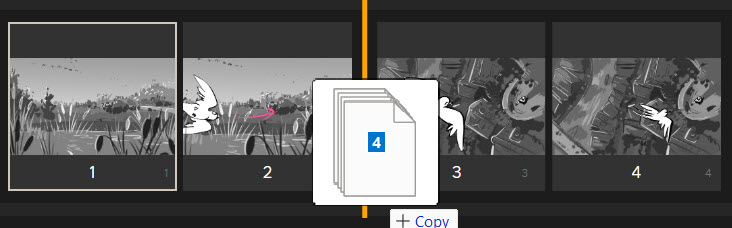
-
Re-use panels by using the Copy and Paste buttons in the Edit toolbar. This creates new panels re-using the same panel, timing, and dialogue.
-
Using the annotation tool. For more information, see Annotating Panels.
-
Adding and versioning dialogue.
You can drag and drop new panels over existing ones to update them. View Panel Versioning to learn more.
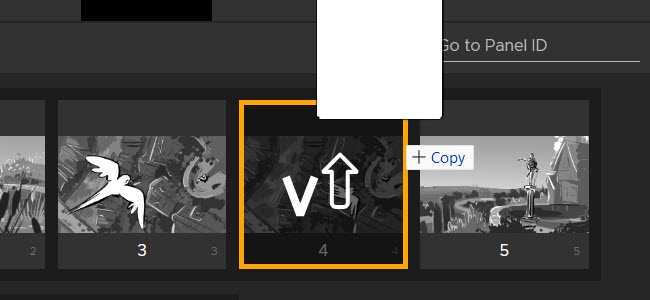
Tip: Duplicate selected panels with the  Duplicate button.
Editing Panels Already in Flix
To make changes to panels in your edit (sequence revision), you can open and edit them in third-party applications. See the Flix for Story section.
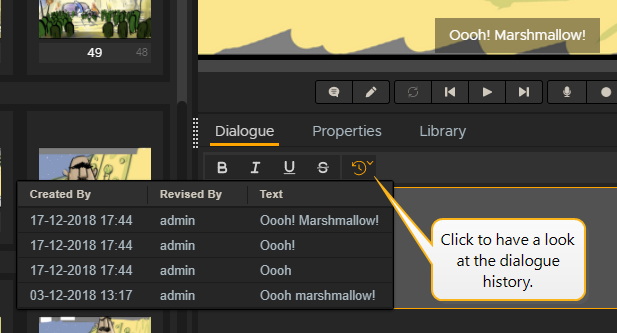
Adding or Editing Dialogue
You can easily add dialogue to your panels in the Story workspace. Dialogue is displayed as subtitles in the Player, which you can turn on and off.
To add and edit dialogue:
-
Select the required panel and enter text in the Dialogue box. Press Enter to add new lines.
This adds dialogue to the selected panel, which is displayed as subtitles in the Player.
Note: If you select multiple panels, the same dialogue is added to all selected panels.
-
Use the Dialogue tools to modify the formatting of your text.
-
Click the Toggle Subtitles button to turn the subtitles on and off. Click and hold on the button to display the text size slider control.

Tip: Use the Undo and Redo buttons, located under the breadcrumb, to undo or redo your recent actions.
-
Click Save to save all new dialogue.
-
Keep track of the dialogue history by clicking on the Dialogue History dropdown menu.
Recording a Pitch
Periodically, you may want to pitch sequences to others involved in the project to present your work. Pitching allows you to do a rough timing for your sequence, for example depending on the action you may want to stay longer on one panel.
You can access the Pitch workspace through the Player in the Panel Properties pane.
-
If you want to record audio while pitching, navigate to File > Preferences > Audio and select an Input Device. If you already have audio in your sequence and don't want to override it, in the Player click the Microphone button to disable it.
Note: When pitching with audio, use the Volume button to make sure the volume is set properly.
Tip: You can switch to Full Screen mode by clicking the Full Screen button. Press Esc to exit the Full Screen mode.
-
Click the Record button to start pitching.
In the red bar at the top of the Player, the Time and the Duration timers are running.
-
As soon as you reach the required duration, press the right arrow key to move to the next panel.
By switching to the next panel, you stop the recording of the duration for the current panel and start the recording for the next one.
-
Keep recording the duration for each panel until the end of the sequence or click the Record button again to stop recording.
In the Panel Properties pane, select the Properties tab to check the updated duration for your panels. You can also change the duration in the Properties tab directly by entering a new duration or using the arrows.
Tip: When playing the sequence, press A to add an audience at the bottom of your panels.