Managing Your Flix Deployment
Upgrading Flix
-
Click here to download the latest version of Flix Server.
-
Extract the files from the download package into the same install directory where Flix Server is currently installed.
A new directory named after the new Flix version is created.
For example, if versions 6.0.5, 6.1.2, and 6.2.2 are installed and you want to upgrade to Flix 6.3.1, the install directory is arranged as follows:
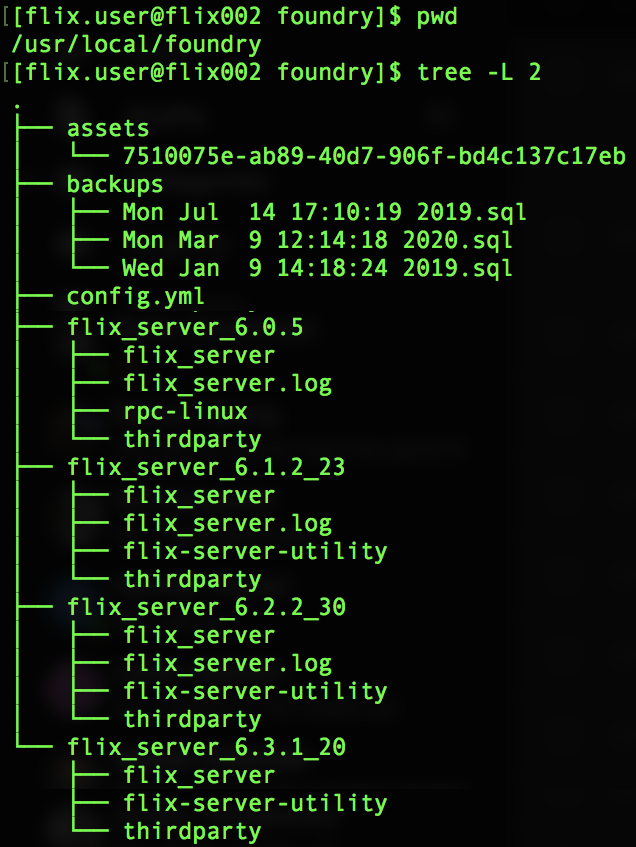
Note: You need to make sure all the config.yml settings match your previous version of Flix 6 and the asset_directory location is set and pointing to the same location as the assets for your previous version.
-
You can now start the new version of Flix Server, pointing it to the same config file as previously used. Following the previous example, the command would be:
./flix_server_6.3.1_20/flix_server --config-file config.yml
-
Flix Server prompts you to upgrade the database if a mismatch between server and database versions is detected.
If you want to upgrade your database later, you can use the --db-upgrade mode to mutate the database schema to the latest version:
./flix_server --db-upgrade --verbose
Note: We recommend using the --verbose flag to have better visibility over the upgrade progress.
-
Flix Server asks if you want to back up the existing database. Press Y to start the backup.
Example of database backup:
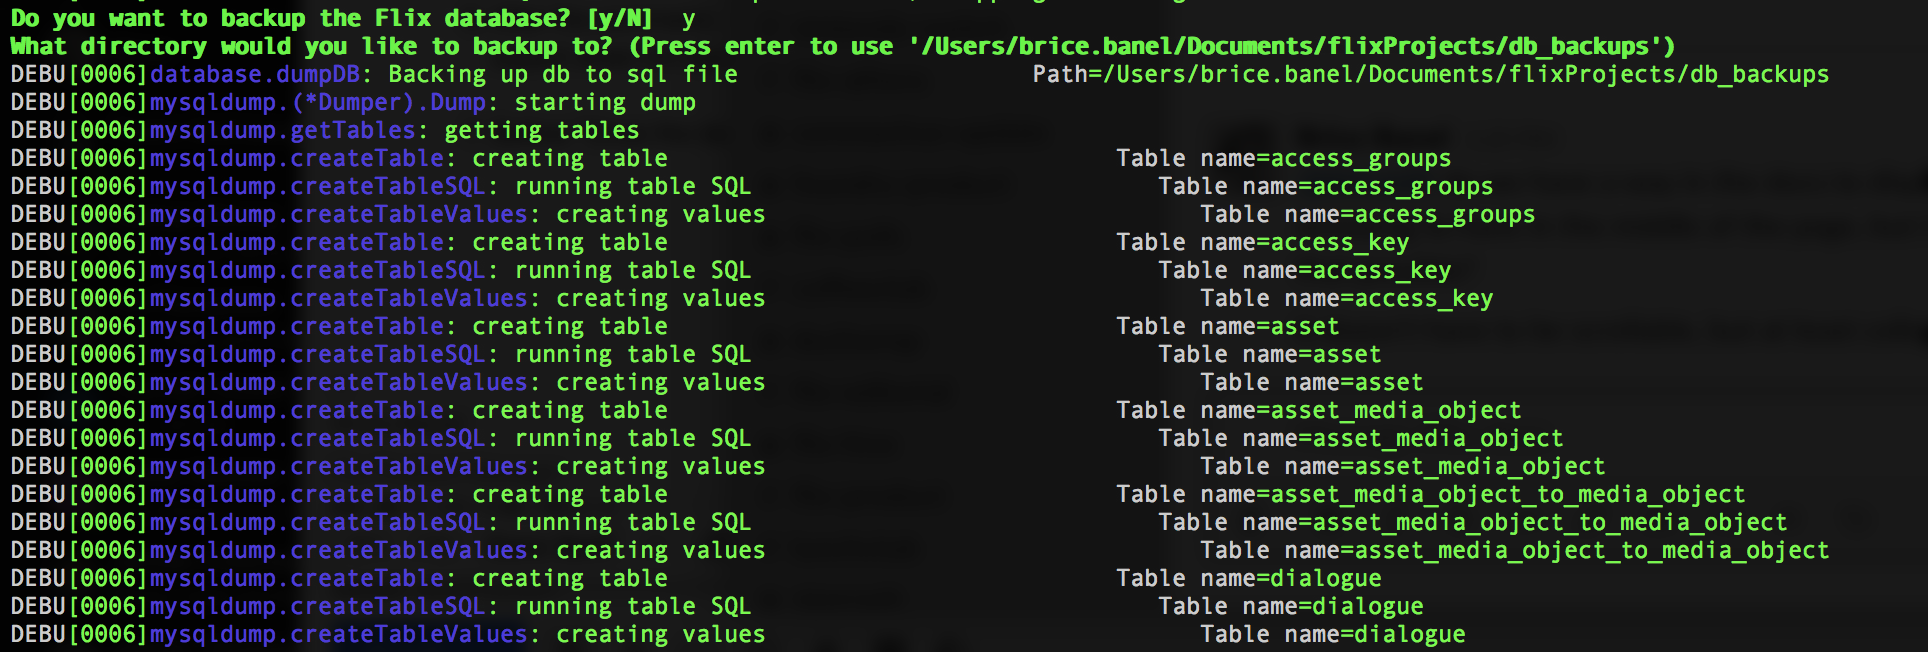
Note: Backing up your existing database is strongly recommended when running a database upgrade. This is to ensure you can restore that backup in case of issues during the upgrade process. See this Knowledge Base Article for more information on restoring a Flix Database backup in MySQL.
-
Once the backup is complete, Flix Server prompts you to start the database upgrade. Press Y to start the upgrade.
Example of upgrading from Flix 6.2 to 6.3:
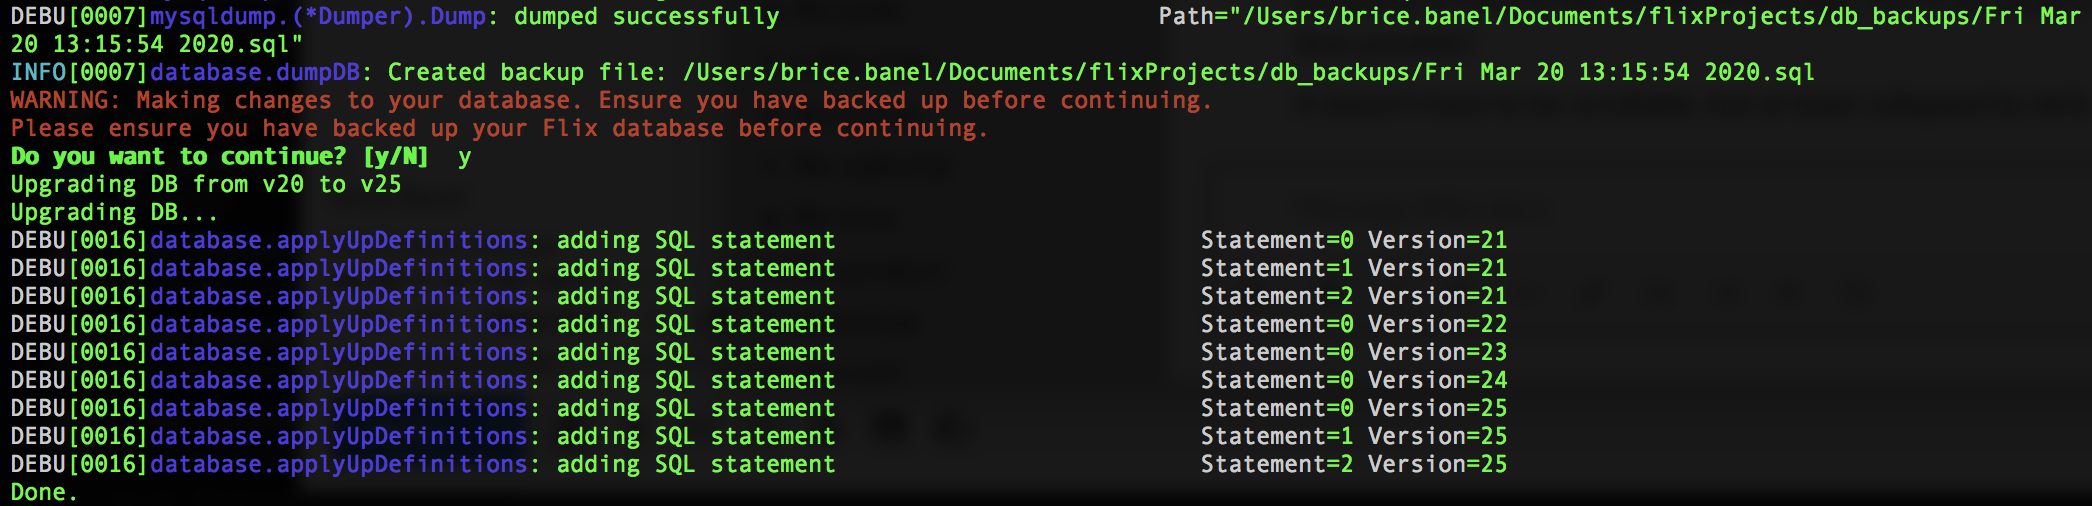
Once the database has been upgraded, you can start the server normally.
Note: You need to upgrade the Flix Client to the same version as your server. You can download the Flix Client from here, or use the auto-update feature when a new version becomes available.
| Flix Server Version | Required Database Version |
| 8.1.0 | 110 |
| 8.0.1 | 102 |
| 8.0.0 | 102 |
| 7.1.0 - 7.1.1 | 90 |
| 7.0.0 - 7.0.2 | 74 |
|
6.6.0 - 6.6.2 |
58 |
|
6.5.0 - 6.5.1 |
56 |
|
6.4.0 - 6.4.1 |
42 |
| 6.3.7 | 29 |
Note: Contact Flix support if you require the database version for older versions of Flix.
Note: You are presented with the option to copy pre-existing assets into new sub-directories for each show when you upgrade Flix Server. The next time you start the server, the option appears again to migrate the assets. To automatically skip the prompt regarding the 6.3 asset migration, you can use the --skip-migration flag when starting Flix Server. We recommend performing the asset migration eventually, as future minor (for example 6.5, 6.6) and major (for example 7.0, 8.0) releases may not support assets stored outside of show sub-directories.
Rolling back to an earlier version of Flix
Your production may at some stage want to roll back to an earlier version of Flix. You can do so with the following command:
./flix_server --db-downgrade
-
Flix asks if you want to backup the database. Type Y (yes) or N (no).
-
Enter the desired database version to roll back to. Please refer to the table above for reference.
-
Type Y (yes) to confirm the database version or N (no) to enter a different version.
Note: The latest version of Flix Server needs to be used to run the Downgrade. For example, if downgrading Flix from 6.1.0 to 6.0.5, use Flix Server 6.1.0 to run the downgrade from database version 12 to database version 5.
Archive, Restore or Delete a Show
Admin users can archive, restore or delete shows. Archiving older or inactive projects can help optimize performance and reduce costs, particularly for cloud-hosted instances.
To archive a show:
-
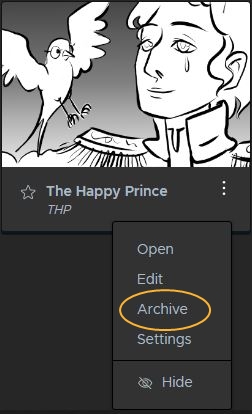
Click on the show kebab menu and select Archive.
-
Enter the show tracking code and click confirm.
Once the archive process is complete, the show is locked and the archive automatically saved on the server, in the location specified in your config for database backups. You can find the config option under MySQL.
-
A locked show is viewable by anyone that had previous access, but it is read-only and cannot be edited. Only admin users can unlock a show.
To restore an archived show:
-
Click Restore Archive on the Shows page. A list appears of available show archives in the location specified by the backups config option. You can identify the show you want to restore from the tracking code recorded against the archive.
To delete an archived show:
-
Click on the show kebab menu and select Delete. Enter the show tracking code and click confirm.
-
A show can only be deleted if it has already been archived and locked. If you unlock a show you will not be able to delete it.
Note: To make the archive bundle as light as possible, the archive process excludes scaled, fullres, and thumbnail media objects. These are regenerated during a show restoration. Opening Sequence Revisions from a recently restored show may take a little longer than usual as Flix transcodes the new files.
Adding Servers
Having multiple servers in your Flix Deployment helps ensure better performance across all users, with HTTP(S) requests spread across all the available resources.
Flix handles its own load balancing, dispatching jobs from different users to all available servers. We strongly advise against setting up your own load balancer in your Flix Deployment, as it is unnecessary and could introduce communication issues between Flix Client and Flix Server.
If moving from a single-server Flix deployment to a multi-server deployment, we strongly recommend using Shared Storage, for all assets from all servers to be stored in a centralized location. We recommend setting up Flix to use Shared Storage for your single-server deployment, and migrating existing assets across to the new shared storage location prior to adding any more servers. See Setting up Shared Storage for more information.
Tip: If moving from a single-server Flix deployment to a multi-server deployment, licensing is much easier to manage with a floating license, as opposed to a node-locked one. See Licensing Flix Server for more information, and contact your Sales representative or our Support Team to change your node-locked license for a floating license.
Follow these instructions to add an extra server to an existing Flix deployment. You can download Flix Server here.
Tip: Adding a new server is easiest if all your Virtual Machines access the Flix Server binary from a network location. Otherwise you need to install the Flix Server binary on any new server/VM and ensure all your Flix Servers are using the same version.
-
Ensure your new Flix Server can access the config.yml file your other Flix Server(s) are using.
-
Ensure the hostname option isn't specified in the config.yml file.
Note: If the hostname option was specified previously, make sure to run your old Flix Server by specifying its hostname using the -hostname CLI flag, as mentioned further below.
-
Ensure your new Flix Server is licensed. See Licensing Flix Server for more information.
-
Run all Flix Servers with the following 2 CLI flags:
-config-file pointing to your config.yml file, for example:
-config-file /mnt/flix/config.yml-hostname specifying the server's hostname, for example:
-hostname flix002.mystudio.comExample command:
./flix_server -hostname flix002.mystudio.com -config-file /mnt/flix/config.yml -verbose
You can repeat these steps to add additional servers.
Note: Adding a server to your Flix deployment doesn’t affect how end users log in. They can keep connecting to the original Flix Server, or any other in your deployment. Since Flix handles the load balancing, all end users can connect to the same Flix server. If a server is used this way, Flix will share the jobs with all servers in your deployment.
Tip: You can check if a server has been added successfully by going to Flix > Management Console > Servers in your Flix client. See Managing Your Flix Deployment for more information.
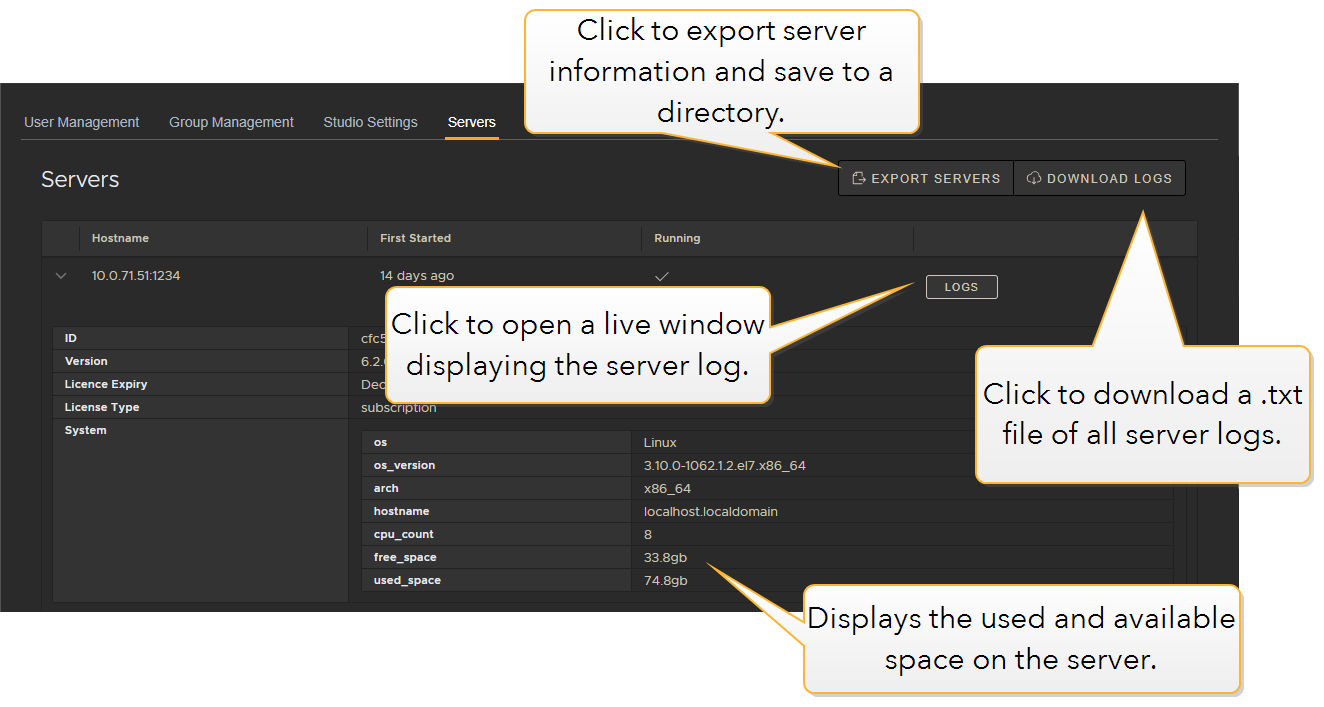
Server Management
You can check the list of servers running Flix by going to File > Management Console > Servers in your Flix Client. Here you can see the server ID, which version of Flix each server is running and download logs for Foundry support if needed.
Note: Flix stores all temporary files in a directory named 'Flix' followed by a 9 digit random number. This directory is created inside the system temporary directory. You can change the environment setting for TMP, TEMP, TMPDIR (depending on your OS) before starting the Flix server, if you want Flix to use a different location for temporary files. Flix server regularly cleans up files stored in the temp directory.
Migrating Assets When Switching to a New Assets Directory
After changing the asset directory option in the config.yml file (see Setting a Custom Assets Directory), you will need to migrate the data from the original assets directory to the new one.
Assets directories are named with their server identification, for example '8c17bef2-2fd9-439b-a5cf-8a1b082ee9d3'. To migrate your assets from their previous assets directory, run the server using the --import-from flag, pointing Flix Server to the old assets directory to import data from. Flix Server imports everything from the specified old assets directory to the new one now specified in the config.yml file by the asset_directory option.
For example, if the previous asset directory was '/mycompany/assets/directory' and your server ident was '8c17bef2-2fd9-439b-a5cf-8a1b082ee9d3', you would use the following command:
./flix_server --import-from /mycompany/assets/directory/8c17bef2-2fd9-439b-a5cf-8a1b082ee9d3
Your assets are copied to the new asset directory. If files already exist in that directory, they are not copied to avoid duplication.
Command Line (CLI) Arguments
For a complete list of Command Line Arguments, simply run Flix Server with the --help flag. For example:
./flix_server --help