Search is based on keyword.
Ex: "Procedures"
Do not search with natural language
Ex: "How do I write a new procedure?"
Importing Source Clips
Hiero supports multi-view clips in two formats:
• single-view - formats such as .dpx and .jpg, with file names that Hiero can interpret as multi-view using specific naming conventions. For example:
myStereo_comp1_left.####.dpx and myStereo_comp1_right.####.dpx
See Importing Single-View Clips for more information.
• multi-view - formats such as .exr, .sxr, and .mov, that support multiple views per file. For example:
myStereo_comp1.####.exr containing two layers called left and right.
Note: Hiero can assign any shot on the timeline to any view in the project, but stereo is the most common use case.
See Importing Multi-View Clips for more information.
Importing Single-View Clips
After setting up views in the Project Settings, Hiero can interpret single-view clips as multi-view using specific naming conventions. These conventions can be applied to the file names themselves or to the directories in which they reside.
File Name Variables
If the images you want to read in contain a view name or the initial letter of one (for example, left, right, l or r) in their file names, replace this with the variable %V or %v in the file name. Use %V to replace an entire view name (for example, left or right), and %v to replace an initial letter (for example, l or r). When a variable is used, Hiero reads in the missing inputs and combines all inputs into a single output.
Note: You can enable detect views in the file browser to automatically substitute the %V or %v variable where possible.
To use the %V and %v variables manually:
| 1. | Click File > Import File(s) or press Ctrl/Cmd+I to display the file browser. |
| 2. | Locate a single-view file, for example pubstitch.left.####.dpx |
| 3. | Replace the view name with the %V variable, continuing the example pubstitch.%V.####.dpx |
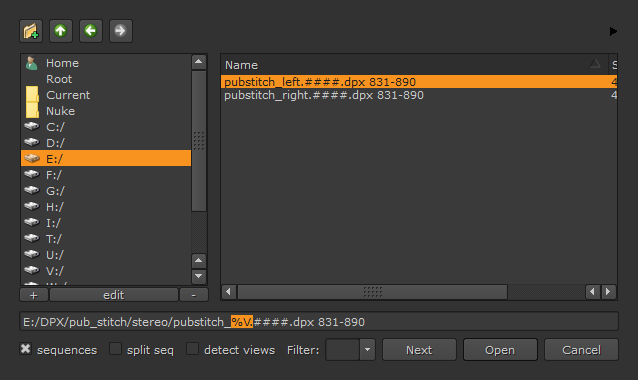
| 4. | Click Open. |
Hiero reads in both pubstitch.left.####.dpx and pubstitch.right.####.dpx with the same Read node, provided that views called left and right exist in the Project Settings.
Note: Mac and Linux operating systems can be case-sensitive or case-insensitive. If your OS is case-sensitive, you'll need to make sure you use the correct case when naming your left and right views, as the %v variable can only retrieve the case used in the view name.
Both input images are combined into a single source clip, marked with a ![]() icon, which can display any of the combined views.
icon, which can display any of the combined views.

See Displaying Views in the Viewer and Displaying Views in the Timeline for more information.
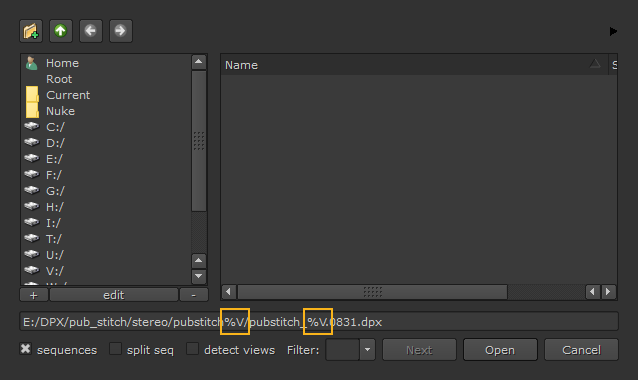
Directory Name Variables
You can also use the %V and %v variables at a directory level. For example, if you have set up views called cam3, left, and right, and you have the following directories and files:
stereo/pubstitchcam3/pubstitch_cam3.####.dpx
stereo/pubstitchleft/pubstitch_left.####.dpx
stereo/pubstitchright/pubstitch_right.####.dpx
If you read in pubstitch_cam3.####.dpx and change the file path to stereo/pubstitch%V/pubstitch_%V.####.dpx, all three inputs are read in with the same Read node, providing that the cam3, left, and right views exist in the Project Settings.
All three input images are combined into a single source clip, marked with a ![]() icon, which can display any of the combined views.
icon, which can display any of the combined views.
See Displaying Views in the Viewer and Displaying Views in the Timeline for more information.
Importing Multi-View Clips
Nuke offers to automatically create views when you import single files containing multiple views, such as .exr and .sxr, unless they already exist. For multiple files, views must be created manually. See Importing Source Clips for more information.
| 1. | Click File > Import File(s) or press Ctrl/Cmd+I to display the file browser. |
| 2. | Locate a multi-view file, for example pubstitch_stereo.####.exr |
| 3. | Click Open. |
The Create missing views? dialog displays.

| 4. | Click Add Views, Replace Views, or No: |
• Add Views - add the views in the incoming clip to those that exist in the project.
• Replace Views - replace all existing project views with those in the incoming clip.
• No - import the clip and display only the first view in the file, retaining any existing views in the project.
You can now access the views in your project. See Displaying Views in the Viewer and Displaying Views in the Timeline for more information.
Multi-View QuickTime Files
Multi-view .mov files only display one view by default. To enable all views in a multi-view .mov file:
| 1. | Double-click the .mov to display its Properties panel. |
| 2. | Disable First track only. |
You'll notice that the .mov in the bin is now marked with ![]() to denote multiple views.
to denote multiple views.
You can now access the views in your project. See Displaying Views in the Viewer and Displaying Views in the Timeline for more information.
Sorry you didn't find this helpful
Why wasn't this helpful? (check all that apply)
Thanks for your feedback.
If you can't find what you're looking for or you have a workflow question, please try Foundry Support.
If you have any thoughts on how we can improve our learning content, please email the Documentation team using the button below.
Thanks for taking time to give us feedback.