Caching Frames in the Disk Cache
Timeline Disk Caching provides reliable playback for more complex timelines by rendering frames to disk using the GPU. The cache provides persistent frames per edit in the timeline that only needs updating for full changes on the edit, such as adding a soft effect. For editorial changes, only the new frames need to be cached.
Note: Frames are always cached at the sequence resolution, regardless of source clip format and Viewer proxy settings.
You can cache whole sequences, selections of clip ranges, and frame ranges specified using In and Out points. Files in the disk cache are frames identical to what you see rendered in the timeline Viewer, written into .exr sequences, and saved in NUKE_TEMP_DIR/TimelineCache by default.
Tip: You can find the location of Hiero's general cache directory from within Hiero by hitting X on your keyboard, when the focus is on the Node Graph, and then running the following Tcl command:
value preferences.TimelineDiskCachePath
Cached frames are represented in the timeline by the state of the timeline cache icon:
|
|
Automatic caching is active. See Update Changes to Cached Frames Automatically for more details. |
|
|
None of the frames in the current timeline are cached. |
|
|
The current timeline is partially cached. |
|
|
The current timeline is fully cached. |
Cached frames are represented in the Viewer with an orange bar, under the RAM cache bar, which is white by default.

See Caching Sequence Ranges, Caching Selected Shot Ranges, and Caching In/Out Ranges for more information.
You can set the cache directory location, size of the timeline cache, and type of EXR compression used:
• Click the timeline cache icon ![]() and select Cache Settings, or
and select Cache Settings, or
• Open the Preferences and navigating to Performance > Caching.
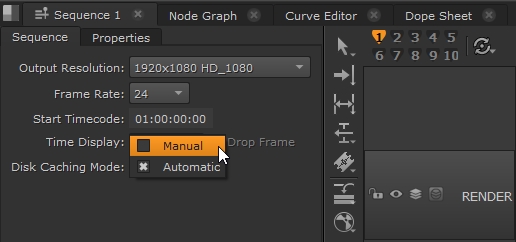
Note: You can override the caching mode in the Preferences using the Sequence panel's Disk Caching Mode dropdown.
Update Changes to Cached Frames Automatically
Timeline disk caching has two modes, Automatic and Manual, providing greater flexibility when used in conjunction with soft effects to ensure the best possible performance when playing back on the timeline.
• Manual - the default mode. When frames are cached, any changes made to soft effects on the cached frames are not automatically re-cached.
• Automatic - when frames are cached, any changes to soft effects made after the initial cache operation automatically triggers a re-cache of the affected region of your cached timeline. This means that your timeline is always cached and up to date in the selected regions, regardless of changes made.
To set the caching mode for all new sequences:
- Navigate to Nuke > Preferences (macOS) or Edit > Preferences (Linux and Windows),
- Select Performance > Caching.
- Click the default disk caching mode dropdown and select Manual or Automatic.
- You can override this preference in the Sequence panel using the Disk Caching Mode dropdown.
OR
Use the Preferences keyboard shortcut Shift+S.
Any new sequences you create default to the option selected in the Preferences.

