Search is based on keyword.
Ex: "Procedures"
Do not search with natural language
Ex: "How do I write a new procedure?"
Creating a Light
Creating a light inside Katana can be done in two ways:
• using separate nodes (LightCreate and Material), or
• using the GafferThree node, which packages up light creation with a number of other useful functions.
To create a light from its core components:
| 1. | Create a LightCreate node and place it within your recipe. |
| 2. | Create a Material node and connect the output of the LightCreate node to the input of the Material node. |
| 3. | Select the Material node and press Alt+E. |
The Material node becomes editable within the Parameters tab.
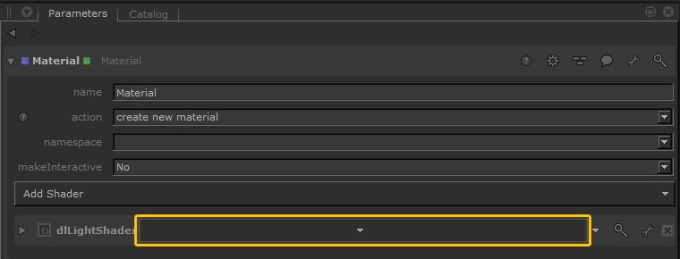
| 4. | Select Add shader > dl> light within the Material node’s Parameters tab. |
A new 3Delight light shader is added to the Material node.
Note: The shader you select in the Add Shader dropdown doesn't necessarily need to be dl. Depending on your studio's setup, you may wish to select a different shader, and this can impact which light options you choose. For the purpose of these instructions, the dl shader has been chosen.
| 5. | Click the arrow to the right of dlLightShader to display the shader options. |

| 6. | Select the type areaLight from the dropdown. |
The light name is populated in the dropdown button.

| 7. | Create a MaterialAssign node and connect it to the output of the Material node. |

| 8. | Select the MaterialAssign node and press Alt+E. |
The MaterialAssign node becomes editable within the Parameters tab.
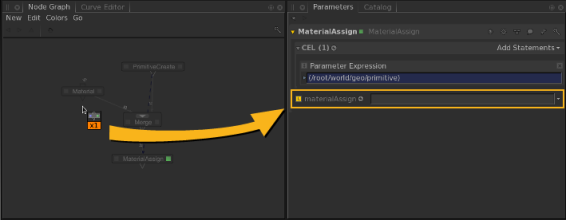
| 9. | Shift+middle-click and drag from the LightCreate node in the Node Graph tab to the Add Statements dropdown in the Parameters tab. |
The Parameter Expression field is populated with the scene graph location.

| 10. | Shift+middle-click and drag from the Material node in the Node Graph tab to the materialAssign field in the Parameters tab. |
An expression is created for the materialAssign parameter that evaluates to the location created by the Material node.

Using the MaterialAssign node, the 3Delight light shader defined in the Material node is now assigned to the light defined in the LightCreate node.
Sorry you didn't find this helpful
Why wasn't this helpful? (check all that apply)
Thanks for your feedback.
If you can't find what you're looking for or you have a workflow question, please try Foundry Support.
If you have any thoughts on how we can improve our learning content, please email the Documentation team using the button below.
Thanks for taking time to give us feedback.