Using the Catalog tab
The Catalog tab acts as an archive for your renders. It has a number of slots where you can place each render. Each slot acts as a stack, you replace the top render in the stack by starting a new render. If the top item is locked, any new renders become the new head of the stack.
Note: For more on changing which slot to use, see Using the Monitor Layer and Monitor Tab .
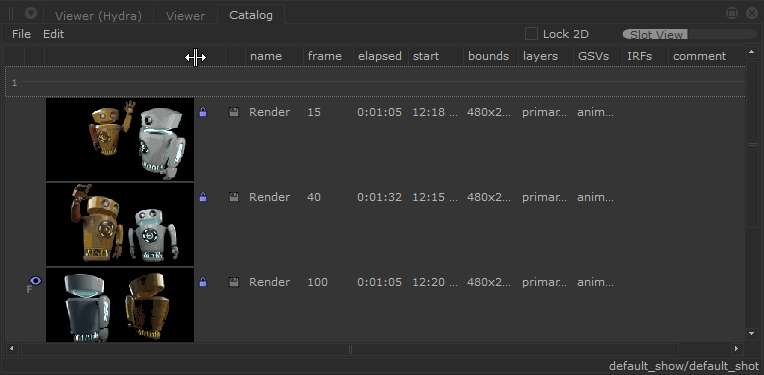
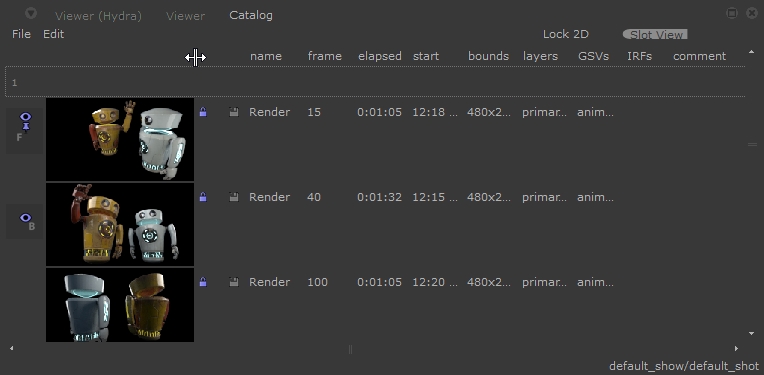
The Catalog tab allows you to view and organize your renders. The Catalog tab also displays render settings, such as the frame, render time, Graph State Variables or Interactive Render Filters. The thumbnails display both complete and running renders, and can be resized by scaling the column size.
Resizing thumbnails in the Catalog tab
Customizing the Catalog Columns
The Catalog tab displays the following information by default:
- name - The name of the node from where the render was started.
- frame - The frame time that the render was started.
- elapsed - The time taken for the render to complete (h:mm:ss).
- start - The time at which the render started.
- bounds - The full image resolution of the render.
- layers - The Image Layers (AOVs) that have been rendered.
- GSVs - The Graph State Variables used for the rendered image.
- IRFs - The Interactive Render Filters used for used for the rendered image.
- comment - Click to type a comment about a rendered image stored in the Catalog tab.
Note: For more information, see Manipulating Catalog Entries.
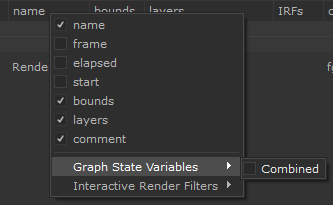
To customize what is displayed:
- Right-click the header bar in the Catalog tab.
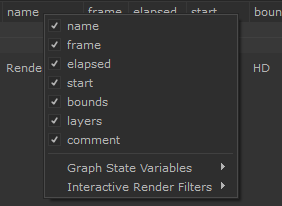
- Deselect/select the required headers of your choice from the menu.
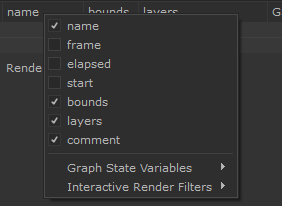
To disable the GSVs and IRFs columns, hover over the Graph State Variables or Interactive Render Filters option and deselect Combined.
Changing the Catalog View
By default the Catalog tab displays renders under their respective slot. It is also possible to view the renders in order of when they were rendered. To change the Catalog tab to a Slot-centric view, click Slot View in the upper-right corner of the tab. To change the Catalog tab to a Time-centric view, click Time View in the upper-right corner of the tab.
Manipulating Catalog Entries
Below are a list of features you can use to manipulate the Catalog entries:
- To move Catalog entries from one slot to another, middle-click and drag.
- To toggle the lock status of a render, click
 /
/ next to the image’s thumbnail. Locked images are not overridden by a subsequent render to the same slot.
 - To toggle whether an image is saved within this Catalog, click
 /
/  next to the image’s thumbnail. The first time the icon is pressed a file is saved to the directory specified by the KATANA_PERSISTENT_IMAGES_PATH environment variable (if not set, it defaults to /tmp/katana_persist). To add a prefix to the filename, use the KATANA_PERSISTENT_IMAGES_PREFIX environment variable.
 - To change the Region of Interest (ROI) to match the ROI of the render, right-click the area to the right of the render thumbnail, and select Adopt Render ROI.
- To change the current frame to match the frame of the render, right-click the area to the right of the render thumbnail, and select Adopt Frame Time.
- To select the node the Catalog render was generated from, right-click the area to the right of the render thumbnail, and select Find in Node Graph.
- To regenerate the thumbnail within the Catalog tab, right-click the area to the right of the render thumbnail, and select Regenerate Thumbnail.
- To create a copy of a Catalog item, right-click the area to the right of the render thumbnail, and select Duplicate Catalog Item.
- To make a comment for a Catalog render, type under the comment heading in the same row as the relevant thumbnail, or if the image is the current Front or Back image, click
 at the top of the Monitor tab and type the comment in the Front or Back field.
 - To toggle the lock for new 2D renders, click the checkbox marked Lock 2D. When ticked, any new renders automatically have the lock icon. Being locked prevents the image being overridden by a subsequent render to the same slot.
Changing the Catalog Renders Displayed in the Monitor tab
To change the Front and Back images within the Monitor tab:
- Left-click a thumbnail to make it the Front image,
- Right-click a thumbnail to make it the Back image, or
- Ctrl-click a thumbnail to pin the image to the Front buffer. Pinning a thumbnail prevents subsequent renders updating the Front buffer.
Click the thumbnail again to unpin the image.
Importing and Exporting Catalog Entries
Importing an Image or File Sequence to the Catalog
- Select File > Import Image / Sequence (from the Catalog tab).
The Import Image / Sequence dialog displays.
- Select whether you want an individual frame or a sequence by toggling Sequence Listing.
- Select the image or sequence to import.
- Click Accept.
Note: During import only a single AOV, the primary pass, is read into the Catalog and becomes available for preview within the Monitor tab.
Exporting an Image or File Sequence from the Catalog
- Select File > Export Catalog and:
• All Images - all entries in the Catalog tab.
• Locked Images - only those entries in the Catalog tab that are locked.
• Selected Images - only selected entries in the Catalog tab.
The Export Catalog dialog displays.
- Choose one of the export methods below:
• Specify the full path to the directory where your files are exported. File names are automatically generated and begin with catalog_export.
• Specify the full path for a sequence. The sequence must follow the pattern sequenceName.#.fileFormat, where # is the amount of padding for image numbers.
The supported export formats are .exr, .tif, .jpg, and .png.
- Click Accept.
Note: When manually entering in a directory path, you must include the file path and name of the directory in order to click Accept.
Removing Renders from the Catalog
To remove all unlocked images from the Catalog, select Edit > Flush Unlocked Images (from within the Catalog tab).
To delete the selected images from the Catalog:
- Select the image(s) to delete.
- Select Edit > Delete Selected Images (or press Delete on the keyboard).
- If the images are locked, confirm deletion by clicking Accept.
To clear the entire Catalog:
- Select Edit > Clear Catalog.
- Click Delete to confirm.
Viewing the Render Log for a Catalog Entry
The Render Log output for renders during this session of Katana are saved as part of its catalog entry. Catalog entries saved with a project do not include their Render Log.
To view a Catalog entry’s Render Log output, click its thumbnail. The entry becomes the Front render in the Monitor tab and its Render Log entry is displayed within the Render Log tab.