Groups, Macros, and SuperTools
Groups, Macros, and SuperTools allow you to create higher-level compound nodes out of other nodes. Groups and macros are created in the Katana UI, while SuperTools are created using Python.
Introduction to Groups
Groups are simply nodes that group together a number of other nodes into a single node. They are typically used to simplify the node graph by collecting nodes together. The simplest way to create a group is by selecting a number of nodes in the node graph and pressing G. A new Group node is created, with the previously selected nodes as its children. Any connections between selected nodes are preserved. You can also create an empty group by choosing Group from the Tab node creation menu. Group nodes can also be duplicated like any other node, creating duplicates of any child nodes and preserving any connections between them.
A Group node may have upstream and downstream connections, depending on the connections of the nodes contained within it.
|
|
|
|
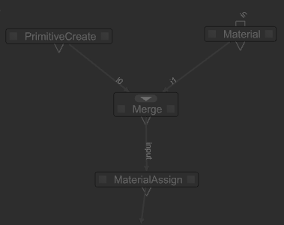
The contents of a group that holds PrimitiveCreate, Material, Merge, and MaterialAssign nodes, with a connection leaving the group from the MaterialAssign node. |
None of the nodes in the group have incoming connections from outside the group. Nodes in the group with outgoing connections show an output connection from the Group node. |

To see and edit the nodes within a group, click on the ![]() icon on the node to show the group’s contents in a new window. When the new window is open, the
icon on the node to show the group’s contents in a new window. When the new window is open, the ![]() icon on the Group node turns into a
icon on the Group node turns into a ![]() sign. Clicking the
sign. Clicking the ![]() sign closes the new window.
sign closes the new window.
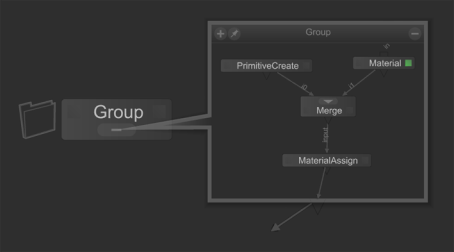
Another way to view the contents of a group is to Ctrl+middle-click on the Group in the node graph to drop down a level in the node graph to the level of the child nodes. With the contents of a group exposed, you can select and edit individual nodes in the same way you would any other. See Editing the Node Graph for more on selecting nodes and editing parameters. To go back up a level in the node graph, use Ctrl+Backspace or click on the up arrow ![]() icon in the node graph address bar. Group nodes - as with any other node - can have user parameters with which you can add parameters to a node, and interactive connections between parameters.
icon in the node graph address bar. Group nodes - as with any other node - can have user parameters with which you can add parameters to a node, and interactive connections between parameters.
Note: See the Adding User Parameters section for more on adding and using user parameters. Additionally, for more on Group nodes and their incoming or outgoing connections, see Help > Developer Guide.
GroupStack and GroupMerge Nodes
As well as standard Group nodes, which can have child nodes of any node type, there are two special convenience group nodes to make it easier to collect multiple nodes of the same type: GroupStack and GroupMerge. These nodes are useful for organizing the UI when there are large numbers of the same types of nodes. Both GroupStack and GroupMerge nodes offer an interface to control some elements of the nodes contained within. To create a GroupStack or GroupMerge node of a particular node type, simply create a GroupStack or GroupMerge and Shift+middle-drag a node of the desired type into it, from the Node Graph tab.
A GroupStack node can only contain nodes of a single type, and those nodes must have at least one input connection, and a single output connection. The contained nodes are chained together in a series inside the GroupStack, with the output of the top node connected to the first input of the next node, and so on. If there are multiple inputs on a node, only the first one is considered. Ctrl+middle-click on the GroupStack node in the node graph to see the arrangement of the nodes inside the GroupStack.
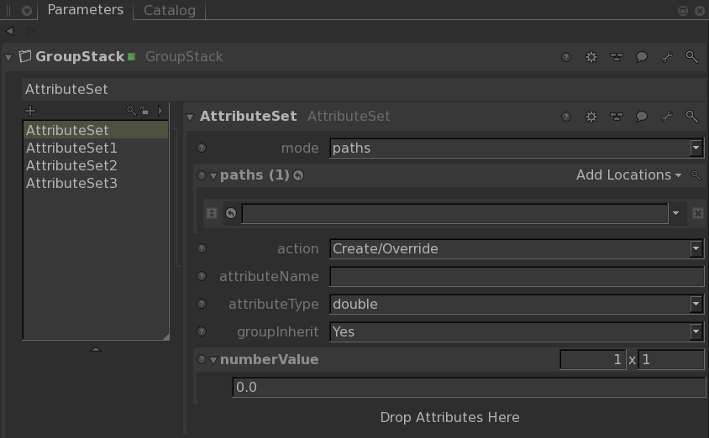
In the node graph, select any nodes you want to place in a GroupStack node, then Shift+middle-click and drag them onto the GroupStack node’s list pane in the Parameters tab. The nodes are transferred to the GroupStack node, and are editable in the GroupStack node’s Parameters tab. GroupStack nodes have additional Parameters tab options for adding, and editing nodes of their selected type. Above the list pane in a GroupStack node’s Parameters tab are icons to add additional nodes of the selected type, filter the list of nodes, and lock highlighted nodes. Highlighting an entry in the list pane and pressing the D key also disables the selected entry.
A GroupMerge node can only contain nodes of a single type and those nodes must have a single output connection, but there is no requirement on the type of input connections used. The child nodes are connected as separate inputs to a Merge node, creating a single output out of the group. Any inputs on nodes inside a GroupMerge node are ignored. The only connections inside the GroupMerge are from the outputs of the constituent nodes, to the input of a Merge node. Ctrl+middle-click on a GroupMerge node in the Node Graph to see the arrangement of its constituent nodes.

In the node graph, select any nodes you want to place in a GroupMerge node, then Shift+middle-click and drag them onto the GroupMerge node’s Parameters tab. The nodes are transferred to the GroupMerge node, and are editable in the GroupMerge node’s Parameters tab. GroupMerge nodes have additional Parameters tab options for adding, and editing nodes of their selected type. Above the list pane in a GroupMerge node’s Parameters tab are icons to add additional nodes of the selected type, filter the list of nodes, and lock highlighted nodes. Highlighting an entry in the list pane and pressing the D key disables the selected entry.
Introduction to Macros
Macros are nodes that wrap any single node, or group of nodes, and publish them so that their state is saved and they can be recalled in other projects. Macros wrap functionality, allowing you to hide or group logic, so that you can then re-use the macros multiple times. You can create a macro made from groups or from any single node by using the ![]() menu at the top of the node’s Parameters tab, and choosing Save As Macro....
menu at the top of the node’s Parameters tab, and choosing Save As Macro....
Once you have created a macro, it can be added to a project as you would add a regular node, including from the Tab node creation menu. By default, if no other directory options are set, macros are saved into the Home directory in .katana/Macros/_User. Like any other node, they can make use of user parameters for more complex functionality. For more on how to set up user parameters, refer to Adding User Parameters.
You can also place and read macros from other directories included in your $KATANA_RESOURCES environment variable. Macros are picked up from sub-directories called Macros and take the name of the parent directory as a suffix. For example, if you point your $KATANA_RESOURCES to /production/katana_stuff/_studio, you can put macros in /production/katana_stuff/_studio/Macros and they are automatically suffixed with _studio.
If you want the macro to have input or output ports, you need to make sure that there are connections to other external nodes when you create the group. For each original connection from an internal node to an external one, the macro creates an appropriate port.
For more information on creating or recalling macros, refer to Macros.
Introduction to SuperTools
SuperTools are like macros but written in Python. The nodes inside are created and controlled using Python scripts, and you can customize how parameters are presented using PyQt. For more information on writing SuperTools, refer to Writing a SuperTool.
Alternatively, for more technical information about how to set up SuperTools using the NodegraphAPI and the Plug-in Registry, refer to SuperTools.