Setting Different Display Properties for Some Locations
You can override the currently selected display method for a number of locations within the Viewer tab using the ViewerObjectSettings node. To change how one or more locations are displayed:
| 1. | Add a ViewerObjectSettings node to the recipe at some point before the current view node. |
| 2. | Select the ViewerObjectSettings node and press Alt+E. |
The ViewerObjectSettings node becomes editable within the Parameters tab.
| 3. | Assign the scene graph geometry locations of the objects to influence to the CEL parameter. See Assigning Locations to a CEL Parameter for more on using CEL parameter fields. |
| 4. | Set any changes to how the locations should be displayed using the node’s parameters. The following display options can be set: |
(in the drawOptions parameter grouping)
• hide - when set to Yes, the selected locations are hidden (as are their children).
• fill - changes how the location is displayed, as points, as a wireframe, as a solid, or to use the Viewer’s default render type (inherit).
• light - changes the lighting model to either the simple shaded model (default) or the current viewer shader (shaded). When set to shaded, the default viewer shader is used if none is currently assigned. Changing an object or lights viewer shader is done in the same way as assigning any other shader. See Material Basics for more information.
• smoothing - changes whether locations have aliasing. You can have aliasing on points, lines, or both (or it can be turned off).
• windingOrder - sets whether the location should be drawn with a clockwise or counterclockwise winding order. The correct value depends on how the imported geometry was exported from its original package.
• pointSize - when displaying the location using the points display type, this option sets the size of the points.
For example, the following image shows two objects, both of which have the same PRMan and Viewer Shader material applied. The Viewer is in Shaded (raw) mode, so each object is lit, and textured.

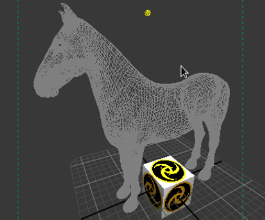
The next image shows the same scene, with the addition of a ViewerObjectSettings node. The CEL in the node points to the pony, and the drawOptions parameters fill setting is set to Wireframe. The Viewer’s draw mode for the pony object is overridden.

(in the annotation parameter grouping)
• text - displays this text with the location.
• color - the background color of the annotation text.
• pickable - when set to No, you can no longer select the object in the Viewer.
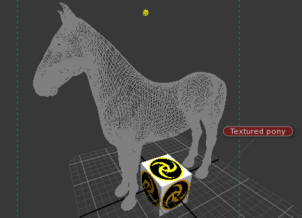
For example, the following image shows two objects, both of which have the same PRMan and Viewer Shader material applied. There is a ViewerObjectSettings node overriding the Viewer mode for the pony, and showing a label with the contents of the text field in the annotation parameters. The background color of the label is taken from the color field in the annotation parameters.

Overriding the Display Within a Specific Tab
You can change the shading settings in a specific tab to reduce or improve the quality. This is useful when positioning a light in one tab while viewing the effect in another.
To change a Viewer tab’s display, use the Options menu in the bottom-left of the tab. Each menu option corresponds to a similar one under the Display menu and acts as an override. To remove any override use No Change.
