Creating a Look File Using LookFileBake
The LookFileBake node is used to compare the scene graph generated at two points within the node graph, an original and a second point downstream of the original. At each location below the LookFileBake node’s rootLocations parameter the difference between the original scene graph and the downstream scene graph is recorded.
Creating a Look File
| 1. | Create a LookFileBake node and place it anywhere within the Node Graph. |
| 2. | Connect from a point in the recipe where the bake asset has no materials assigned to the orig input of the LookFileBake node. |
Tip: Connecting from a point straight after the geometry has been imported usually produces the best results.
| 3. | Connect an output from downstream in the recipe, where the asset has the look you want to bake, to the default input of the LookFileBake node. |
| 4. | Select the LookFileBake node and press Alt+E. |
The LookFileBake node becomes editable within the Parameters tab.
| 5. | In rootLocations, enter the scene graph location to traverse. |
Tip: It is a good idea to make sure rootLocations matches the location the asset was initially imported.
You can traverse multiple locations by using Add Locations to the right of the rootLocations parameter. For more information on adding path locations using location parameters, see Node Parameter Basics.
| 6. | Enter the asset name for the look file in the saveTo parameter. |
| 7. | Click the Write Look File button. |
The Write Look File dialog displays.
| 8. | Select where the asset is going to be saved (it defaults to the saveTo parameter) and click Accept. |
Katana starts to bake out the look file. This may take some time as all locations in rootLocations must be fully expanded for each pass and all their attributes compared. Any differences detected between the scene graph generated at the orig input and the scene graph generated at the pass inputs are written to the look file.
Adding Additional Locations and Using rootIds
A LookFileBake can compare multiple original points (root locations) with a single downstream location, potentially recording the changes to multiple assets, located under different scene graph branches. When resolving a Look File with multiple root locations, Katana attempts to match root locations in the Look File, with scene graph locations in the target scene.
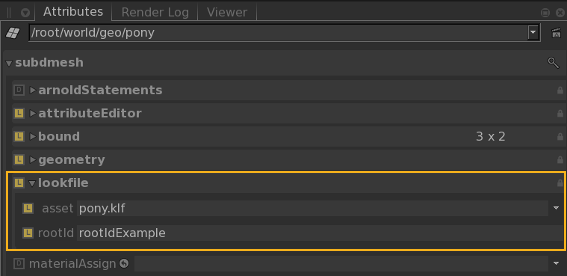
You can specify a user attribute called rootId for any scene graph location, and - if that location is used as a root locations in a LookFileBake - use rootIds to help determine which scene graph location the resulting Look File is resolved to. A rootId is an attribute of type string, under lookfile.rootId in a scene graph location’s Attributes.

Note: To create a user attribute lookfile.rootId, use an AttributeSet node pointed to the target location. Set the action field to Create/Override, the attributeName field to lookfile.rootId, the attributeType to string, and groupInherit to Yes. In the stringValue field, enter your chosen rootId. For more on using AttributeSet nodes, see Making Changes with the AttributeSet Node.
Note: You can select any scene graph location as a root location. It determines the first level of the relative path - or paths - generated by a LookFileBake.
When a LookFileAssign is resolved, local paths are determined using either the root location names of source and target, or if specified by the unique rootIds of source and target root locations. Materials from a Look File are applied using a combination of the determined local paths, and the name of the location the material is applied to.
In an example with multiple root locations, and materials at multiple child locations, there are a number of possible outcomes when the resulting LookFile is resolved:
• With rootIds set, and matching location names, the materials are assigned as expected.
• With no rootIds, but location names the same, one of the multiple source materials is assigned. There’s no way to guarantee which one.
• With no rootIds and different location names, one of the multiple source materials is assigned. Again there’s no way to guarantee which one.
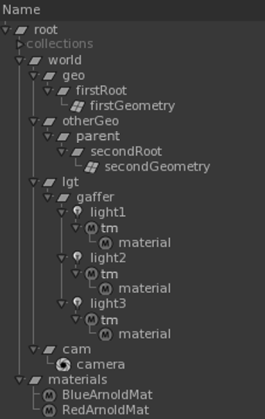
The scene graph shown below has multiple root locations firstRoot and secondRoot, with geometry under each.

In this case, each root location has geometry with applied materials in the path below it, and we want to include those materials in a Look File. We also want to use rootIds to determine the resolve locations of the Look File, so scene graph locations firstRoot and secondRoot each have a unique rootId. See Look Development with Look Files for more on Look Files, and their uses.
To use rootIds in a LookFileBake with multiple root locations, first set rootIds on the root locations, then add each root location to the rootLocations field in a LookFileBake node before writing a LookFile:
• In a scene like the one shown below, with multiple scene graph root locations, add rootIds to each root location using an AttributeSet node.
• Add a LookFileBake node.
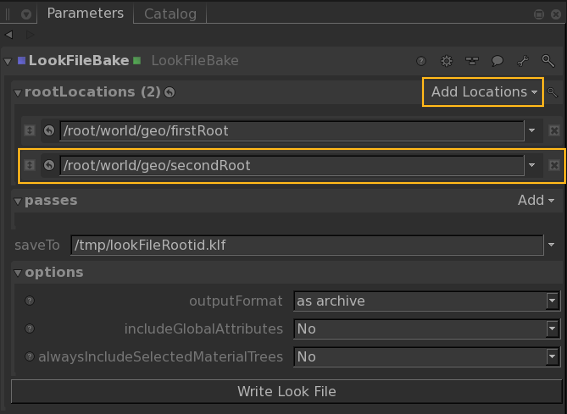
• Edit the LookFileBake node, select Add Locations > Path, in the node’s Parameters tab and enter the path of a scene graph location you want to add into the resulting rootLocations field. Repeat for each additional root location you want to add.

• Write the Look File.
The Look File stores local paths using each rootId as the top level, as well as the asset names.
Note: If the chosen root location has a rootId, it is included in the LookFileBake. If not, the location name is used.
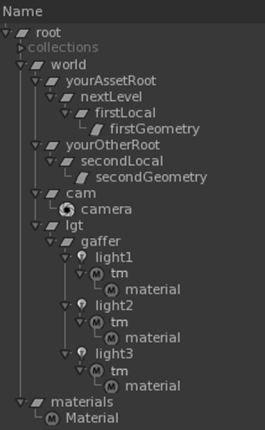
Using a LookFileAssign node, bring the Look File into a new scene, with different scene graph location names, and paths (such as the scene shown below).

Although the paths, and path names are different, the geometry locations firstGeometry and secondGeometry have the same relationship to locations firstLocal and secondLocal that the same locations did to firstRoot and secondRoot in the original scene. So, as long as firstLocal shares a rootId with firstRoot, and secondLocal with secondRoot, and the geometry location names are the same, the Look File assigns as expected.
Adding Additional Passes to a Look File
| 1. | In the LookFileBake node, select Add > Add Pass Input to the right of the passes parameter grouping. |
A new pass name parameter displays.
| 2. | Type the name of the new pass in the name parameter. |
A new input is added to the LookFileBake node, named according to the name of the new pass
| 3. | Connect the new input of the LookFileBake node to the output of the point in the recipe you want to record the look of. |
Having the Look File Include any Changes to /root
Select Yes for the includeGlobalAttributes dropdown inside the options parameter grouping of the LookFileBake node.
Including Materials within the Look File
Look files automatically include materials that are assigned to geometry below locations it traverses (as are renderer procedurals). On occasion it might be useful to include extra materials created during look development to be read in later using the LookFileMaterialsIn or Material nodes.
To force materials to be included within the look file:
| 1. | In the options parameter grouping of the LookFileBake node, select Yes for the alwaysIncludeSelectedMaterialTrees dropdown. |
A locations widget displays.
| 2. | In selectedMaterialTreeRootLocations, enter the material root scene graph location of the materials to include. |
Multiple locations can be included by using Add Locations to the right of the selectedMaterialTreeRootLocations parameter. For more information on adding path locations using the location widget, see Manipulating a Scene Graph Location Parameter.
Note: Two things that are not recorded when a look file is written: changes over time (only differences for the current frame are recorded) and deleted locations (locations cannot be removed by look files - for geometry, a similar effect can be achieved by setting its visibility to off).
