Managing Your Team Licensing Organization
This section covers all the information that Team Login Licensing admin users (OrgAdmins), need to know to add and manage users in their Team Login licensing organization and to control who has access to their licenses.
Team Members' ability to access licenses is managed through Entitlement Pools and Groups. Entitlement Pools, Groups and Team Members can all be accessed by admins via the Organization Dashboard.
Note: If you are migrating from RLM licenses to Team Login Licenses, please follow the steps found in the Instructions for Users Transferring to Login Licensing article available on the Support Portal. If you have an active RLM license installed on your machine, your Foundry application will automatically detect and use that license. In order to use Team Login licenses, your RLM license must be disabled.
Adding Users to Your Organization
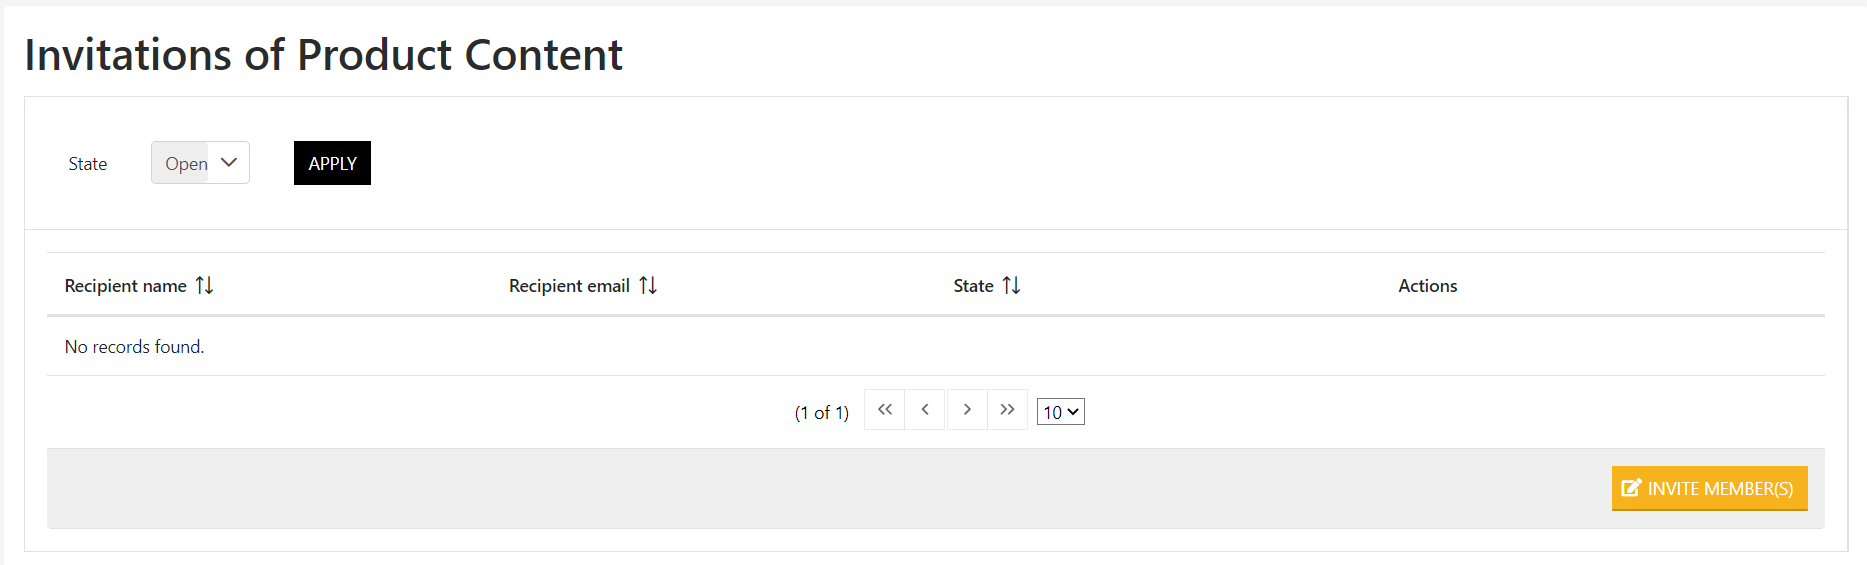
Organization admins can add users to an organization via the Invitation Menu in the OrgAdmin Dashboard.
To access the Invitation Menu:
- Log into the OrgAdmin Dashboard
- Select the Invitations tab from the top navigation menu.
- Click Invite Members.
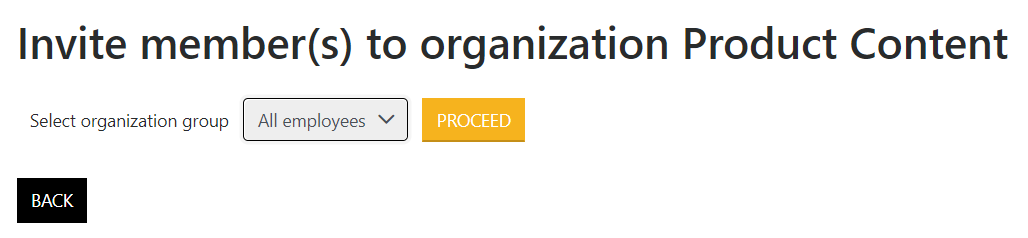
- Select an organization group from the dropdown menu to add team members.
If you are the Admin of more than one organization, choose the organization you want to manage from the dropdown.
Tip: The OrgAdmin dashboard can be accessed by clicking the Organization Admin Dashboard button found in the Team Licenses menu within the Login licenses tab under My Account on foundry.com
Note: In order to access the license all members must be invited to the default Employees of X group that is created when your licensing organization is set up. Do not change the group type from ‘Employees’ to ‘License Consumers’ as this will break access to your licenses. Once added to the Employees of X group, team members can be added to other groups, which are used to restrict access to certain entitlements on a per-group basis. For more information on groups, see Creating Groups and License Pools.
Once a group has been created, you are presented with the Draft Invitations window. Here, you are able to create invitations for a single user, or create multiple invitations at once in a batch.
Creating a Single Invitation
To create a single invitation:
- Click Add.
- In the window that appears, enter the recipients email address and name.
- Click Save.
- Click Approve and Send to send invitations to invitees.
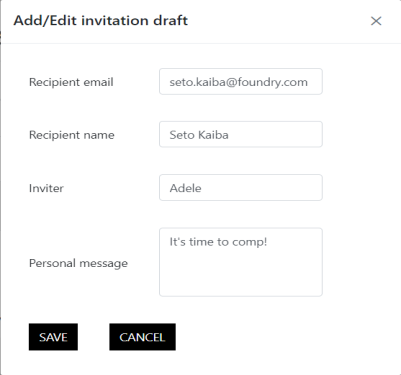
Note: The name in the Inviter field is populated by the name of the admin inviting the member, but this can be changed manually. You are also able to add a description to invitations, but this is an optional step.
The draft invitation is added to the list of draft invitations.

Note: Steps 1-3 can be repeated as many times as needed before clicking Approve and Send.
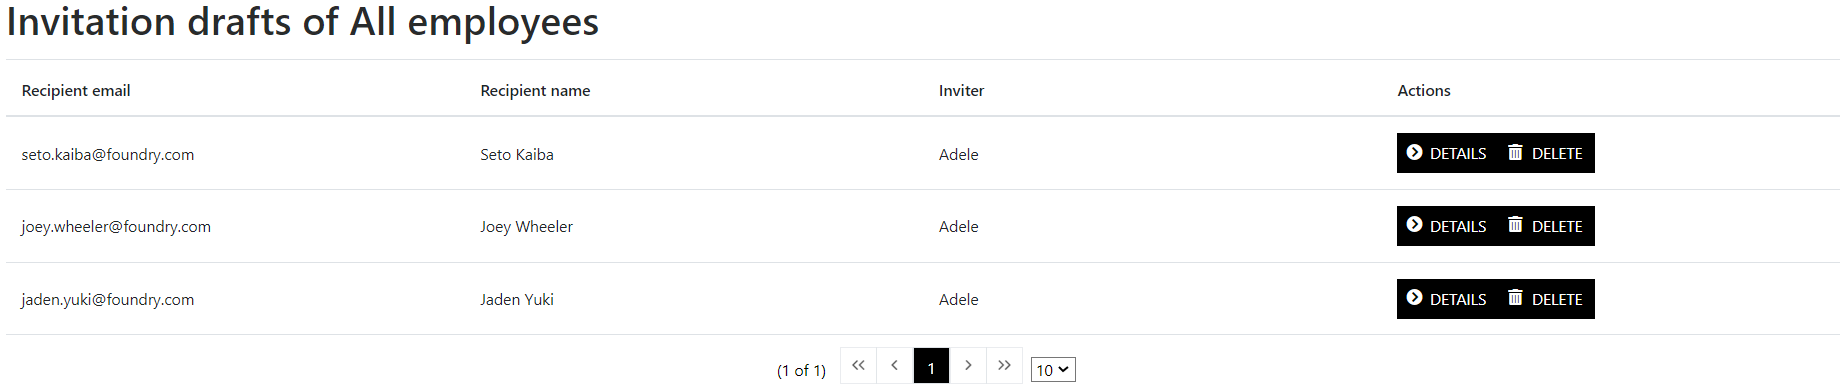
Creating Invitations in Bulk
You can create multiple invitations at the same time, by adding a batch of user details.
All invitations must be formatted in the following way:
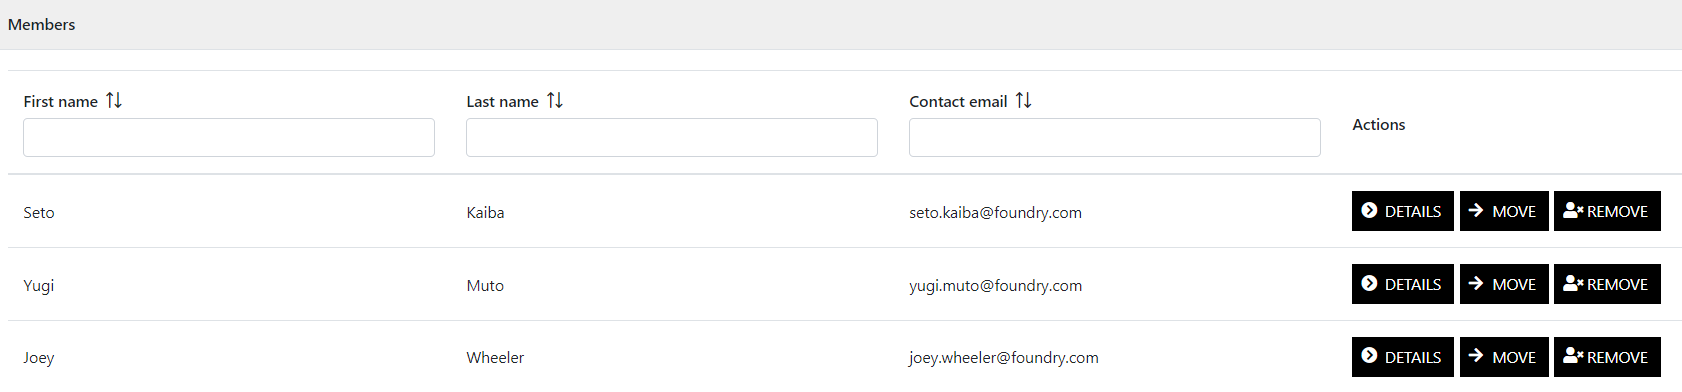
Email,FirstName,LastName
These entries must be separated by , (comma) and must not include any spaces. All entries for individual users must be separated by a line. For example:
seto.kaiba@foundry.com,Seto,Kaiba
joey.wheeler@foundry.com,Joey,Wheeler
jaden.yuki@foundry.com,Jaden,Yuki
To send a batch invite:
- Click Add from Batch.
- Enter the email, first name(s), and last name(s) of the users to be invited in the window that appears.
- Click Add.
- Click Approve and Send to send invitations to invitees.
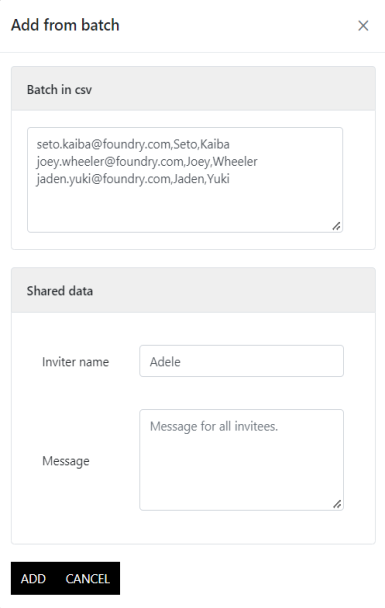
The invitations are added to the list of draft invitations as individual entries.
Note: Invitations are not sent to invitees until Approve and Send is clicked. Invitations are kept in a draft state until then and are not stored if the page is navigated away from or your session times out.
How to Promote Users to Admin Status
When a Team login licensing organization is first set up, a single user is nominated as an admin. That admin can promote other users to admin status once they have been invited to and accepted the invitation of the organization.
Admins can easily promote team members to admins. As an admin, the team member can invite and remove users, create groups and entitlement pools, split licenses between pools, and reserve licenses for users.
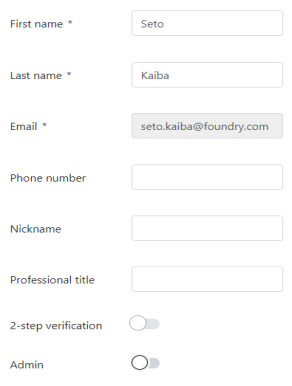
To promote a user to an admin:
- Navigate to the Users tab in the top navigation bar.
- Click Details next to the user you want to be promoted to admin.
- In this window, toggle the Admin button.
- Click Save.
The following window appears:
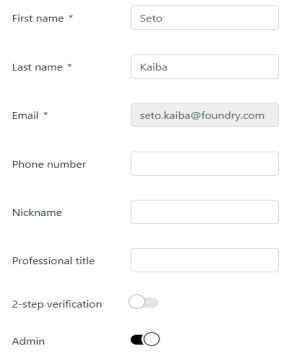
The user has access to the OrgAdmin dashboard.
It is important you do not remove the last admin user on your account, or you will lose all access to the OrgAdmin dashboard.
Controlling Access to Licenses
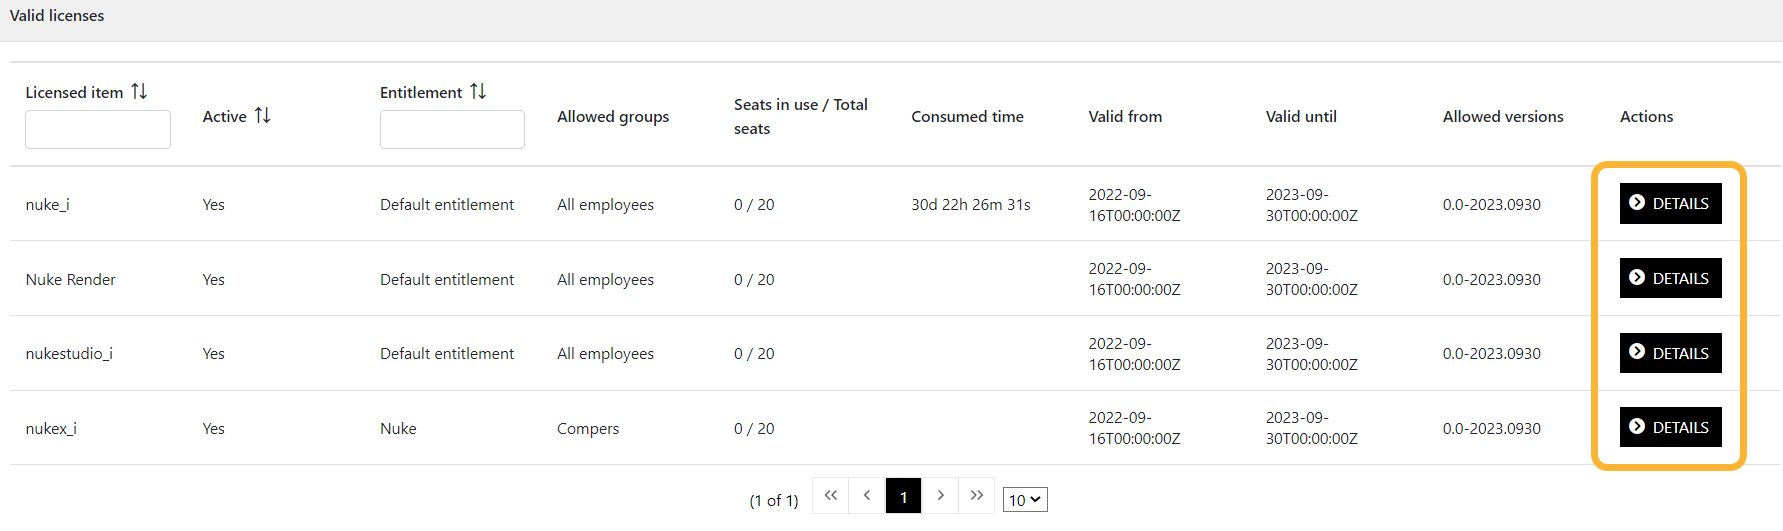
Access to Team Login licenses is controlled through Groups and Entitlement Pools.
- Entitlement Pools store your licenses and their seats in a bucket.
- Groups contain members of your organization, and can granted access to specific pools depending on which application they need to access.
When your Team Login Licensing Organization is created there will be one Entitlement Pool (Default) with your licenses in it and one Group (Employees) who will have access to the default pool. This simple setup works if you're happy for all of your users to access all of your Team Login licenses.
If you want to control your license usage you have the option to reserve licenses for named users or create more Entitlement Pools and Groups and choose which Groups access which Entitlement Pools.
Note: The only way to return a license that is currently being used is for the software instance to be closed on the user’s machine. It is not possible to force a license to return to the pool remotely. In practice, this means that you cannot force a license to return to the pool via the OrgAdmin dashboard. For More information on license returns, go to the License Seat Returns section of this page.
Reserving Seats For Specific Users
License seats can be reserved for specific users within a team. To reserve a seat:
- Select Licenses from the top navigation bar.
- Next to the license who's seats you want to reserve, click Details
- Click Reserve Seats.
- Next to the name of the user you want to reserve a seat for, click Reserve Seat.
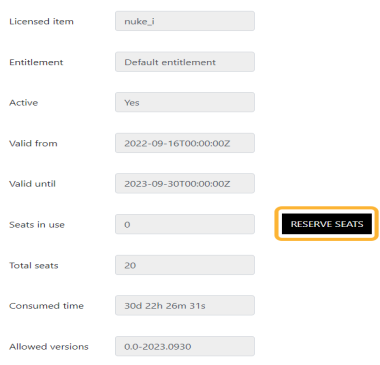
The Available Users window displays how many seats are currently in use, how long the license is valid for and how long a license has been in use.
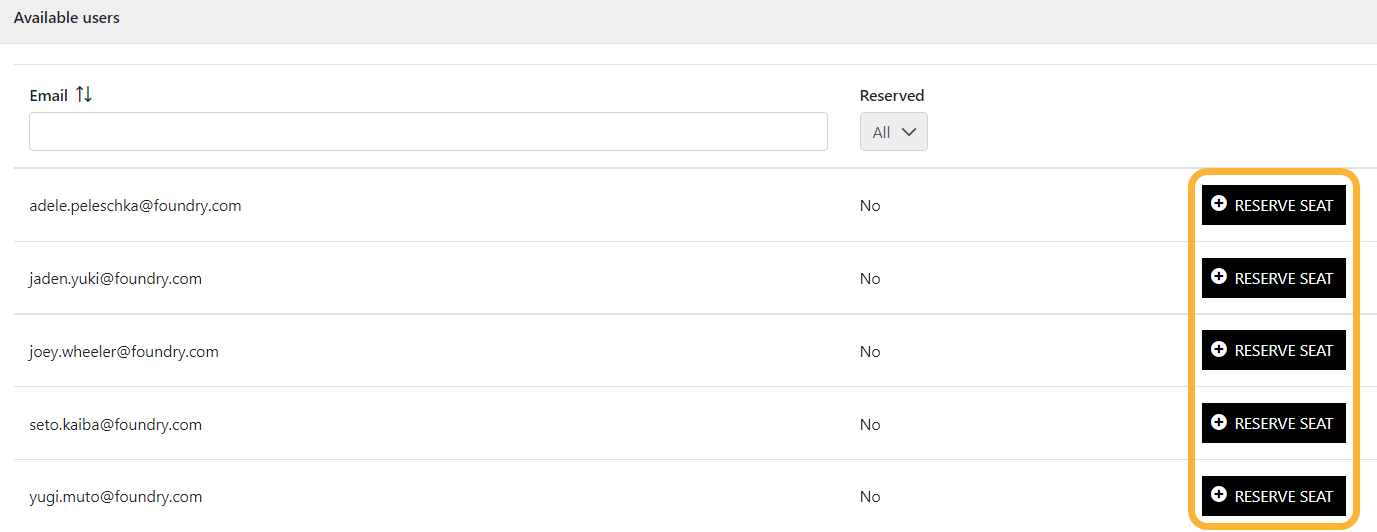
The seat is now reserved.
Once you reserve a seat for a particular user, this seat is no longer available for other users to access, even when this is not in use.
Creating Groups to Control Users’ Access to Licenses
Groups are used to control who has access to licenses within an entitlement pool.
To create a group:
- Select Groups from the top navigation bar.
- Click Create.
- Add a Name, Description and Type for your group.
- Click Create.
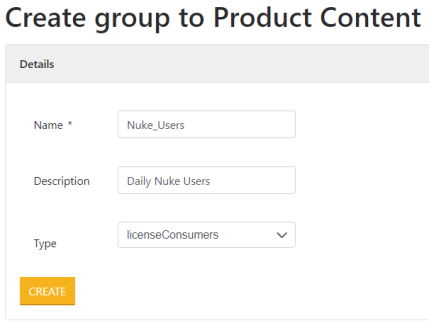
Note: Currently, there can only be one group with type "Employees", which will be the group created with the organization. Users need to be in the "Employees" group in order to query the licensing organization when accessing team login licenses for the first time. When creating additional groups, it is recommended to set new groups with type licenseConsumers and leave the default "Employees" group as type Employees.
Adding Users to Groups
Once a group is created, users can be added to groups. There is no limit to how many groups a user can be added to.
Note: There is no limit to how many groups a user can be added to, but ensure all users are kept in the Employees group whilst adding and removing them from other groups if required.
To add a user to a group:
- Select Groups from the top navigation bar.
- Click Details next to the group you want to add members to.
- Click the Add Member to Group button next to the user(s) you want to add to the group.
Note: You can also directly invite members to groups by clicking Invite Members, but we recommend to invite users into the default Employees group. For more information on inviting members, see Managing Your Team Licensing Organization.
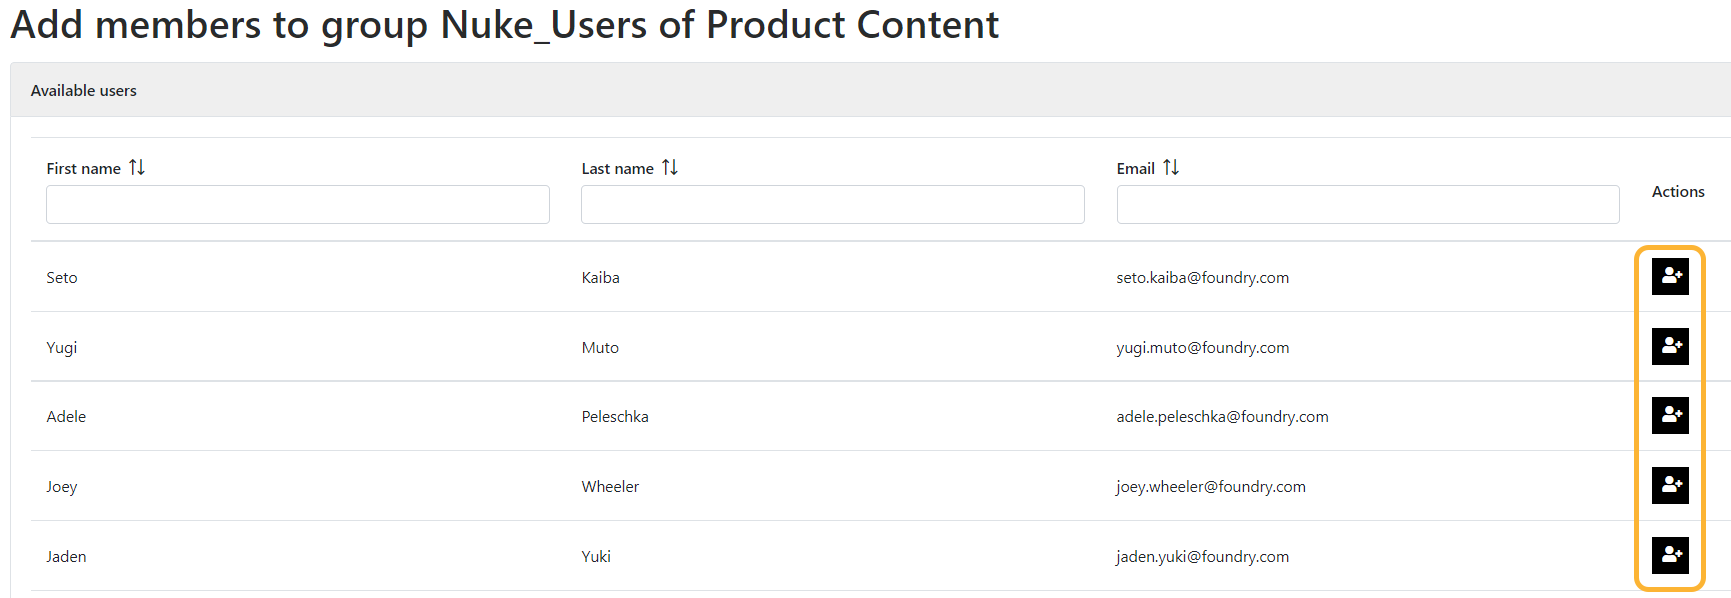
The selected members have been added to the group.
You can view members assigned to a group under the Members field of the group.
Creating Entitlement Pools
Entitlement pools are where your licenses are stored. By default, all licenses are placed into the same entitlement pool. You can create other entitlement pools and move licenses between them. Groups can then be granted access to entitlement pools, giving you granular control over who should and shouldn't have access to licenses.
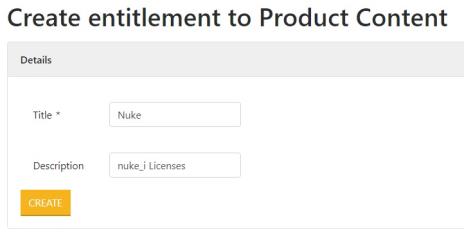
To create an entitlement pool:
- Select Licenses from the top navigation bar.
- Click Create.
- Give your pool a Title and Description.
- Click Create.

Note: By default, all of your licenses are placed in the same pool. After creating a new entitlement pool, licenses can be moved from the default entitlement pool into newly created pools allowing you to isolate licenses. For more information, see Moving Licenses Between Pools.
A license pool has been created.
Assigning Groups to Entitlement Pools
By default, groups cannot access licenses from entitlement pools unless they have been allowed access. This allows you to restrict the usage of certain licenses between certain entitlement pools and groups of users.
Note: For more information on how to create Groups, see Creating Groups to Control Users’ Access to Licenses
To give a group access to an entitlement pool:
- Select Entitlements from the top navigation bar.
- Click Details next to the entitlement pool you want to give a group access to.
- Next to the group you want to have access to the licenses, click Allow.

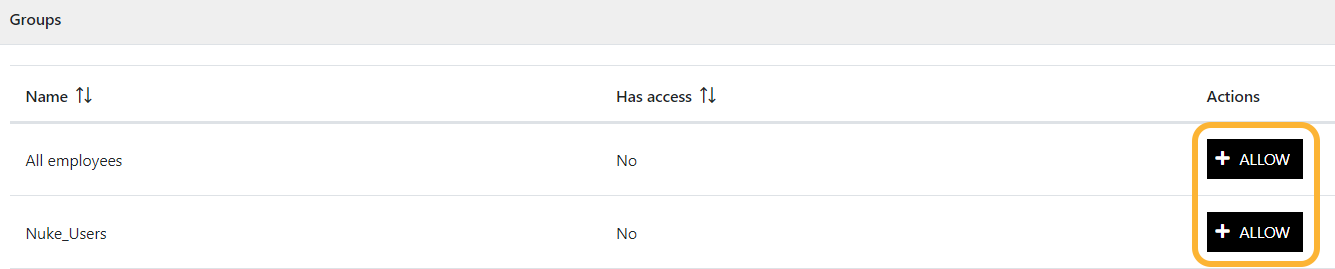
Once allowed, groups have access to licenses and team members within allowed groups have access to the licenses.
Moving Licenses Between Pools
Licenses can easily be moved between entitlement pools, allowing you to create custom groups of licenses for users to access.
To move licenses between license pools:
- Select Entitlements from the top navigation bar.
- Click Details next to the pool containing the licenses you want to move.
- Click Move next to the licenses that you want to move into a different entitlement pool.
- In the dropdown, specify which entitlement pool you want to move the license to.

Note: If this is the first time you're moving licenses, all of your licenses are placed in the same default entitlement pool. If licenses have been moved between pools before, they are in the last group they were placed into.
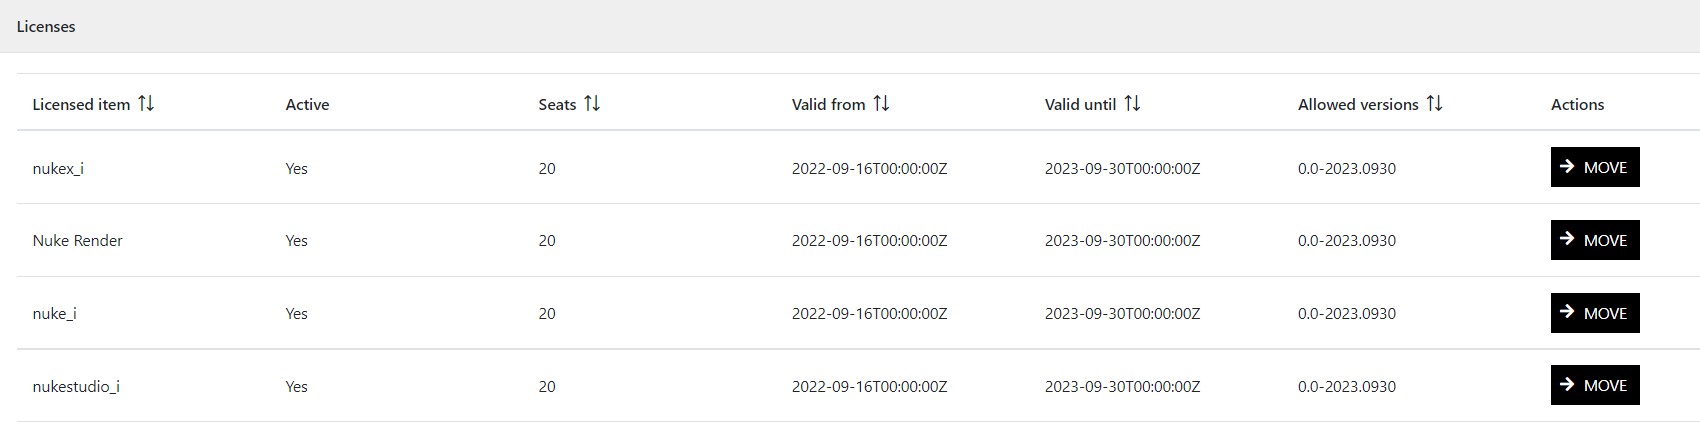
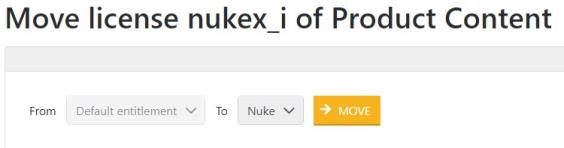
The license(s) has been moved into another entitlement pool.
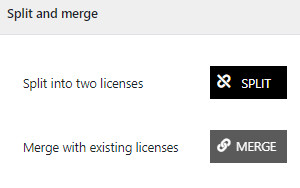
How To Split a License Between Multiple Pools
Admins can split a block of licenses into smaller blocks containing a controlled amount of seats. These smaller blocks can then be moved into different entitlement pools, allowing one license to be assigned to multiple entitlement pools.
Licenses can only be moved between entitlements in the blocks of seats that they appear as within the OrgAdmin dashboard. You may be issued multiple seats within one license block depending on how licenses were purchased. These blocks can then be split into smaller blocks with a specific number of seats, allowing Admins to spread the license between multiple pools.
For example, if you purchased 10 licenses at once, you will receive a block of 10 licenses. However, you may want 6 licenses to be placed in one entitlement pool and 4 licenses in another. To do this, you would need to split that larger licensing block into two smaller ones before being able to move the licenses into two separate pools. This ensures that Team Members are always able to access the licenses that they need, without having to worry about whether or not a specific license has been checked out by another team member.
Once a license is split, a link to the original block of licenses they were split from is maintained, allowing split licenses to be merged back together. This link also allows split licenses to be updated if the licenses are renewed or extended without the need to merge them back together manually.
To split a license:
- Click Licenses in the top navigation bar.
- Next to the license that you want to split, click Details.
- Under Split and merge, click Split.
- In the Seats to Split field, input the number of seats that you want to be split off from the main block.
- Click Split.
Once split, your license appears twice in the Licenses window. The number of seats available in each license changes depending on how many seats were distributed between the two licenses. Separate licenses created when a license is split are added to the same entitlement pool as the original license. You can move the different license blocks into other entitlement pools by following the steps covered in Moving Licenses Between Pools.
Merging Licenses
Once a license has been split, Admins can merge them back together again. This can be useful if working on a project that requires a change in how your licenses are distributed or new team members with specific licensing requirements are added to your Team Organization.
Note: You can only merge licenses that were created from the same original license block. For example you cannot merge the nuke_i licenses from different NukeX and NukeStudio purchases.
To merge a license:
- Click Licenses in the top navigation bar.
- Next to the license that you want to split, click Details.
- Under Split and merge, click Merge.
- Next to the compatible license that you want to merge with, click Merge

Once merged, you have one less block of license seats available in the Licenses window. The merged license is placed into the entitlement pool you merged from.
License Seat Returns
When a user with unreserved/ unroamed license seats closes the last instance of the software they are using, the license seat will be returned to the pool. This license seat can then be used by another person. This process can only be done from the machine where the license seat is being used; it is not possible to close the software remotely or return the license seat from the OrgAdmin dashboard.
Article: If you experience issues with licenses not returning correctly once the software has been closed, go to KB article Q100727: What to do if your team license seat has not been returned to the organization. This article also covers best practices when using Team license seats.