Search is based on keyword.
Ex: "Procedures"
Do not search with natural language
Ex: "How do I write a new procedure?"
Modifying Custom Shelves and Their Contents
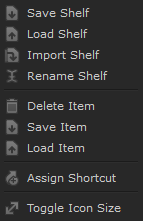
The Shelf palette includes a right-click dropdown menu with options to rename, delete items from, and assign shortcut keys to items in the Personal, Project, or custom shelves. (It also includes features to Importing and Exporting Shelves and Items.)
Tip: Some of the customization features are not available for some of the preset brushes shelves (their name and contents cannot be changed).
| 1. | To rename a shelf, right-click anywhere in the shelf and select Rename Shelf. |
The Rename Shelf dialog box displays.
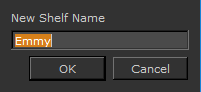
| 2. | Type the new name, and click OK. |
Mari renames the shelf.
| 3. | To delete an item from a shelf, right-click it and select Delete Item. |
Mari removes that item from the shelf.
| 4. | To assign a shortcut key to an item in a shelf, right-click it and select Assign Shortcut. |
The Assign Keyboard Shortcut dialog box displays.
Tip: Resize columns and the dialog box to better view shelf names and the Shortcut column.
| 5. | Double-click in the Shortcut column for the selected item, type a shortcut key, and click OK. |
You can now use that shortcut to select that item.
| 6. | To delete a shelf, open it, and click  at right. Mari asks you to confirm deleting the shelf and all its contents. at right. Mari asks you to confirm deleting the shelf and all its contents. |
| 7. | Click OK. |
Mari deletes the shelf.
Experiment: As a learning exercise, try this: create a custom shelf, rename it, add an item to it, rename the item, delete the item, then delete the shelf.
Sorry you didn't find this helpful
Why wasn't this helpful? (check all that apply)
Thanks for your feedback.
If you can't find what you're looking for or you have a workflow question, please try Foundry Support.
If you have any thoughts on how we can improve our learning content, please email the Documentation team using the button below.
Thanks for taking time to give us feedback.