Search is based on keyword.
Ex: "Procedures"
Do not search with natural language
Ex: "How do I write a new procedure?"
Customizing a Brush
Customizing brushes involves three main steps: selecting a preset, changing its properties, and saving it to a shelf.
| 1. | On the left-hand Tools toolbar, select a painting tool such as Paint, Blur, Vector Paint, Paint Through, Gradient, or Clone Stamp. |
| 2. | Open the Shelf palette, select a shelf for a category of preset brushes, and select a brush. |
| 3. | Open the Tool Properties palette and change the Brush Properties. |
| 4. | In the Shelf palette, select the Menu shelf, Personal shelf, Project shelf, or any other custom shelf you may have created. |
| 5. | Drag the customized brush from Mari's top toolbar to the Shelf palette's shelf on which you want to store the brush. |
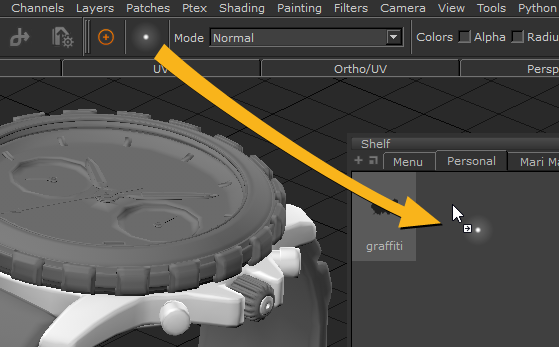
Note: You must drag modified brushes from the toolbar. If you drag a modified brush from an existing shelf, such as Basic Brushes, any changes you made are discarded.
The modified brush displays in the selected shelf. By default it is named Brush (and then Brush_1, Brush_2, and so on.
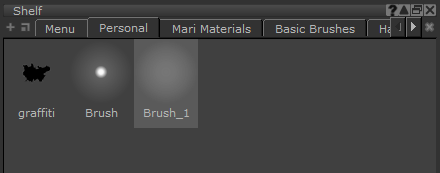
| 6. | To rename a brush, double-click its name, type a new name, and press Enter. |
| 7. | To save your new customized brush, save your project. The Project shelf only stores brushes per project. |
Note: Any brush tip that you select is shown as an outline for the brush cursor design with any tool that allows you to apply paint to the model, for example, Paint, Paint Through, and Clone Stamp, among others. This cursor outline scales according to the radius of the brush tip, but does not reflect other options, such as jitter or opacity.
Tip: To a delete a custom brush, select the brush then right-click and select Delete Item from the dropdown menu. You can also press Backspace or Delete.
Tip: Try creating three custom brushes you might actually use and test them out on a model. If it doesn’t turn out as you expected, try customizing it and re-saving it to your Personal shelf.
Sorry you didn't find this helpful
Why wasn't this helpful? (check all that apply)
Thanks for your feedback.
If you can't find what you're looking for or you have a workflow question, please try Foundry Support.
If you have any thoughts on how we can improve our learning content, please email the Documentation team using the button below.
Thanks for taking time to give us feedback.