Search is based on keyword.
Ex: "Procedures"
Do not search with natural language
Ex: "How do I write a new procedure?"
Available Filters
We mentioned previously that an Invert checkbox and a Mask Curve editor displays in certain situations. These options are universal to all filter operations that use a channel or an image from the Image Manager as a mask.
The Invert checkbox decides whether Mari inverts the input from the mask. If this is selected, the mask data is black on white rather than white on black.
The Mask Curve editor sets how the channel masking works. The x axis is the color of the source pixel (black to the left and white to the right). The y axis is how paintable the target pixel is. By default, the curve runs from the bottom left up to the top right. This means that black pixels are totally masked, white pixels are totally paintable, and there's a constant curve between the two. Use this if you want to change what pixel values are masked.
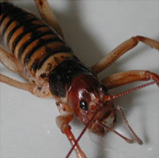
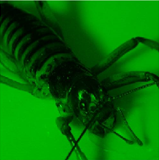
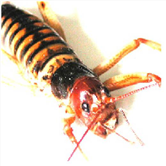
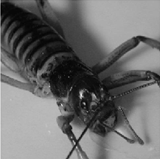
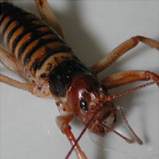
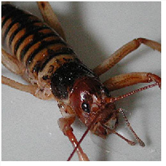
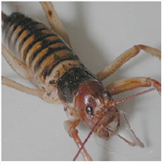
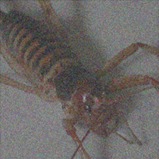
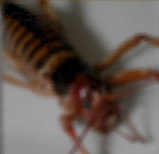
The following table describes and shows examples of each of the filters that come with Mari, applied to the following image:
Filters Menu
|
Filter |
Description |
Options |
Example |
|
Invert |
Inverts the colors in the selection. Replaces colors with their “opposite” in the color chart. For example, replaces a color with a float value of 0.3 with a color with float value 0.7. |
You can set whether to invert the Alpha channel as well as the colors. |
|
|
Luminosity |
Outputs just the luminosity value of each pixel in the selection. That is, it outputs a grayscale image based on the brightness of each of the pixels in the original image. |
None. |
|
|
Blur |
Applies a standard blur to the selection. |
You can select the blur radius - the number of pixels Mari uses when calculating the blur value for each pixel. The higher the radius, the more blurred the results. If you use a larger blur radius, you may get slight lines on the boundaries between patches. This is an artifact of the way that Mari handles the edges of patches. |
|
|
Soften Blur |
Applies a subtle softening blur. This is a quick, predefined blur filter. If you need more control over the degree or type of blurring, use either the standard Blur or Gaussian Blur filters. |
None. |
|
|
Gaussian Blur |
Applies a Gaussian blur. Compared to the standard Blur filter, this gives you much finer control over the degree of blurring, and the option of using much higher blur values. |
You can set both the Radius and the Amount. The higher the radius, the more blurred the results. Amount defines how much to mix the blurred result with the original. If you use a larger blur radius, you may get slight lines on the boundaries between patches. This is an artifact of the way that Mari handles the edges of patches. |
|
|
Gamma |
Changes the gamma levels in the selection. |
Do Inverse reverses the gamma conversion. That is, a higher setting for Gamma results in a more washed-out looking image. Selecting Use default gamma disables the other controls and uses your default setting for gamma (as set in the Painting tab of the Mari Preferences dialog box, accessible from the Edit menu). Otherwise, select a particular gamma level. |
|
|
sRGB To Linear |
Applies an sRGB to |
Checking Invert applies a linear to sRGB colorspace conversion. |
|
|
Hue |
Changes the hue, saturation, and value of the colors on the model. |
To change the hue of the colors, set the value for Hue. This moves the colors around the color wheel. The rotation value is the degree around the color wheel that each color shifts, between 0 and 360 (which both correspond to the original colors). The options to change the • Saturation - how large the saturation is. Select a multiplier from 0 to 2, where 1.00 is the original saturation value. • Offset - an offset value to add to the initial saturation value, before applying the scale. You can also edit the Saturation curve. This controls how the filter translates current saturation values to new values. For each input value along the bottom of the graph, the output value is set from the position of the line above that point. Edit the curve by: • pulling the anchor points • clicking between anchor points to add a new point • right-clicking to select from a set of preset values. You can edit the Scale, Offset and Value curve for the value of the colors in the same way. |
|
|
Brightness |
Changes the brightness of the paint on the model, either overall or for specific channels. You can also change the contrast at the same time. |
You can either change the brightness of all color channels at once, or one-by-one. Changing the main Brightness control changes (overwrites) any changes you make to brightness values for individual color channels. |
|
|
Contrast |
Changes the contrast of the paint. |
You can select the amount of contrast using the slider. |
|
|
Clamp |
Clamps color values to lie within the specified upper and lower values. |
You can set the Upper Value and Lower Value by adjusting the sliders or entering values in the text fieldes. Select the individual Color Component to clamp in the dropdown menu. |
|
|
Levels |
Changes the color levels in the paint. You can change the white, midtone and black points for each color channel or all together. |
As you change the settings, the display at the top of the dialog box updates to show the current white point, midtone, and black point. You can set the: • Color Component - whether this is affecting the overall Value of the color, or the specific color channel (Red, Green, or Blue). • White Point - the upper limit of displayed color intensity. Areas with a value higher than this are mapped to 1 (white). • Midtone - the middle point between white and black. Mari remaps the values so that this is the middle of the range between the white point and black point. Moving this pushes the values towards that end of the spectrum. • Black Point - the lower limit of displayed color intensity. Areas with a value lower than this are mapped to 0 (black). • White Output Level - how strongly to output the white in the filtered image. Higher values show the entire white output, lower values show decreasing amounts. • Black Output Level - how strongly to output the black in the filtered image. Higher values show the entire black output, lower values show decreasing amounts. |
|
|
Color Curves |
Changes the color curve for each color channel (RGB) in the painting. |
You can also edit each color curve, controlling how each color channel appears on screen. This controls how the filter translates current color values to new values. For each input value along the bottom of the graph, the output value is set from the position of the line above that point. Edit the curve by: • pulling the anchor points • clicking between anchor points to add a new anchor point • right-clicking to select from a set of preset values. |
|
|
Color Switches |
Turns individual color channels on or off. |
Use the checkboxes to select which color channels display. When Mari applies the filter, it removes any unchecked color channels from the painting. |
|
|
Tone Mapping |
Varies the “exposure” of the painting. |
You can set the: • White Point - the upper limit of displayed color intensity; any colors of greater intensity map to white. • Exposure - lower exposures give darker images; higher exposures give lighter ones. |
|
|
Copy Channel |
Copies the value from one RGB color channel to the other two. The result is a grayscale image with the intensity values from the selected channel. |
Select the source channel from the list. When you apply the filter, Mari copies the selected channel over the other two channels. |
|
|
Premultiply Alpha |
Either pre- or post-multiplies the alpha in the selected image. If you are painting using an image without premultiplied alpha onto one with it, use this filter to perform the premultiplication, so the images match and you avoid lines around the outside of the patch. (Postmultiply works the same, but in reverse (removes premultiplication to match images that do not have premultiplied alpha). |
If the Postmultiply box is checked, this acts in reverse (that is, removes premultiplied alpha). |
|
|
Edge Detect |
Finds “edges” (transitions between colors) in the image and heightens them. |
None. |
|
|
Emboss |
Applies an “emboss” effect, so that textures look “raised” on the surface. |
None. |
|
|
Sharpen |
Removes 'fuzziness' and clarifies detail in the image. |
You can set the amount of sharpening. Higher values mean more sharpening, while a value of 0.00 is the picture without the filter applied. |
|
|
High Pass |
Removes low frequency information from the image while maintaining higher frequency detail. This can be useful for quickly creating specular maps where only the higher frequency image highlights are maintained. |
You can set the kernel size (the amount of filtering) by adjusting the Radius. If you use a large radius, you may get slight lines on the boundaries between patches. This is an artifact of the way that Mari handles patch edges. This filter is not supported with Ptex channels. |
|
|
OCIO Colorspace |
Applies a colorspace correction to the current channel or painting. |
Set the colorspace of the current channel or painting in the Input Colorspace dropdown. Set the colorspace correction to apply to the current channel or painting in the Output Colorspace dropdown. |
|
|
Add Noise |
Applies noise to the current channel or painting. |
Use the Amount slider to adjust how much noise is applied and select the component you want to affect from the Color Component dropdown. For additive grayscale noise, that modifies the intensity while retaining the original color, check the Grayscale checkbox. You can regenerate the noise using different random samples by dragging on the Seed slider. Adjust the size of the noise applied by dragging on the Size slider. |
|


Objects Menu
|
Filter |
Description |
Options |
Example |
|---|---|---|---|
| Gaussian Blur | Applies a Gaussian blur. Compared to the Filters menu Gaussian Blur, this allows you to apply a blur effect over whole objects in 3D space. |
Set the Geometry Version so it knows what object to which the blur should be applied. For animated objects, Frame specifies on which frame the blur should be applied to the object.
|
|
| Displacement |
Allows you to generate a displacement map, using a high polygon source model and a low polygon destination model to calculate the displacement. |
Select the source Object, Version, Size, and the Frame (if animated) from the options provided for the high polygon model, and specify what destination version and frame to which the displacement should correlate on the low polygon model. Adjust the sampling options, such as Interpolation and Sample Count to specify how the displacement map is generated. |
|
| Height |
Allows you to generate a height map, using a high polygon source model and a low polygon destination model to calculate the height. |
Select the source Object, Version, Size, and the Frame (if animated) from the options provided for the high polygon model, and specify what destination version and frame to which the height should correlate on the low polygon model. Adjust the sampling options, such as Interpolation and Sample Count to specify how the height map is generated. |
|
Sorry you didn't find this helpful
Why wasn't this helpful? (check all that apply)
Thanks for your feedback.
If you can't find what you're looking for or you have a workflow question, please try Foundry Support.
If you have any thoughts on how we can improve our learning content, please email the Documentation team using the button below.
Thanks for taking time to give us feedback.