Moving, Viewing, and Locking Objects
Mari allows you to move objects freely across the canvas. For example, you might need to move an object which appears on top of an existing object.
Note: Where objects appear on the canvas depends on the configuration of the model file.
To move an object:
| 1. | Select the Transform Selected Objects |
The transform handles (gimbal) appear at the position of the object's pivot point that was saved in the original .obj, .fbx, or .abc file.
| 2. | Drag the object, or use the transform handles to move the object along one of the handle directions in the object's local space. |
|
|
|
|
Initial state. |
Apron moved to the left. |
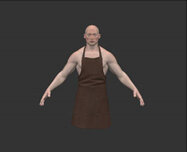
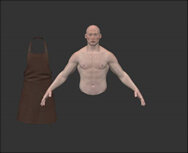
Clicking on an object selects it. You can then configure and edit it, for example, to change to paint on a different channel.
| 3. | The Objects palette lets you show/hide and lock/unlock the object: |

• To show or hide an object, click ![]() .
.
• To lock or unlock an object, click ![]() .
.
| 4. | If you move the object accidentally or want to reset the object back to its original position, Shift+click to reset the object, press the apostrophe key (’) on the keyboard to reset all objects, or select Objects > Reset Object Transform to return the selected entity in the Objects palette back to its original coordinates. |
Tip: You can also use the Transform Selected Objects tool to move lights around (see Configuring the Lighting).
Using the Gimbal
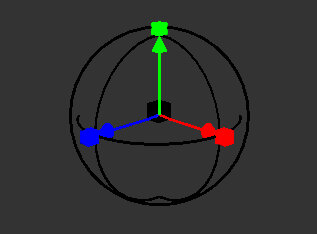
When you want to move an object using the Transform Selected Objects ![]() tool along either Global or Local space, a gimbal appears at the selected object's pivot point. A gimbal allows you to drag on transform handles to move, rotate, or scale the selected object. The colors of the handles correspond to the axes available in 3D space: red transforms the x-axis, green transforms the y-axis, and blue transforms the z-axis. Mouse over parts of the gimbal to highlight the control for each axis.
tool along either Global or Local space, a gimbal appears at the selected object's pivot point. A gimbal allows you to drag on transform handles to move, rotate, or scale the selected object. The colors of the handles correspond to the axes available in 3D space: red transforms the x-axis, green transforms the y-axis, and blue transforms the z-axis. Mouse over parts of the gimbal to highlight the control for each axis.
Moving an Object with the Transform Handles
Drag the arrow to move an object on the given axis:
• X translate (red arrow),
• Y translate (green arrow),
• Z translate (blue arrow), or
• Free translate (center of the gimbal widget)
![]()
Note: Free translation is a 2D (x, y) transformation in the angle of projection of the camera, and can also be achieved by clicking anywhere on the model.
Tip: By default, the gimbal moves the selected object along its local space. You can change this to Global (world) space using the dropdown in the Transform Selected Objects ![]() Tool Properties Toolbar.
Tool Properties Toolbar.
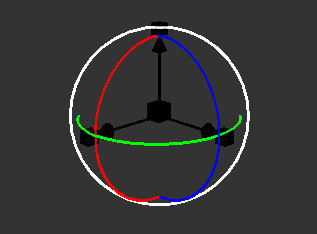
Rotating an Object with the Transform Handles
Drag a specific axis ring to rotate either:
• X rotation (red circle),
• Y rotation (green circle),
• Z rotation (blue circle), or
• from the camera angle (white circle).
Tip: Hold CTRL while rotating with the Transform Selected Objects ![]() tool to snap the rotation of the object or locator. Adjust the stepping angle inEdit > Preferences > Navigation > Stepping Angle.
tool to snap the rotation of the object or locator. Adjust the stepping angle inEdit > Preferences > Navigation > Stepping Angle.
Scaling an Object with the Transform Handles
Click and drag a single axis square to scale on that axis or Ctrl/Cmd+Shift and drag any axis square to scale uniformly on all axes:
• X scale (red cube),
• Y scale (green cube), or
• Z scale (blue cube).