Painting Through an External Image
| 1. | Drag your source image from the Image Manager (or from a shelf) onto the canvas. |
The image “floats” above the canvas, ready to paint through.
Note: If you do not have the Paint Through tool active when trying to drag an image onto the canvas from the Image Manager, Mari automatically switches you to the Paint Through tool to continue.
| 2. | Get the image how you want it: |
|
To... |
You need to... |
|
Move the image around the canvas |
Hold down Shift, click on the image and drag it. Or, click on the white square in the middle of the image and drag it. |
|
Resize the image, preserving the scale |
Hold down Ctrl/Cmd+Shift, click anywhere on the canvas and drag. Or, hold down Shift, click on a side of the image and drag it. |
|
Resize the image in one direction |
Click on a side of the image and drag it. |
|
Rotate the image |
Hold down Ctrl/Cmd, click anywhere on the canvas and drag. Or, click outside the image and drag. |
| 3. | If you just want to stamp the image straight onto the model, press ' (apostrophe). |
Mari stamps down the image, as it is currently floating over the model, onto the surface.
|
|
|
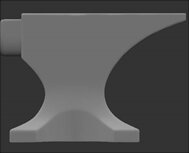
|
Model before painting. |
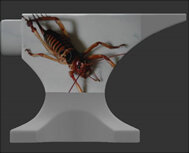
Texture stamped down. |
| 4. | To paint using the brush, just click and drag to paint normally. |
As you paint, your brush paints down the texture from the image at the point you're painting.
|
|
|
|
Model before painting. |
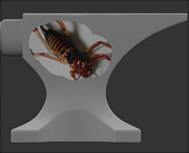
Texture painted through. |

Tip: Painting with the brush lets you more subtlety control how Mari applies the paint - for example, you can use a brush with a relatively low alpha, and “build up” the paint on the model using multiple strokes.
You can apply a color grade to the source image as you paint through. Set the color grade settings in the Source Grade area of the Painting palette. See Clone Stamping for details of how the color grade settings work and the effects you can achieve. For more information about the Source Grade controls,
Experiment: Experiment with different brush settings and their effect on painting through. Adjust details such as opacity, alpha, and noise to affect the way the texture is painted onto the model.
| 5. | You can apply a Tint, which allows you to combine a color with the image to apply a tinted version of the image using Paint Through. |
| 6. | You can also apply a Stencil. The stencil allows you to paint through an image to create a design of the image on the model. |
By default, there is No Stencil applied to the model.