Rendering with Modo
The Modo render script provides you with options so that you can link Mari channels to specific Modo Effects, preview the results, and/or render your textures by sending them to Modo in a flattened state or as a whole.
The preview function sends geometry, textures, and other data to Modo, and tells Modo to preview-render your Mari scene with channels linked to Modo shader effects. If you've specified a file location, Modo saves an .lxo file representing the scene. There are two modes for previewing your model: previewing in a Flattened or Not Flattened state. Previewing, either in a flattened state or as is, produces a full preview window in the palette, which shows you what the texture looks like in Modo. At the same time, Modo is opened and the texture is sent to the application.
The render function sends geometry, textures, and other data to Modo, and tells Modo to render your Mari scene with channels linked to Modo shader effects. If you've specified file locations, Modo saves the rendered image in a .png or .exr file, and the scene in an .lxo file. There are also two modes for rendering your model: rendering in a Flattened or Not Flattened state. Rendering, either in a flattened state or as is, does the same thing as the preview functions do, but also allows you to save the render to a specific location or save the scene as an .lxo file to a specific location.
To send your textures and other data to Modo for preview in the Modo Render palette:
| 1. | Open the Modo Render palette and select the Render tab, if it's not already selected. |
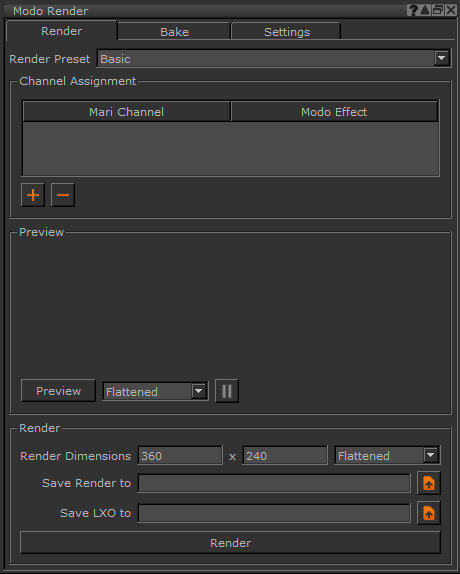
| 2. | Choose a preset from the Render Preset dropdown. The preset allows you to set the render settings you wish to use for previewing and rendering. |
By default, the Render Preset dropdown is set to Basic, which allows Mari to tell Modo to render using Modo's default settings. However, you can set this to None, if you prefer not to use a preset.
| 3. | Under the Channel Assignment section, click the Add button to specify the Mari channels and Modo effects to link. |
The Assign Channel dialog appears.
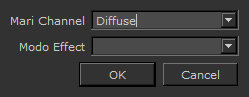
Tip: You can only link one channel and one effect at a time, however, you can add as many channel assignments as you want by repeating step 3.
| 4. | Choose the Mari Channel and Modo Effect you want to link to one another and click OK. |
The channel assignment is shown in the table and, if you have multiple channel assignments, you can scroll though the table to see which assignments are in the list.
| 5. | Specify Flattened or Not Flattened for your preview settings and then click Preview. |
If your project has a lot of UDIMs or high-resolution textures, flattening can take longer than previewing as is. However, previewing Flattened saves time when sending lots of commands to Modo, so it may be faster for lighter projects.
Either option produces a full preview window in the Modo Render palette and sends the texture to Modo. Previewing is nearly real-time, so camera movements made on the canvas also occur in the preview window automatically. If you have clicked Preview already and proceed to make changes to your channels or channel assignments, you need to click Preview again in order for Mari to send new channel data and assignments to Modo.
The camera settings and the field of view for the preview are taken from Mari.
| 6. | Click the pause |
When you click this, any camera changes you make in Mari, especially those stemming from navigation in the canvas, are not automatically updated in the Preview pane. These updates won't be taken into account and sent for preview until you toggle the pause ![]() button again.
button again.
Note: When a preview is active (not paused) only camera updates are continually sent to Modo. If you are navigating around the model and continuing to paint, the paint isn't updated in the preview. To see these changes, you need to Preview the scene again.
Previewing doesn't save out the final rendered image, though it does still send textures and data to Modo. If you have finished with your channel assignments, and you are ready to render your final scene:
| 1. | Follow steps 1-4 in the previewing steplist above. |
| 2. | Specify the Render Dimensions in pixels. |
| 3. | Specify whether you want to render Flattened or Not Flattened, depending on which option is better for your project. If your project has a lot of UDIMs or high-resolution textures, flattening can take longer than rendering as is. However, flattening the channels saves time when sending lots of commands to Modo, so it may be faster for lighter projects. |
| 4. | Specify the location to which the final rendered images is saved on render in the Save Render to field or browse to it with the file browser button. This is only the rendered image file. Modo saves the rendered image in a .png or .exr file format. |
| 5. | Specify the location to which the Modo scene is saved as an .lxo file on render in the Save LXO to field or browse to it with the file browser button. This allows you to open the .lxo file in Modo at a later point after the render has been completed. |
| 6. | Once you've set your render settings, click Render. |
Both Flattened or Not Flattened options produce a full preview window in the Modo Render palette and sends the textures and other data to Modo. It also saves the rendered image file and the Modo scene in the locations specified in Save render to and Save LXO to.
Video: To learn how to use the Modo renderer inside of Mari, watch Using the Modo Renderer.