Using Python in Mari
Mari uses Python 2.7.13 and Unicode Character Set (UCS) 4. Most of Mari’s functions are implemented through the use of manager objects, such as mari.projects, mari.menus, and so on.
Accessing Mari’s Python Documentation
- To view HTML documentation on Mari’s Python API, select Python > Documentation in Mari.
- To view example Python scripts, go to the Media/Scripts/examples sub-directory of the Mari application directory and open any of the .py files there in a text editor. You can also see the results of these example scripts in the Python menu in Mari.
Note: Executing the Python help() command in the Python Console launches the HTML documentation in a web browser.
Tip: To read more about Python, review its documentation, or interact with other Python users, you can visit the Python programming language official website at http://www.python.org/.
Mari's Python Console Palette
Mari's Python Console palette behaves in a very similar way to a standard Python console. To open the Python Console in Mari you can:
• click Python Console in the right-hand palette menu,
• navigate to View > Palettes > Python Console,
• navigate to Python > Show Console in the menu bar or press Ctrl/Cmd+Alt+P, or
• right-click in the toolbar area on top of the Mari workspace and select Python Console.
The Python Console is divided into three parts, the output pane, the toolbar, and the input pane. Use the input pane to enter and evaluate Python statements and the output appears in the output pane.
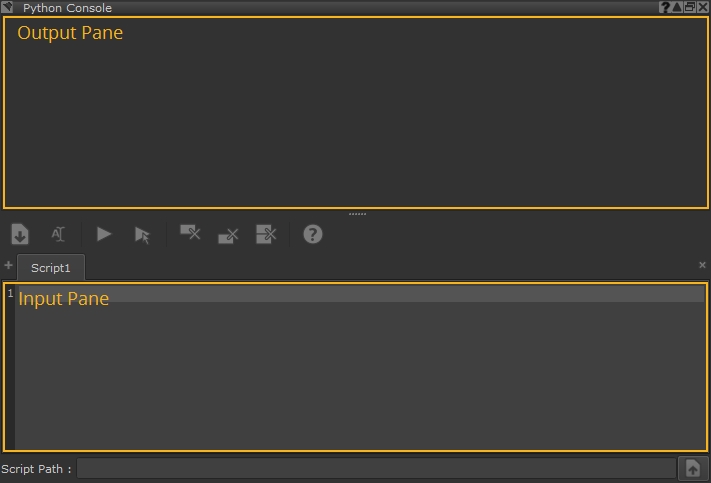
The toolbar manages loading, evaluation, and housekeeping.
|
|
Save As |
Click to save the contents of the current script tab to disk. A browser is displayed to locate the required file path. |
|
|
Rename Tab |
Click to rename the current script tab to something more descriptive. The tab name is the default name given to the save file when you click Save As. |
|
|
Evaluate Input Pane |
Click to evaluate the contents of the current script tab. You can also use the Ctrl/Cmd+Enter keyboard shortcut. The result is displayed in the output pane. |
|
|
Evaluate Selected String |
Click to evaluate only the highlighted strings in the current script tab. You can also use the Ctrl/Cmd+Shift+Enter keyboard shortcut. The result is displayed in the output pane. |
|
|
Clear Output Pane |
Click to clear the contents of the output pane at the top of the palette. |
|
|
Clear Input Pane |
Click to clear the contents of the input pane at the bottom of the palette. |
|
|
Clear All |
Click to clear the contents of both the output and input panes at once. |
|
|
Show Python Help |
Click to display a browser containing the Mari Python API Help. |
Evaluating Statements
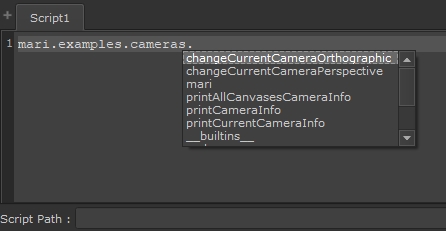
- Type statements into the input pane. As you type, Mari provides auto-complete suggestions, if any are available. For example, entering:
mari.example.cameras.
Displays available functions that follow the statement:Tip: You can temporarily turn off Mari's auto-complete function in the Python Console by pressing Esc when the auto-complete list appears.
- Use the arrow keys to select the required entry and press Enter to append it to your statement.
Copy and paste functions work the same as in other text editors, but you can also right-click on the input pane and select the desired function.Note: Copying and pasting statements from another source, such as an email, into the Python Console can cause syntax errors. This may be because of mark-up or encoding in the source material. To fix the problem, re-enter the statement manually.
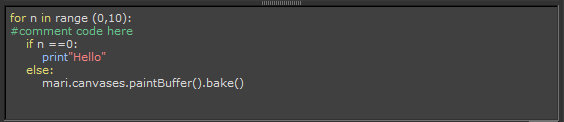
- Mari includes a syntax highlighting scheme in the input pane, so that code can be more easily identified at a glance. Text in red represents strings, green represents comments, and various Python keywords are represented by yellow, magenta, and blue.
- To execute the statement, click the Evaluate
 button or press Ctrl/Cmd + Return.
Your statement appears in the output pane, preceded by >>> (or ... if your statement spans multiple lines).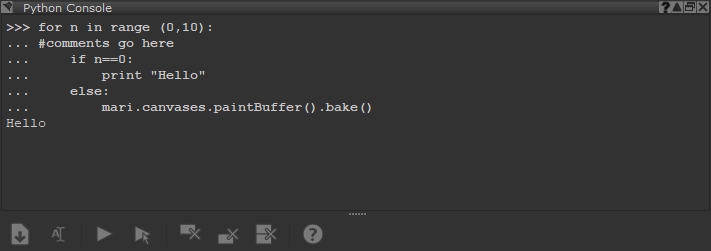
If you enter an invalid statement, Mari produces an error in the output pane.
- If you want to repeat a statement, you can step backwards or forwards through the history of your script by pressing Alt+Up or Alt+Down on Windows and Linux or Cmd+Ctrl+Up or Cmd+Ctrl+Down on macOS.
- If you want to clear the input and output panes, click the Clear Input
 , Clear Output
  , or Clear All
  button.
 - If you want to open the Mari Python API Help without going to the Python > Documentation menu, click the Help
 button.
You can move this window around and keep typing in the input pane while it's open. This window cannot be docked like a palette, but you can change focus from the window while it's still active, unlike most of Mari's dialogs.
Tip: To execute only part of the code in the input pane, highlight the code you want to execute and click the Evaluate Selected ![]() button or press Ctrl/Cmd +Shift+Enter.
button or press Ctrl/Cmd +Shift+Enter.
Tip: You can increase or decrease the font size in the Python Console by holding down Ctrl/Cmd and pressing + or -.
Note: If Mari detects an auto-complete suggestion while the Mari Python API Help window is open, the suggestion appears in the help automatically.
Saving Scripts
To save a Python script to disk:
- Select the script tab you want to save to disk.
You can work on as many separate script tabs as required and the contents of each tab is loaded every time you launch Mari. - Click the Save
 button to display the Save Python Script dialog.
 - Navigate to the save directory and enter a File name.
Tip: You can use the Rename
 button to give script tabs a name before saving to disk, which completes the File name automatically.
 - Click Save to write the file to disk.
Loading Scripts
To load a script through the Script Path text field:
- Manually enter the script’s location, or
- Click on
 to launch the Python Script Path dialog box and browse to the location of the script.
 - To execute the statement, click the Evaluate button.
Custom scripts load from the import directory prior to the scripts being run from the main folder. Mari uses particular order to load modules to ensure the proper, full functionality of the program when using Python scripts.
If existing start-up scripts do not work correctly due to the load module order, you can revert back to the old behavior by setting the environment variable MARI_OLD_PYTHON_INIT to any non-empty string other than 0.
Note: Mari looks for metadata that is over 250 MB in size and discards anything over this size. This check is performed on project load, and is intended to strip corrupt and problematic data. This affects metadata added using the Python API.
Running Scripts on Start-up
If you would like your script to be automatically executed at start-up, do the following:
- Enter your script in any text editor.
- Save the text file with the extension .py (for example, my_module.py) to:
- The import directory, contained in the following folders of your custom scripts path:
• the ~/Mari/Scripts sub-directory of the Mari application directory, or
• your own directory by setting the environment variable MARI_SCRIPT_PATH to a custom folder.
If a script called init.py exists, it is run first. If you need scripts to run in a specified order, you should put them in a separate folder and use a Python import statement in init.py.
You can also specify multiple directories to run scripts on start-up, using a path list separated by ':' or ';' as per the standard for your operating system.
• On Linux: /home/username/dir1:/home/username/dir2
• On Windows: C:\Users\username\dir1;C:\Users\username\dir2
• On Mac: /home/users/username/dir1;/home/users/username/dir2
• On Linux: /Mari/Scripts
• On Windows: Documents\Mari\Scripts
• On Mac: /Documents/Mari/Scripts
Scripts saved to this directory are imported rather than run, which prevents unnecessary pollution of the global namespace. If you save your custom script to the import directory, it is automatically imported before the scripts in the main folder are run.
Note: Python files and sub-folders that you wish to import without running in the import directory must be __init__.py files.
Terminal Mode
Mari provides a terminal mode, which allows users to access features through a Python shell on the command line. This is similar to the Python console palette in the Mari GUI, or to a standard Python shell. Terminal mode can be used to perform administrative actions such as archiving projects, exporting textures, and other tasks that do not require graphical interaction from the user.
Terminal mode is not a true "headless mode" because it still requires graphics functionality to run. Mari still initializes its GUI when starting up terminal mode - it just won’t display it. If you try to run a Mari interactive and terminal session at the same time, an error displays on the command line:
MriMainApp.cpp:798 ] : [ !! ] Mari already running somewhere else
Note: You can run a Mari interactive session and a terminal/execute session concurrently if you have a mari_i interactive and a mari_r render license, which allows you to paint in one project while exporting from another at the same time. See Using a Render License for more information.
You can supply the file name of a Python script to run on the command line, if desired. If supplied, Mari runs the specified script before providing the Python shell input prompt. It is also possible to start in "execute mode", which is the same as terminal mode but exists after running the provided script.
To start terminal mode from a shell, use the following commands:
On Linux
cd /path/to/mari
# Normal terminal mode
./mari -t
# Terminal mode - run the script, then show a Python input prompt
./mari -t /path/to/script_name.py
# Execute mode - run the script, then exit
./mari -x /path/to/script_name.py
On Windows
cd \path\to\mari
# Normal terminal mode
Mari6.0v3.exe -t
# Terminal mode - run the script, then show a Python input prompt
Mari6.0v3.exe -t \path\to\script_name.py
# Execute mode - run the script, then exit
Mari6.0v3.exe -x \path\to\script_name.py
On Mac
cd /path/to/Mari
# Normal terminal mode
./Mari6.0v3 -t
# Terminal mode - run the script, then show a Python input prompt
./Mari6.0v3 -t /path/to/script_name.py
# Execute mode - run the script, then exit
./Mari6.0v3 -x /path/to/script_name.py
Using a Render License
Running Mari in terminal or execute mode searches for a mari_r render license by default. A render license allows you to use Mari in non-interactive mode without the full UI experience. If a render license is not available then Mari looks for a mari_i interactive license.
To force Mari to use a render license, use either of the following arguments:
-r
--render
You can't run two Mari interactive sessions concurrently because there is a risk of cache corruption when two sessions try to write to the same cache location. However, if you have an interactive license and a render license, you can run a Mari interactive session and a terminal/execute session concurrently, which allows you to paint in one project while exporting from another at the same time.
Warning: Running multiple terminal or execute sessions along side an interactive session is an experimental feature and has no safety mechanism to prevent two sessions writing to the same project cache. A warning message is displayed on the command line if multiple sessions are detected:
IMPORTANT: Render mode allows multiple instances to share the same project location. This has the risk of data corruption if the same project is opened across instances and modified simultaneously.
To launch Mari in terminal or execute mode using a render license, use the following commands:
Linux
./mari -t -r
./mari -x -r
Windows
Mari6.0v3.exe -t -r
Mari6.0v3.exe -x -r
Mac
./Mari6.0v3 -t -r
./Mari6.0v3 -x -r
Tip: You can also add the -v argument to set the command line output to verbose mode so you can troubleshoot more easily.
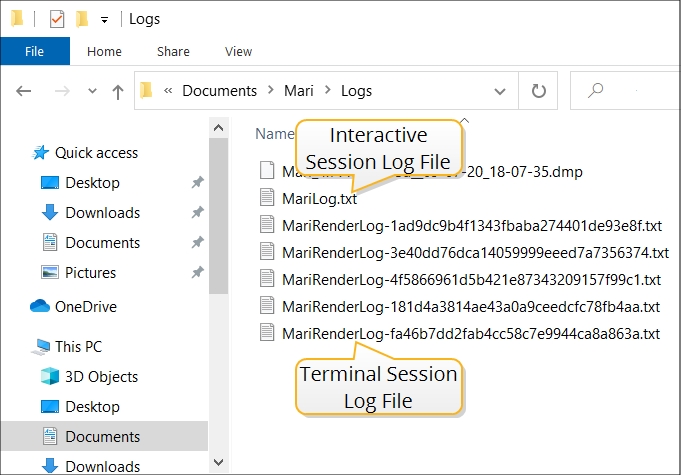
Operational logs for terminal and execute sessions are written to the same location as standard Mari logs, but a unique hash is added to the log file for identification. To print the hash for a terminal or execute session, use the following command:
mari.app.logFileName()
Log files are written to the following directories by operating system:
• Linux and Mac: /home/<username>/Mari/Logs
• Windows: C:\Users\<username>\Documents\Mari\Logs
An example of a Windows log directory containing log files is shown in the image.
Using PySide2 in Mari
Mari ships PySide2 together with its Python scripting engine. PySide2 is a library of Python bindings for Qt, similar to PyQt. For more information on PySide2, visit http://qt-project.org/wiki/PySide.