Managing Projects
A Mari project stores your work on geometries, and any associated textures. Mari's Project tab holds all the projects you are working on.
Note: For more detailed information about the New Project dialog,
Creating a New Project
| 1. | Do one of the following: |
|
Select from
|
or click on
|
or click on the
|
or type
|
or from the Project tab, right-click |
|---|---|---|---|---|
|
File > New |
|
New |
Ctrl/Cmd+N |
New |
The New Project dialog displays.

| 2. | Set the Project Name (for you to identify it only - this is not a filename). |
| 3. | In the Geometry tab, follow these steps: |
• Select the geometry file for the project in the Path field. The dropdown lists the last 10 files selected, or you can click ![]() to browse to a file.
to browse to a file.
Various mesh options display in the dialog directly under Path, depending on whether you open an .obj, .ptx, .abc, or .fbx file:
|
File formats |
Mesh Options |
|---|---|
|
.obj |
You can select options for the Mapping Scheme, Selection Groups, and Multiple Geometries Per Object. |
|
.ptx |
You can select whether the mesh data in the file represents a single new object or, when there are multiple input files, if the mesh data in each file represents a separate geometry in a single new object by setting the Merge Type field. For more information on the Mesh options, see Creating a New Project with OBJ and Ptex Files. |
|
.abc and .fbx |
You can select options for the Mapping Scheme, Merge Type, and Merge Selection Groups, as well as set the objects that are to be merged in the object hierarchy. |
|
.fbx |
You can set the animation Take on project creation/object load. This binds the animation take to the object and this cannot be changed again once the animation take has been selected and loaded. For more information on the Mesh options, see Creating a New Project with Alembic and FBX Files. |
Note: If you are loading an animated sequence with .obj, .abc, or .fbx file formats, Mesh options displays with the additional options Start Frame, End Frame, Single Frame, and All Frames. These provide the frame range to view either user-defined start and end frames, a single frame, or every frame. A Frame Offset also allows you to specify how the Alembic file is loaded into Mari. This is available for .abc files only.

• To create a project from multiple files, browse to a folder and select multiple files from the directory, before clicking Open.
The selected files are all shown in the Path field. These files are stored in the history as a single project under the assigned name.
Note: It's only possible to create a project from multiple files with .obj and .ptx files. You can only load one .abc or .fbx file when creating a new project.
| 4. | In the Channels tab, set the following channel options: |
|
Channel option |
Description |
|
Root Path |
Select the root path for the project. This is where Mari looks for any existing textures to import as it creates the channels. |
|
Scan |
Click Scan to make Mari scan the project's root path for any existing textures. If any textures exist for your channels, Mari shows a green dot next to the channel. You can select to import these textures. |
|
Category |
Selects a Mari channel preset template from the list of available shaders. The selected channel preset updates with channels. |
|
Template |
Select a channel template. Channels templates control the format of the filenames when Mari looks for existing textures on disk. |
|
Prefix |
Set a filename prefix for existing texture files, if applicable. |
|
Create |
Check the box to create a shader and connect channels to the shader on project creation. You can right-click to get a dropdown menu allowing you to easily create or import all the channels. |
|
Import |
Check the box to import existing textures into the channel after creating it. You can right-click to get a dropdown menu allowing you to easily import all the channels. |
|
Name |
This is the name of the channel to create. Mari sets a default value. As with the project name, the channel Name is for you to identify it only - when you export you can select a different name. |
|
Size |
Set a patch size for the new channel. |
|
Colorspace |
Set the colorspace in which the colors within your project are interpreted. Either select from the shipped config files or allow Mari to set an Automatic colorspace. |
|
File Space |
Set the file space used when generating vectors. |
|
Fill |
Set the Fill option to fill a channel with a specified color, by default. |
|
Depth |
Set the Depth. If you select a different Depth or resolution, file sizes can vary dramatically (for example, a 2k RGB “Byte” texture file is 2MB - whereas a 4k “Float” is 172MB). |
|
Files |
Specify the filename template used to pick existing textures to import into the channel. Mari sets a default value, but you can change this, or you can use the button to open a dialog allowing you to manually pick the files. |
| 5. | In the Color Settings tab, set your colorspace options for the project in the following fields: |
Tip: If you are just starting out in Mari and aren't familiar with colorspaces, you may want to leave the colorspace fields at their default.
|
Colorspace Option |
Description |
|---|---|
|
Color Management Enabled |
Enable or disable the OpenColorIO color management. |
|
OCIO Config |
Select a user-defined config file or shipped OpenColorIO config file that handles colorspace. |
|
Custom OCIO Config |
Specify the filepath for the custom (non-shipped) config file. |
|
Monitor |
Set the default colorspace, which applies to thumbnails and UI elements. Typically, this should be the same colorspace as you intend to use for the canvas. |
|
Color Picking |
Set the colorspace for all color pickers, swatches, and image viewers. |
|
8 bit Data |
Set the default colorspace for 8-bit channels, and reading and writing image files with 8-bit data. |
|
16 bit Data |
Set the default colorspace for 16-bit channels, and reading and writing image files with 16-bit data. |
|
8 bit Scalar |
Set the default colorspace for masks, heights, normals, depths and, generally, any non-color image with 8-bit data. |
|
16/32 bit Float Data |
Set the default colorspace for 16- or 32-bit (float) channels, and reading and writing image files with 16- or 32-bit, floating point data. |
| 6. | In the Lighting tab, set the following options: |
|
Lighting Option |
Description |
|---|---|
|
Shader |
Select a shading model. |
|
Lighting |
Select the lighting on the main mesh. |
|
Active Light Count |
Set the number of active directional lights. |
|
Environment Map |
Select an environment light. |
| 7. | Click the Create New Project button. |
Mari renders your selection and displays it on the canvas.
Tip: Depending on the size and complexity of textures, it can take several minutes the first time you load them into a Mari project. Once saved, however, the project should open quickly in future.
Note: Mari checks the model for any errors that might prevent it from processing; for example, touch border edges. A Mesh Sanity Check dialog displays any warnings or errors. (Errors cancel opening the model, but you can continue with warnings.)
Note: For information on model requirements in Mari, refer to Modeling Requirements.
Opening Existing Projects
| 1. | Click on the Projects tab. |
This shows all the projects you have on your computer.
Note: You can see your Disk Usage at the bottom of the Projects tab. This is a percentage indicating how much disk space remains on the drive where you installed the Mari cache.
| 2. | Double-click on the project to open. |
Note: On project load, Mari looks for metadata that is over 250MB and discards anything that is over this size. This is intended to strip corrupt and problematic data, and also affects metadata added through the Python API.
Using the Command Line
You can also open Mari and a specific, existing project, as well as archives using the command line. From the Run dialog on your computer, use a command in the format of:
./mari /tmp/testproject.mra
By specifying the project name, UUID, folder path, or project.mri path, you open Mari and the designated project.
The command line can also be used to run scripts that contain a Python call to open a project. From the Run dialog on your computer, use a command in the format of:
./mari example_script.py
The example_script should contain the Python call to open a project.
Saving Your Project
Do one of the following:
|
Select from menubar |
or click on toolbar |
or type shortcut key |
|
File > Save |
|
Ctrl/Cmd+S |
Tip: Save your project often.
-Note that while your textures remain cached locally, saving does not export them, so export often too!
-If you don't need to save (no changes since the last save), the toolbar icon is gray.
Article: Take a look at: Q100188: Improving performance in Mari and in specific Projects for more information on how to optimize your projects.
Using Automatic Project Backup & Restore
Mari has a highly optimized project backup system, which makes it easy to maintain your work and restore archives to a previous state in time.
Note: For more information see Project Settings: Settings
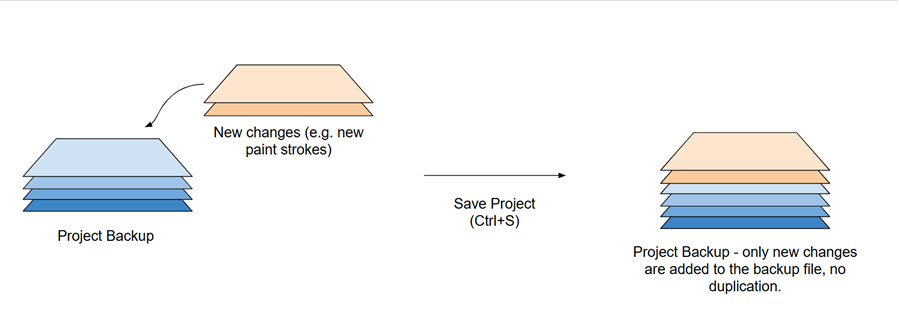
Note: Saves in Mari are incremental and store only the difference since the previous save, which means the backup files are often smaller than a full Mari archive.
Setting Up Your Backup System
To set up the project backup system for your project:
| 1. | Within the project, go to File > Settings > Backup Path. |
| 2. | Type in the backup path in the text input, or use the Add Directory button ( ) to select a backup destination on your machine/ network. ) to select a backup destination on your machine/ network. |
| 3. | Each time you now save your project, Mari records the changes since your last save in this location. |
Note: We recommend that your Backup Path is a separate location to the existing Project Location.
Using the Automatic Backup System
Each time you save your project, Mari records the changes since your last save. This snapshot is saved in your backup location as defined in File > Settings > Backup Path. This means Mari’s backup system is incredibly lightweight.
The automatic backup system works asynchronously. This means that when you import, duplicate or restore a project, Mari loads the most crucial information you need first, and opens up the project with those files. You can then continue painting while your project continues to load all of its information.
Note: By default, Mari will trigger the backup system when the current project is saved. To disable this behavior (e.g. if you want to manually trigger the backup system using a script), set a MARI__DONT_AUTO_TRIGGER_PROJECT_BACKUP=1 environment variable. See more at Studio Backup Integration.
Project Tagging
You can tag project backups by right-clicking the project and selecting Tag Backup. This will open up a text input for you to label your backup. This way you can easily identify each backup and group versions by using a common tag. You can also add tags to automatic backups in order to search for and identify them.
When you have a project open, and it has a backup location configured, you can run File > Tag Version (or use the Ctrl+Shift+S shortcut) to save the project and add a tag at the same time.
There is an option to tag your most recent backup by right-clicking the project and selecting Tag Backup > Latest.
Tip: Input multiple tags in the text input by separating them with a comma.
You can also add project tags if your project has a configured backup location, and this tag will be applied to the range of the project backups. This tag won’t show up on the Restore options, but can be found when you hover over the Project thumbnail.
Opening Backups
The project Restore menu (Found at Projects > Restore or by right-clicking the project’s thumbnail) is organized into date-time and tag-based sub-menus.
To see backups and restore the project to a previous version:
| 1. | Open the Projects tab. |
| 2. | Right-click on a project thumbnail, and select Restore to see a list of backups. |
This list is organized into date-time and tag-based sub-menus. You can search via Version Tags, Today, Yesterday, This Week, Last Week, This Month, and Last Month. You can still access older back ups by clicking the Other option in the Restore menu. This opens a browser in the backup location where you can browse all backups.
| 3. | Roll over the backup to see its details and a thumbnail preview of the project. |
| 4. | Click the desired backup to restore the project. |

To find a save point that isn’t in the current backup location, use Other to open a file browser. You can also access this file browser by selecting a project and click the Restore button in the Projects tab.
Note: Mari will autosave your project, but these won’t be displayed in the Restore menu. To access autosaves, use the Other option in the context menu, or click the Restore button at the bottom of the Projects tab to open a file browser at the backup location. You can then select an autosave backup. All backups will be listed in this location as *mri files.
If you’re loading a project with a backup and there is a corrupted file, Mari will try and match the corrupted file with another backup version to repair the corruption so you can continue working on your project as expected.

Studio Backup Integration
A backup location and Restore actions can also be set up for a studio pipeline. To run the backup system in a pipeline, you will need to stop the automatic backups. To do this, set the environment variable MARI_DONT_AUTO_TRIGGER_PROJECT_BACKUP=1.
Other manual scripts can be run with the backup once this environment variable is set by using the Python API. For example, certain tags can be restricted from the Mari UI.
To learn more, read the Python API documentation at Help > SDK > Python > Documentation.
Archiving Your Project
You can archive your Mari projects to store all the projects' information or to share them with other artists.
To archive your project, do the following:
| 1. | Save and close your project before archiving it by clicking on File > Save, then File > Close. |
| 2. | In the Projects tab, if your project is not already selected, select your project. |
| 3. | At the bottom of the application, click Archive or right-click on your project and select Archive. |
The Archive dialog opens.
| 4. | Browse to the location where you want to archive your project. |
| 5. | Click Save. |
Your project is archived to the location you selected as an .mra file.
Note: The only supported format for archiving projects is .mra.
Video: To learn more about how to archive projects, watch Archiving Mari Projects.
This video shows the workflow using Mari 3. Even though the Mari 4 workspace is different, the workflow remains the same. To have a look at the main UI differences, see Mari 3.3 vs 4.0.
Article: Take a look at the Best practices for sharing Mari archives article.