Using Backdrops, StickyNotes, Groups, and Gizmos
You can organize and label nodes in the Node Graph using the Backdrop and StickyNotes nodes or use the Group node. The Backdrop node adds a background box behind the nodes, separating the nodes visually from the rest of the node tree. The StickyNote node allows you to add annotations to the elements in the node tree.
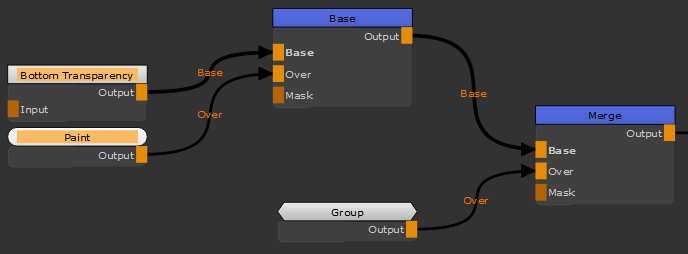
A Group node combines a set of nodes into a single node, acting as a nesting container for them. Group nodes can be published as gizmos, allowing you to share parts of your node tree that perform specific functions with other artists.
Note: Groups and gizmos support the usual range of Mari metadata types as Name=Value pairs.
Adding Backdrops
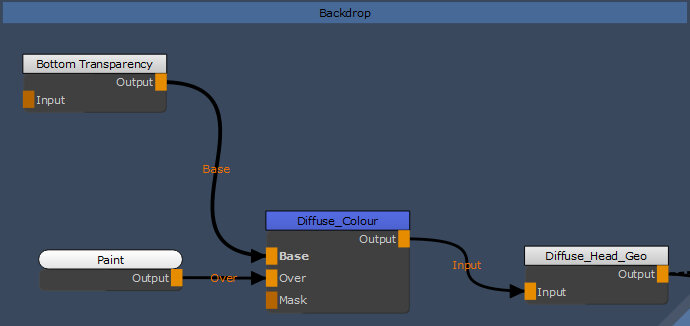
Backdrop nodes allow you to organize parts of your node tree into named areas performing a specific function.
To add a Backdrop, do the following:
| 1. | Select the nodes you want to place within the Backdrop node. |
| 2. | To add a Backdrop, either: |
• press Tab to display the node selector, type Backdrop, and press Return, or
• right-click in the Node Graph and select Node > Misc > Backdrop.
A Backdrop is added containing the selected nodes.
| 3. | Double-click the Backdrop node's header to display its properties. |
Note: You can use the Z Order control in the Node Properties palette to layer-up Backdrop nodes. Backdrops with lower Z Order values appear underneath those with a higher value.
| 4. | Click the Background Color and select a new color, if required. |
| 5. | Click the Label field to add a text description to the Backdrop's background. |
| 6. | Enter the required Backdrop name in the Name field. |
Adding StickyNotes
StickyNote nodes allow you to add annotations to elements in the node tree. For example, you might add text describing the function of a certain part of the node tree.
To add a StickyNote:
| 1. | Press Tab to display the node selector, type StickyNote, and press Return, or right-click in the Node Graph and select Nodes > Misc > StickyNote. |
| 2. | Double-click the node to open its properties. |
| 3. | Enter the note text in the Label field. |
The text is added to the StickyNote in the Node Graph.
Managing Groups
Group nodes allow you to condense parts of your node tree into groups performing a specific function.
Creating Groups
Mari creates groups automatically in some cases, such as when you add a new graph layer from the Layers palette, but you can create groups manually from a selection of nodes.
To create a Group:
| 1. | Select the nodes you want to place within the Group node. |
| 2. | To create the Group node, do one of the following: |
• press Ctrl/Cmd+G, the Group keyboard shortcut,
• press Tab to display the node selector, type Group, and press Return,
• right-click in the Node Graph and select Group.
A Group node with the required number of Input pipes and one Output pipe is added. For example, if you have three nodes that are connected to nodes within the Group, Mari creates three inputs for the Group node.
Tip: If you didn't make any node selections, an empty Group is created.
| 3. | Double-click the Group node to display its contents and properties in the Node Properties palette. |
| 4. | In the Node Properties palette, click the Name field to give the Group a meaningful name. |
Note: To enter a Group node Ctrl +double-click the Group node to open its subgraph. Alternatively, select the Group node and press Ctrl+Enter or in the Node Properties palette, click the s button.
Exposing Group Properties
You can expose node properties of a Group node using two methods. One is entering the nodes within the Group node and exposing their properties by clicking the Promote  button. The other is exposing node properties at the Group node level using the Group Node Knobs dialog.
Group nodes don't display any properties by default, other than those shared by all nodes. See Working with Node Properties for more information.
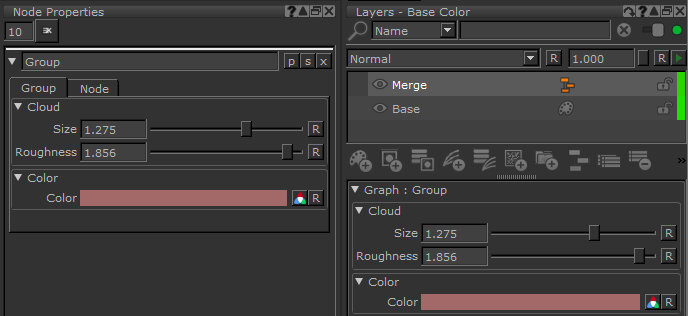
Exposed properties are displayed in the Group's Node Properties palette and in the associated Graph layer in the Layers palette. For example, given a merged Group in the Node Graph containing a Cloud and a Color node:
You could expose Size, Roughness, and Color properties:
Exposing Controls Using the Promote Button
| 1. | Enter a Group node and then double-click the required nodes within this Group node. |
Note: To enter a Group node, Ctrl +double-click the Group node to open its subgraph. Alternatively, select the Group node and press Ctrl+Enter or in the Node Properties palette, click the s button.
The properties of the nodes display in the Node Properties palette.
| 2. | Click the Promote button. |
The Promote button turns orange  and the node properties are exposed at the Group node level.
| 3. | Click the Promote button again to unexpose the node properties. |
Note: You can link exposed node properties together under one control (see Linking Exposed Properties) but if you unexpose one or more node properties that are part of this control, this deletes the control at the Group node level as the control becomes irrelevant.
Exposing Controls Using the Group Node Knobs Dialog
| 1. | Double-click the Group node's header to display its properties, if they're not already open. |
| 2. | Click the p button at the top-right of the Node Properties palette. OR Right-click on the Group node and select Edit > Groups > Manage User Knobs. |
The Group Node Knobs dialog displays.
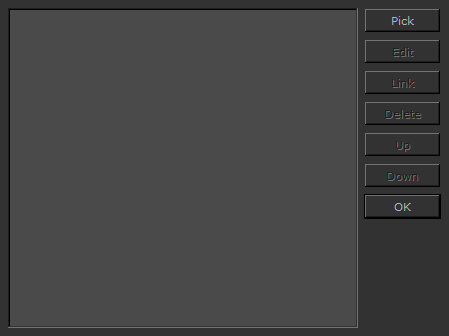
| 3. | Click Pick to begin exposing controls in the Pick Knobs to Add dialog. |
Note: Mari allows you to search for controls to expose in the Pick Knobs to Add dialog. To do so, enter the name or part of the name of a control in the Search field and click the left ![]() or right
or right ![]() arrow. Mari finds all the controls containing the letters you've entered.
arrow. Mari finds all the controls containing the letters you've entered.
Note: You can also do a wildcard search, which is based on character pattern, using the character *.
For instance, if you're looking for Principled BRDF controls that contain the letters s and f in that order, enter s*f in the Search field, and as a result, the Subsurface control displays in the dropdown menu.
| 4. | Select the required control from the list available. You can only select controls that are associated with nodes contained within the Group. |
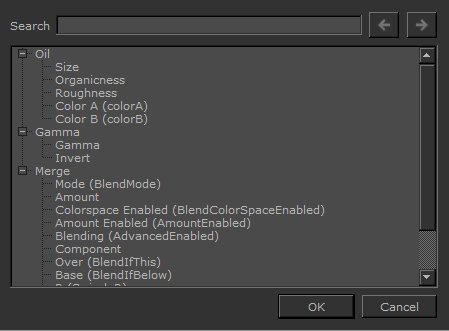
| 5. | Click OK to expose the control(s) in the Node Properties palette. |
You can expose as many controls as you like in a Group's properties by repeating this process.
Tip: You can expose all the properties of a node at once. To do so, in the Group node, right-click on the required node and select Edit > Groups > Expose Node Properties.
Note: The gizmo values defaults to the ones set in the Group node properties at the time you export a Group as a gizmo. See Exporting Groups as Gizmos.
| 6. | The controls editor has some additional functions to help you organize how controls appear in the Node Properties palette. |

• Edit - click to give the selected control a custom name, though the control itself retains its original function.
• Link - click to link the exposed controls you've selected. For more on the Link functions, see Linking Exposed Properties.
• Delete - click to remove the control from the Group's properties.
• Up/Down - click the Up and Down buttons to re-arrange the order in which controls appear in the Group's properties.
Linking Exposed Properties
The Link function allows you to link a number of exposed properties together under one control.
For example, if you have a Cloud procedural inside a group with a number of offsets X,Y, and Z, the Link function allows you to scale these offsets uniformly under one exposed control, instead of having to set each of these properties individually.
To link exposed properties:
| 1. | Make sure you have exposed properties in the Group Node Knobs dialog. See Exposing Group Properties |
| 2. | Ctrl/Cmd+click to select as many properties as you need and click Link. |
The Link Knobs dialog opens.
| 3. | Enter a name for the control you want to create, and click OK. |
The new control is created.
| 4. | Click OK to close the Group Node Knobs dialog. |
In the Node Properties palette, the exposed properties are linked under one control in the associated group.
Note: If you link exposed properties from the same node, the control displays under the node menu in the Node Properties palette. If you link exposed properties from separate nodes, the control displays under a Links menu in the Node Properties palette.
Note: If you unexpose one or more node properties that are part of a control, this deletes the control at the Group node level as the control becomes irrelevant. See Exposing Group Properties.
Exporting Groups as Gizmos
You can export a Group as a gizmo so that other artists can use parts of your node tree to perform similar tasks. Gizmos are exported using the .mng file extension and can be imported into any project in Mari 3.0, or above.
To export a gizmo:
| 1. | Double-click the Group node you want to export to open its properties. |
| 2. | Click the Node dropdown to expand the view. |
| 3. | Click Export as Gizmo. |
The Export as Gizmo dialog displays.
| 4. | Navigate to the required directory, enter a File name, and then click Save. |
Mari saves your gizmo (.mng) to the specified location.
Note: The gizmo values defaults to the ones set in the Group node properties at the time of export.
Importing Gizmos
To import a gizmo, do the following:
| 1. | Create a Gizmo folder in the following location, depending on the platform in use: |
• Windows: C:\Users\<username>\Documents\Mari\
• Linux and Mac OS X: /home/<username>/Mari/
| 2. | Copy the gizmo to the Gizmo folder, depending on the platform in use: |
• Windows: C:\Users\<username>\Documents\Mari\Gizmos\
• Linux and Mac OS X: /home/<username>/Mari/Gizmos/
| 3. | Restart Mari to make the gizmo available. |
| 4. | Right-click inside the Node Graph and select Nodes > <gizmo_name>. |
Tip: You can create a sub-menu in the Nodes dropdown, to better organize your gizmos, simply by creating another folder in the Gizmos folder. For example on Windows: C:\Users\<username>\Documents\Mari\Gizmos\Gizmos\
OR
Right-click inside the Node Graph, select File > Import nodes, then navigate to the gizmo's location, select the required gizmo and click Open.
Mari inserts the gizmo into the Node Graph.
Tip: You can use a MARI_GIZMO_PATH environment variable to set custom locations for loading gizmos at launch.