Creating Custom Toolbars
If you want quick access to functions not included on the default toolbars, you can create as many additional
toolbars as you need. To create a new toolbar:
| 1. | From the Edit menu, select Toolbars. |
The Manage Toolbars dialog box opens.

| 2. | Click Add to create a new toolbar. |
Mari prompts you to name the toolbar.
| 3. | Give your toolbar a name, and click OK. |
The new toolbar displays under Custom Toolbars in the Manage Toolbars dialog box, and an empty toolbar displays for it on the main screen.
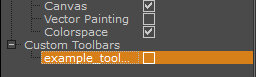
Tip: If the empty toolbar does not display, make sure that the Visible checkbox in the Manage Toolbars dialog box is ticked. Also note that the new toolbar may display at far right, and you may have to drag its handle to the left to resize it, to make room for new icons.
| 4. | Add functions to your toolbar by dragging from the list on the left in the Manage Toolbars dialog box, onto the empty toolbar on the main screen. |
Tip: Click + to expand the nodes in the list to see the functions available. At the moment, items cannot be removed from custom toolbars.
| 5. | Click OK to close the Manage Toolbars dialog box when you're happy with your new toolbar. |
Note: To remove items from your custom toolbar, click on the dropdown arrow next to the item and select Remove.
Your project needs to be open in order to remove items.
Try this to acquaint yourself with managing toolbars:
| 1. | create a new toolbar, |
| 2. | add a few items to it, |
| 3. | resize it, |
| 4. | undock it, move it, and re-dock it somewhere else, |
| 5. | hide it from the display, then |
| 6. | remove it. |