Selecting Areas Onscreen
There are also quick menu items for selecting large areas on your model at once. In the Selection menu, you can opt to:
• Select All - to select all of an object, patch or face.
• Select None - to de-select patches and faces.
• Select Invert - to select the inverse of the selected area.
• Select Visible - to select the visible area of a patch, face, or object.
Alternatively, use the Marquee Select tool to select an area onscreen, rather than on the model. The Marquee Select tool lets you build up your selection (adding and removing to the selection as required), then transform it – moving it around, rotating it, fill it, invert it, or resizing it.
| 1. | Paint a few strokes onto your model, so you can see the effects when you start drawing marquee selections. |
| 2. | Select the Marquee Select tool |
| 3. | In the Tool Properties, select the tool type. You can select a rectangle, lasso, polygonal, ellipse, or wand. |
|
Tool |
Lets you |
|
|
Draw a rectangular selection. |
|
|
Draw the outline of your selected area. You can draw any shape you want. |
|
|
Draw the outline of the selected area by setting points for the polygon sides and double-clicking or clicking the original point to close. You can draw any shape you want. |
|
|
Draw an elliptical selection. |
|
|
Select by color. When you click, Mari creates a selection around the point you clicked. The selection is based on color – areas with a similar color to the original point are selected. You can change the color threshold for the selection. |
Tip: For the Polygonal mode, you can also close the selection by pressing Enter or double-clicking on the canvas.
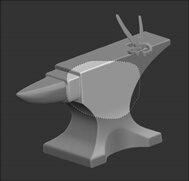
| 4. | Click and drag to create your initial selection. |
|
|
|
|
Initial buffer, with |
Marquee select - only the paint within the selection is visible. |
| 5. | To edit the shape of the selection, change the Mode in the Tool Properties. You can set this to: |
|
Mode |
Does |
Notes |
|
Replace |
the new selection replaces the existing selection. |
In Replace mode (the default), you can: • hold down Shift, click and drag to add to the current selection, or • hold down Ctrl/Cmd, click and drag to remove from the current selection. |
|
Transform |
lets you move your selection area around (move, rotate, or scale the selection) |
In Transform mode, you can: • hold down Shift, click and drag to move the current selection, • hold down Ctrl/Cmd, click and drag to rotate the current selection, or • hold down Shift+Ctrl/Cmd, click and drag to scale the current selection. |
| 6. | You can fill the selected paint buffer area with the current foreground color using the Fill |
| 7. | If you want to soften the edges of the selection, turn up the Feathering |
| 8. | In Wand mode, you can change the Color Threshold (how close the colors need to be to be selected when you click). At 0, only areas of the exact shade as the pixel you click on are be selected. As the value increases, more colors are selected when you click. |