Vertex Map Texture

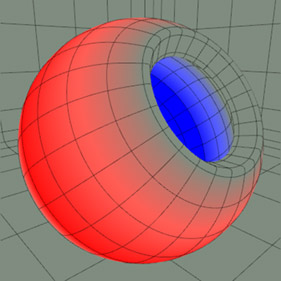
The Vertex Map Texture allows you to assign certain Vertex Maps for use in the Shader Tree. Specifically, vertex RGBA color maps and vertex weight maps. Vertex maps, when used in this way, can provide interesting options for shading a model as they are resolution-independent and can provide a variety of effects with much less system overhead than similar bit-mapped textures. Additionally, the information is embedded into the model and requires no additional external files, making them highly portable.
Usage
Vertex color maps need to be created for the target geometry first, which embeds the information into the vertices. Maps are first generated for a Mesh Item in the Vertex Map List. When selected, the resulting Vertex Map can be painted using the Modo's vertex painting brushes. Vertex color maps can also be generated automatically based on the scene's current surfacing and lighting with the Vertex Shader Baking command.
Once the map is created, you can add the Vertex Map Texture layer to the Shader Tree by clicking Add Layer > Processing > Vertex Map Texture.
Note: For information regarding adding and working with Shader Tree item layers, see Shader Tree.
In the resulting Vertex Map Texture layer you can select the appropriate RGBA vertex color map from the Vertex Map list menu. You can obtain the best results by using a layer effect that requires color information. When using a RGBA vertex color map, the Value, Color, and Alpha options have no effect on the map.
For vertex weight maps, these need to be created as well. This can be done using the vertex painting brushes, but the brushes assign weight values instead of colors. You can also automatically create vertex weight maps with the Vertex Curvature Baking command, which may be used to produce some interesting effects.
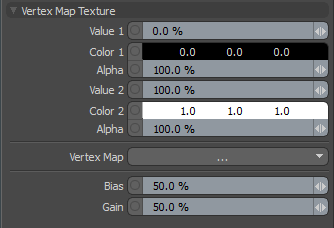
Once the map is created, you can add the Vertex Map Texture layer to the Shader Tree using the Add Layer control. In the resulting Vertex Map Texture layer, you can select the appropriate vertex weight map from the Vertex Map list menu. Depending on the type of effect chosen, you can adjust the Value, Color, and Alpha options to produce the desired look. Additionally, the Bias and Gain options control the attenuation between the weight map values in the map. When using a layer effect that requires color values (such as Diffuse Color), you can assign colors to Color 1 and Color 2, where Color 1 maps to the 0 value areas of the weight map, and Color 2 maps to the 1 value areas of the weight map. Where the effect type requires grayscale input (such as with a layer or group mask), you can adjust the Value 1 and Value 2 inputs, where Value 1 maps to the 0 value areas of the weight map, and Value 2 maps to the 1 value areas of the weight map. When the Vertex Map Texture item is selected, the attributes are visible in the Properties panel.
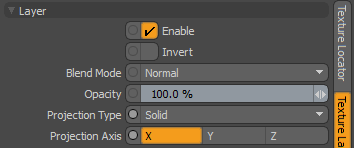
Layer Properties

|
Layer |
|
|
Enable |
Toggles the effect of the layer on and off. This duplicates toggling visibility in the Shader Tree. When disabled, the layer has no effect on the shading of the scene. However, Modo saves disabled layers with the scene, and they are persistent across Modo sessions. |
|
Invert |
Inverts the colors (RGB values) for the layer to produce a negative effect. |
|
Blend Mode |
Affects the blending between different layers of the same effect type. With this, you can stack several layers for different effects. For more about blending, see Layer Blend Modes. |
|
Opacity |
Changes the transparency of the current layer. If there are layers below this layer in the Shader Tree, reducing this value increasingly reveals the lower layers. Reducing the value always dims the effect of the layer. |
|
Projection Type |
Defines how a material us applied to a 3D surface. Types vary significantly in their effects. For a guide to each Projection Type see Projection Type Samples. |
|
Projection Axis |
The material is projected down this axis. This applies to Planar, Cylindrical, Spherical, Cubic, Box, and, Light Probe projection types. |
Vertex Map Texture Properties

|
Option |
Description |
|---|---|
|
Layer |
|
|
Enable |
Toggles the effect of the layer on and off to duplicate the functionality of toggling visibility in the Shader Tree. When disabled, the layer has no effect on the shading of the scene. However, Modo saves disabled layers with the scene, and they are persistent across Modo sessions. |
|
Invert |
Inverts the weight values for the layer producing a negative effect. |
|
Blend Mode |
Affects the blending between different layers of the same effect type. With this, you can stack several layers for different effects. For more about blending, see the Layer Blend Modes topic. |
|
Opacity |
Changes the transparency of the current layer. Reducing this value increasingly reveals lower layers in the Shader Tree, if present, or dims the effect of the layer, itself, on the surface. |
|
Vertex Map Texture |
|
|
Value 1 |
Determines the value of the texture for weight values of 0, ramping toward Value 2 based on the weight map itself. This control is only active when the texture layer's Effect is set to a non-color attribute. |
|
Color 1 |
Determines the color of the texture for weight values of 0, ramping toward Color 2 based on the weight map itself. This setting only applies to surfaces that require a color value. |
|
Alpha 1 |
The opacity of the Color 1 zone. Note: You can adjust the Alpha value using the Color Picker. |
|
Value 2 |
Determines the value of the texture for weight values of 1. This control is only active when the texture layer's Effect is set to a non-color attribute. |
|
Color 2 |
Determines the color of the texture for weight values of 1. This setting only applies to surfaces that require a color value. |
|
Alpha 2 |
The opacity of the Color 2 zone. |
|
Vertex Map |
Specifies an existing weight map or vertex color map. |
|
Bias |
The bias control causes the texture to favor either the primary or secondary value or color. By increasing the bias, more of the Color/Value 1 appears, while decreasing the number forces more of the Color/Value 2 into the gradient blend. |
|
Gain |
This setting is similar to a contrast control that effects the falloff of the gradient ramp between the Color/Value 1 and Color/Value 2. Setting the Gain to 100% creates a very sharp contrast, whereas setting the value to 0% reduces the contrast between the two to almost imperceptible amounts. |