Vertex Normals
Modo provides a set of tools for working with vertex normals under Vertex Map > Vertex Normals. Vertex normals provide an efficient way to smooth shade a polygon mesh, giving it the appearance of a much higher poly mesh. Vertex normal smoothing provides much more control over edges hardness than material smoothing.
About Smoothing
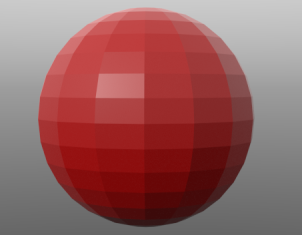
Smoothing graduates the shading across polygons to produce a surface that appears smooth, without adding any additional geometry.
|
|
|
|
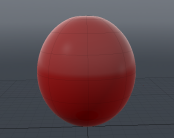
No Smoothing - the surface is faceted. |
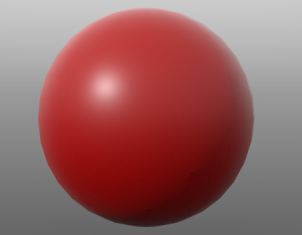
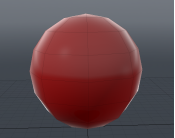
Smoothing |
Modo provides a number of ways to smooth an object so that the surface does not appear faceted. For example:
• The mesh can be smoothed in the 3D viewport through SDS Subdivide (press Tab or Shift+Tab).
• The surface's material item has a Smoothing setting.
Smoothing with Vertex Normals
Once smoothed, you can freeze the smoothing by baking out the current values into a fixed Vertex Normal Map. This captures the smoothing that is displayed in the 3D viewport. The map then preserves the shading when used with a lower poly mesh.
Note: Unlike displacement maps, vertex normal maps do not modify the geometry, and the contours of the mesh are unaffected. The map gives the impression that the surface is smooth, but the silhouette will be shaped according to the underlying geometry.
Note: A vertex normal map overrides any smoothness settings of the material.
A vertex normal is calculated by averaging the surface normals of the faces that contain the vertex.
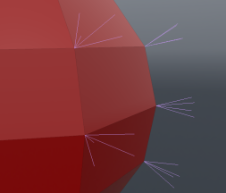
In Modo, you can display the neighboring surface normals at each vertex, as shown below.
Tip: This is done by checking Show Vertex Normals when using the Vertex Normals Tool.
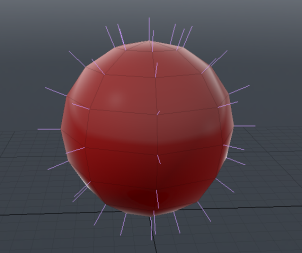
The orientation of vertex normals provides a means to determine the properties of reflected light (and therefore the shading) at each vertex. By interpolating between the vertex normals, Modo can smooth shade across the surface.
You can edit the values in the fixed Vertex Normal Map to vary the shading settings. If you generate a vertex normal map, it saves the map with the model, and you can export it in various formats.
Setting Vertex Normals
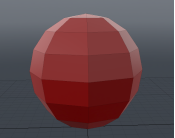
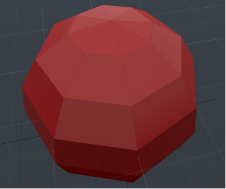
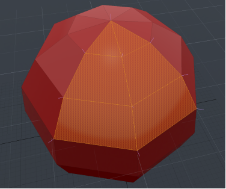
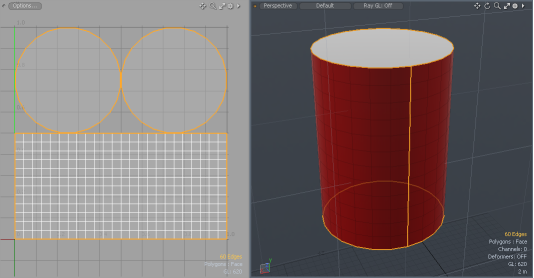
You can generate a Vertex Normal Map based on the current selection. The smoothing is then baked into a Vertex Normal Map and is automatically applied when you reduce the smoothing. The images below demonstrate this process using subdivision.
|
|
|
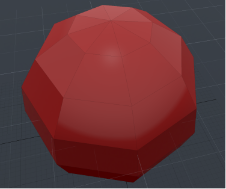
| A low poly sphere with no smoothing. | The same sphere subdivided by pressing Tab. Set Vertex Normals is then selected to to bake the shading into a Vertex Normal Map. | The low poly version, viewed by pressing Tab. Notice how the Vertex Normal map is now smooth shading the surface. |
Tip: You can apply Vertex Normal Maps to sections of a mesh by selecting the required polygons.
To Set Vertex Normals
| 1. | Open your geometry in a 3D viewport, with the preferred smoothing method applied. |
| 2. | Select Vertex Map > Set Vertex Normals. |
You will see the Normals Vertex Map dialog.
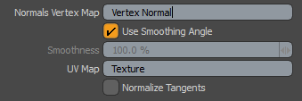
Adjust the following parameters:
• Normals Vertex Map - Enter a name for the Vertex Map. This will be the name used in the Lists viewport.
• Use Smoothing Angle - Enable this to use the smoothing values from the Material item's Smoothing and Smoothing Angle settings.
If disabled, you can specify a Smoothness value that Modo assigns to all vertices in the target geometry.
• Smoothness - Specifies a percentage for smoothing the Vertex Map. This option is available if you clear the Use Smoothing Angle checkbox. IAt 100%, Modo fully smooths all vertices.
Once applied, you can then select specific edges and apply the Split Normals command to add creases to specific areas of a surface.
• UV Map -
• Normalize Tangents -
| 3. | Click OK. |
You will see the new Vertex Normal Map in the Other Maps section of the Lists viewport.

| 4. | You can now switch to a low poly version or reduce the material smoothing. The Vertex Normal Map will be used to shade the selection. |
Warning: When Modo associates a vertex normal map with a Mesh Item, modifying the smoothing value for that surface no longer affects the actual smoothing of the surface in the viewports because vertex normal maps supersede any other settings. To modify the values, remove the map and generate a new one with the new values or apply the Split Vertex Normals command with an appropriate
Using the Vertex Normals Tool
Modo provides a live tool to create and edit Vertex Normal Maps. If there is no current Vertex Normal map active on the selection, the tool adds a Vertex Normal map to the Lists viewport. Otherwise, it modifies the Vertex Normal map using the tool's settings.
To apply the tool:
| 1. | Select the geometry. |
| 2. | Select Vertex Map > Vertex Normals > Vertex Normals Tool. |
| 3. | Adjust the tool parameters as required (see below). |
| 4. | Click in the 3D viewport. |
This applies the tool with the current settings.
Unlike Set Vertex Normals, the tool stays live until it is dropped, and it updates automatically when the smoothing is changed. For example, if the tool is live and you subdivide, the new shading will be automatically baked into the Vertex Map.
Note: You must make your selection before using the Vertex Normals Tool. If the tool is active, you will need to drop the tool to make a new selection. If you switch to a different selection mode (such as polygons to edges), the tool is automatically dropped.
Note: If you find the mesh isn't responding to the tool, highlight the Vertex Normal map in the Lists viewport and try again.
Baking Smoothing
The tool provides an alternative to Set Vertex Normals when baking smooth shading to a mesh. With the smoothed mesh visible, activate the tool and click in the 3D viewport to bake the smoothing to a new Vertex Normal Map.
Showing Vertex Normals
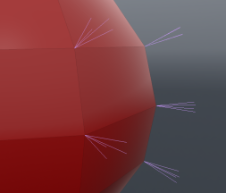
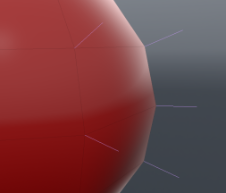
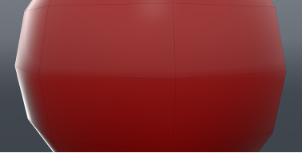
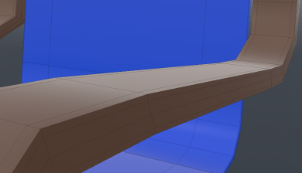
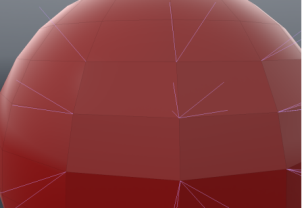
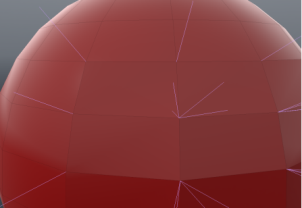
To help visualize the effect of different smoothing settings, Modo lets you display the normals on each vertex. When soft shading, the neighboring polygon normals are averaged to create a single vertex normal. For other types of shading, such as hard shading, different normals are used for each polygon to lessen the visual continuity. The images below demonstrate normals at three different settings of Hardness.
|
|
|
| Normals at 100% Hardness. The normals correspond to the neighboring polygon normals | Normals at 50% Hardness. | Normals at 0% Hardness. The normals are averaged to form a single vertex normal. |
To show the vertex normals:
| 1. | With the tool active, check Show Vertex Normal. |
| 2. | To let Modo set the Vertex Normal length, check Auto Size. |
| 3. | To size the Vertex Normals manually, uncheck Auto Size and adjust Normal Scale. |
| 4. | You can hide normals on vertices that are behind the visible geometry by checking Cull Hidden Normals. |
Adjusting Hardness
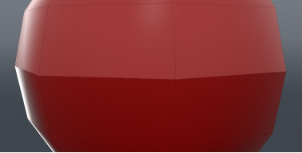
You can harden the smoothing at selected edges to make adjacent polygons appear more faceted. At 100% Hardness, Modo will use the polygon normals to shade each polygon. The difference between the normals (and therefore the shading) results in hard edges between the polygons. At 0% Hardness, the normals are averaged at the vertex to create soft shading.
|
|
| Soft edges | A hardened edge |
To adjust the hardness:
| 1. | Select the edges that you want to harden. Leave the mesh unselected to harden all edges. |
| 2. | Add the Vertex Normals Tool. |
| 3. | Set Method to Harden. |
| 4. | Click and drag in the 3D viewport to adjust the Hardness setting. |
| 5. | If you want to harden more edges. press the spacebar to drop the tool and repeat the steps above. |
Note: Modo automatically adds additional hardened edges to the HardEdges map.
Tip: To see how the normals change, turn on Show Vertex Normals before adjusting the Hardness .
Making a Hard Edge Selection Set
When adjusting hardness, you can choose to create a selection set containing the edges that you are editing. To do this, check Make Selection Set for Hard Edges in the Vertex Normals Tool's properties. This is useful should you need to reselect the edges and readjust the hardness.
Modo uses an Edge Pick map called HardEdges to store the selection. This is shown in the Other Maps section of the Lists viewport.
Reselecting Hard Edges
If you have created a hard edge selection set, you can restore the selection to make further edits.
| 1. | Open Select > Use Selection Set... |
| 2. | Select HardEdges from the Name dropdown, and Select from the Mode dropdown. Click OK. |
Adjusting Softness
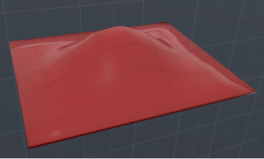
You can apply smooth shading to a selection using the Soften method. Softening will average the normals at each vertex, and interpolate between each vertex normal to provide continuous shading. The images below show the Soften method used on a polygon selection.
|
|
|
| Mesh without smoothing | Polygons are selected and the Vertex Normal Tool is applied using the Soften method. | The polygons are now smoothed. |
To apply softness:
| 1. | Select the geometry as required. This may be edges, polygons, or no selection for the complete mesh. |
| 2. | Add the Vertex Normals Tool and select Soften from the Method dropdown. |
| 3. | Click in the 3D viewport to soften. |
Smoothing by Angle
You can decide how smoothing is applied depending on the angle between adjacent polygons. This is useful for avoiding smoothing at hard edges, such as right-angles. The Smoothing Angle sets the angle threshold between two polygons, polygons at angles below this value will not be affected by the Hardness setting. The images below show how the angle may be used to harden certain edges.
|
|
| A smoothed chair with Hardness setting at 100% and a Smoothing Angle of 120°. The polygons remain smooth as the angles fall below the threshold. | The Smoothing Angle is adjusted to 80°. The edges of the arm are at roughly 90° and so they become hardened. |
To Use the Smoothing Angle:
| 1. | Select the geometry, or leave the geometry unselected to adjust the entire mesh. |
| 2. | Add the Vertex Normals Tool and select Angle from the Method dropdown. |
| 3. | Click in the 3D viewport to activate the tool. Adjust the Hardness and Smoothing Angle as required. |
| 4. | To use the Smoothing Angle from the material properties, check Use Material Smoothing Angle. |
Note: If a selection includes multiple materials, the matching material is used for each polygon.
Updating the Polygon Boundary
When you edit the smoothing of part of a mesh, the polygons at the edge of the selection are shaded the same as the rest of the selection. However, you can also tell Modo to average the vertex normals at the boundary of a selection to apply smooth shading in the polygons around the border. To do this, check Update Polygon Boundary. //check this is what it was intended for. The image below show the effect of checking this option.
|
|
| A polygon selection with maximum Hardness. Update Polygon Boundary is off. The polygons are faceted, note the separated vertex normals at the edge of the selection. | The same selection. Update Polygon Boundary is now on. The central polygons are faceted, and the perimeter is smoothed. Note the single, averaged vertex normals at the edge of the selection. |
Recalculating the Vertex Map
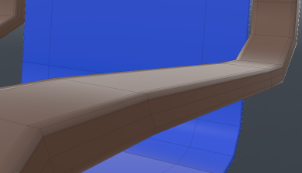
If you deform or edit the mesh, the Vertex Normal Map does not change to match the new shape. Instead, the shading will remains matched to the shape at the time the map was generated. However, you can regenerate the map at any time to recalculate the normals based on the current mesh. To do this, select Vertex Normals > Recalculate.
|
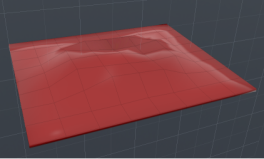
|
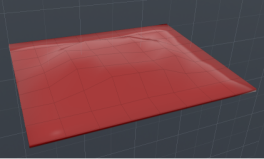
|
| A mesh shaded using a Vertex Normal Map. | The mesh has been almost flattened. Notice how the shading persists. | Recalculate has been selected. The shading, as defined by the Vertex Normal Map, now matches the deformed mesh. |
Softening and Hardening Shortcuts
The Vertex Normals submenu provides shortcuts for hardening and softening edges as a quick alternative to using the Vertex Normals Tool. To soften (0% Hardness) a selection:
• select Vertex Map > Vertex Normals > Soften Vertex Normals.
To apply 100% Hardness to a selection:
• select Vertex Map > Vertex Normals > Harden Vertex Normals.
Selecting Hard or Soft Edges
You can quickly select hard or soft edges to edit using the selection options in the Vertex Normals submenu. To select edges:
• select Vertex Map > Vertex Normals > Select Hard Edges
or
• select Vertex Map > Vertex Normals > Select Soft Edges
Note: If you haven't explicitly defined edges types, Modo will determine edge hardness based on the current shading.
Selecting UV Boundaries
UV boundaries tend to mark important edges on a mesh where surfaces join, and as such, these edges tend to need hardening. To help you with this, Modo can quickly select all edges on the model that are placed at UV boundaries. To do this:
• select Vertex Map > Vertex Normals > Select UV Boundary Edges.
Selecting Polygon Tag Boundaries
If you've tagged any polygons, you can quickly select the edges around the tagged region to edit them in the Vertex Normal Map. The selection is done by tag type: Material, Part, Smoothing Group, or Selection Set.
To select tagged regions:
| 1. | Select Vertex Map > Vertex Normals > Select Polygon Tag Boundary Edges. |
| 2. | Select the Polygon Tag Type and click OK. |
To find out more about polygon tags, see Defining Shaders.