Radial Array Items
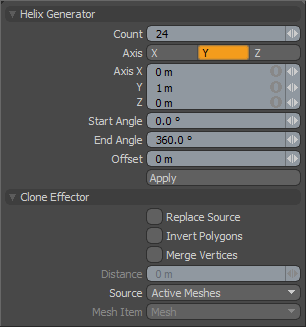
The Radial Array tool copies the selected geometry into a circular or helix pattern. There are a variety of controls that allow precise control over the count, placement, angles and spiral.

|
Option |
Description |
|---|---|
|
Count |
Set the number of copies in the array. |
|
Axis |
Determines along which axis to create the helix. |
|
Axis XYZ |
These three values determine the location of the tool's axis control handles. If the values are set to 1 meter on all axes, the handle ends have one end at -1 X, -1 Y, -1 Z and the other at 1 X, 1 Y, 1 Z, creating an skewed off axis plane for the array. |
|
Start Angle |
Determines the rotation placement for the first cloned geometry. |
|
End Angle |
Determines the rotation placement for the last coned geometry. Tip: By default the start and end angles go from 0 to 360 degrees. This creates an array that completes a circle. Changing these two values can create an array that revolves many times or one that leaves one side of the circle agape. Setting the End Angle value to greater than 360 degrees is very useful when combined with some non-zero offset value. |
|
Offset |
Moves each successive clone a user-defined distance from the previous along the tool's axis. This value is very useful when combined with an End Angle greater than 360 degrees so that the array creates a spiral. |
|
Replace Source |
When enabled, the original mesh elements cloned by the tool are replaced by an additional clone. |