Stitching

Modo allows you to add stitches to existing mesh items. You can do this by using the Stitch Mesh Setup command available from the Geometry menu. This uses a Stitch Particle Generator to create the stitches along a curve. The Stitch Particle Generator is a custom version of the Curve Particle Generator.
Courtesy William Vaughan
Using Stitch Mesh Setup
You can access Stitch Mesh Setup from the menu bar.
Note: If you've applied transforms to your geometry, make sure you freeze it before adding stitches. To do this, select your item in the Items list or the 3D viewport, and in the Properties panel on the right, in the Transform section, click Freeze > All. Without freezing, the stitches are positioned in relation to the original geometry.
| 1. | Click Geometry > Stitch Mesh Setup. |
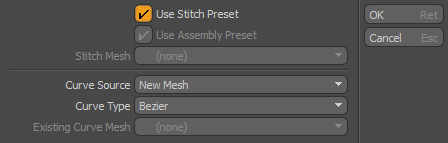
The Stitch Mesh Setup dialog appears. You have to specify what stitches to use and the curve along which they should be placed.
| 2. | Select the type of stitch you want to use: |
• Use Stitch Preset - The default option. Select this to choose a stitch from the Stitches category of the Preset Browser.
• Use Assembly Preset - Select this to use an existing assembly for stitching. You can pick an assembly from the Preset Browser.
• Stitch Mesh - Select this to use a mesh from the current scene. You can also leave this set to (none) and add the stitch later in the item's Properties tab or the Schematic.
| 3. | In the lower half of the dialog, specify the curve along which the stitches are placed. |
• Curve Source - Select how the curve should be created. You can draw a curve using the default New Mesh option, or choose an existing curve in your scene by selecting Existing Mesh.
If your model has edges at the required location, you can use them to define the curve. Selected Edges (Procedural) creates a curve along the edges you selected. The curve is procedurally linked to the mesh and as you edit the mesh, the curve and the stitches change with it. Selected Edges (Unlinked) adds a curve to the selected edges that is not linked to the geometry and therefore it's not affected by transforms applied to the mesh, but you can edit the curve manually.
• Curve Type - You can use a regular or a Bezier curve.
• Existing Mesh - When Curve Source is set to Existing Mesh, you can pick the mesh to be used here.
| 4. | Click OK. |
| 5. | If you've selected Use Stitch Preset or Use Assembly Preset, the Preset Browser appears. Select a stitch or assembly, then click OK. |
| 6. | If you've set Curve Source to New Mesh, the curve tool is activated and you can start drawing your curve. Stitches are added automatically as you draw. |
Tip: You can create multiple curves. To start a new curve, hold Shift while clicking to create the first control point.
If you've selected an existing curve, the stitches are added to it. In the case of selected edges, a curve and stitches are added along the selected edges.
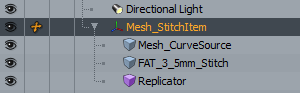
In the Item Tree, a Stitch Item appears. It consists of a curve that is the path for the stitches, a stitch, used as the prototype mesh, and a replicator that propagates the prototype along the curve.
Editing Stitches
You can edit your stitching in the Stitch Item's Properties panel. To open it, click the Stitch Item in the Item Tree. The Properties tab in the lower right panel is populated with the Stitch Item's properties.
Setup
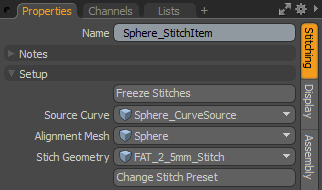
In this section, you can edit some of the properties you specified when setting up your stitches using Stitch Mesh Setup. You can change the curve, the stitch mesh, and the alignment of the stitches. In addition, you can also freeze your stitches, turning them into exportable geometry.
|
Freeze Stitches |
As stitches are replicated items, it might be difficult to export them. Click Freeze Stitches to convert them to geometry that you can easily export. Note: Once the stitches are frozen, their properties can't be edited. |
|
Source Curve |
Change the curve along which the stitches are replicated. |
|
Alignment Mesh |
Change the mesh to which the stitches are aligned. |
|
Stitch Geometry |
Change the stitch mesh to be replicated. |
|
Change Stitch Preset |
Click this to choose a new preset to be used as Stitch Geometry. |
Placement
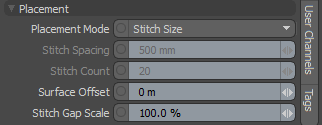
These properties determine how the stitches are placed along the curve.
|
Placement Mode |
Determines how stitches are placed along the curve. The following options are available: • Stitch Count - Places a given number of stitches along each curve. • Spacing Distance - Places stitches approximately this far apart. • Stitches Per Inch - Fits a given number of stitches into one inch of the curve length. • Stitch Size - Uses the bounding box size of the stitches so that stitches lay end to end along the curve. |
|
Stitch Spacing |
Increase or decrease the spacing between stitches when Placement Mode is set to Spacing Distance. |
|
Stitch Count |
Increase or decrease the number of stitches when Placement Mode is set to Stitch Count. |
|
Surface Offset |
Specify how far stitches are pushed into the mesh surface. |
|
Stitch Gap Scale |
Increase or decrease the spacing between stitches when Placement Mode is set to Stitch Size. |
Stitch Variants
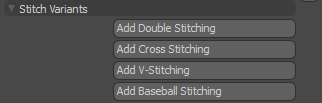
You can create your own rigs to manipulate the stitching look, but these properties allow you to create some common looks automatically.
Stitch variants can be combined, but some of them negate other types. For example, cross stitching can't be combined with v-stitching or baseball stitching.
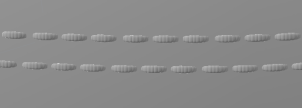
Double Stitching
|
Add/Remove Double Stitching |
Click to add or remove double stitching. When enabled, additional properties appear. |
|
Remove Central Curve |
When enabled no stitches are created along the original curve, only on either side of it. |
|
Stitch Radius |
Determines how far to offset the two outer curves from the original curve. |
|
Create Positive Side |
When enabled, Modo creates the outer curve on the positive side of the central curve. |
|
Create Negative Side |
When enabled, Modo creates the outer curve on the negative side of the central curve. |
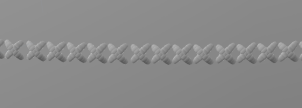
Cross Stitching
|
Add/Remove Cross Stitching |
Click to add or remove cross stitching. When enabled, additional properties appear. |
|
Rotation |
Specify the angle at which each stitch is rotated. |
|
Stitch 1 Inset/Stitch 2 Inset |
Specify how much each of the pair of stitches is pushed into the alignment mesh surface. |
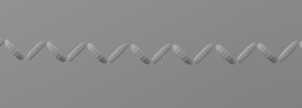
V-Stitching
|
Add/Remove V-Stitching |
Click to add or remove v-stitching. When enabled, additional properties appear. |
|
Rotation |
Specify the angle at which each stitch is rotated. |
Baseball Stitching
|
Add/Remove Baseball Stitching |
Click to add or remove baseball stitching. When enabled, additional properties appear. |
|
Rotation |
Specify the angle at which each stitch is rotated. |
|
Stitch Gap Scale |
Increase or decrease the spacing between stitch pairs. By default, each pair of stitches is placed one stitch-width from the next pair. |
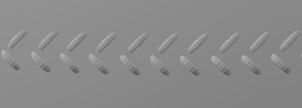
Variation
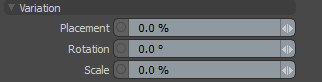
These properties allow you to randomize stitch properties. This can make your model more realistic.
|
Placement |
Move each stitch randomly forward or backward along the curve by the specified amount. |
|
Rotation |
Rotate each stitch by a random amount. |
|
Scale |
Scale each stitch by a random amount. |
Stitch Holes

This is a texturing effect that places dots at the ends of stitch geometry using texture replicators, resembling the holes the stitches go through. When you open the Preview render, you can see the texture with holes.
Note: The holes are only visible on the render, you can't see them in the 3D viewport.
| Add/Remove Stitch Hole Texture | Add or remove stitch hole texture. |
| Shading Effect | Set the texture layer's effect to Diffuse Amount, Bump, or Displacement. |
| Texture Group | Parent the texture layer to a specific material group in the Shader Tree. |
| Opacity | Set the opacity of the texture layer. The Bump and Displacement effects may look a bit strong, so this allows you to tone them down. |
| Hole Size | Set the texture replicator's particle size. This is the radius of each hole. |