Form Workbenches
Workbenches are forms that you can edit in the UI. They allow you to group and organize tools, commands, channels, scripts, macros, and so on.
Courtesy William Vaughan
You can open a workbench in two different places.
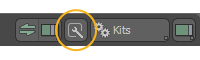
• To open a vertical workbench, in the Model layout click the Workbench ![]() button at the top of the left panel.
button at the top of the left panel.
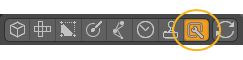
• To open a horizontal workbench, click the Workbench ![]() button in the top-right area of the UI.
button in the top-right area of the UI.
Editing Your Workbench
To start customizing your workbench, click the Edit Workbench button. This reveals three additional buttons. In the horizontal version, the same functions can be found by clicking the Additional Controls ![]() button.
button.
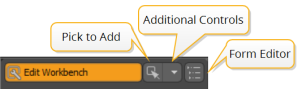
Click the Pick to Add ![]() button. This allows you to click on an element in the UI and add it to the workbench. You can pick buttons, properties, presets, and even open the Command History and click any of the commands used previously to add it to the workbench. As you hover over elements with Pick to Add active, they are highlighted in green.
button. This allows you to click on an element in the UI and add it to the workbench. You can pick buttons, properties, presets, and even open the Command History and click any of the commands used previously to add it to the workbench. As you hover over elements with Pick to Add active, they are highlighted in green.
Note: Make sure you have the required menus open before activating Pick to Add.
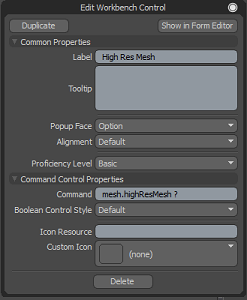
Once you've added an item to your workbench, while in Edit mode, you can right-click to further customize it.
|
Common Properties |
|
|
Label |
The text on the button. |
|
Tooltip |
The text of the tooltip, which displays when you hover the cursor over the button. |
|
Popup Face |
Determines what appears on the face of a popup control. The following options are available: • Option - Display the selected option if available, otherwise display (none).
• Option or Label - Display the selected option if available, otherwise display the label.
• Label - Display the label only.
• Label: Option - Display a combination of the label and the option in the format 'Label: Option'. Display (none) if no option is selected.
• Label: Option or Label - Display a combination of the label and the option in the format 'Label: Option'. Display label only if no option is selected. |
|
Alignment |
Determines how the controls in a form are aligned. Wide makes the control wider to show more of the body, and Full makes the control the full width of the form. |
|
Proficiency Level |
The skill level/utility of the command, which can be used to filter what controls are shown in the form. For more information, see Base Form Proficiency Level in Defaults Preferences. The following options are available: • Basic - Core functionality that should always be visible. • Standard - Functionality that you can use to get the most out of a feature. • Advanced - Functions used by advanced users for special behaviors. |
|
Command Control Properties |
|
|
Command |
Allows you to edit the command directly. |
|
Boolean Control Style |
The style of the control. You can use the Default option, which is the style defined by the command, a Checkmark, or a Toggle Button. |
|
Icon Resource/Custom Icon |
Allows you to specify a custom icon from disk. |


In addition to the options above, this panel allows you to Duplicate or Delete the control, or to Show in Form Editor.
Tool Presets, Macros, and Scripts
In addition to adding UI items, you can add tool presets, macros, and scripts to your workbench. You can find these options by clicking the Additional Controls ![]() button.
button.
Click Add Current Tool Pipe and Save Preset to save the currently created tool preset and add it to the workbench.
Tip: For more information on creating tool presets, see Tool Pipe.
To add a macro, record it, then either click Add Recorded Macro and Save to File to save it as an .lxm file, or Add Recorded Macro and Store in Config to store it in the user config. In both cases, a button is added for the macro to the workbench.
Note: For more information on recording macros, see Macro Recorder.
You can add a script in two ways. To add one from the Script Editor:
| 1. | Open the Script Editor containing your script. You can find it in the menu bar, under Layout > Palettes > Scripting. |
| 2. | In the workbench, click the Additional Controls |
This opens a file browser.
| 3. | Name your script and navigate to the folder to which you want to save it, then click Save. |
Your script is saved on disk and a button for it is added to your workbench.
To add a script from disk:
| 1. | Click the Additional Controls |
This opens a file browser where you can select the script to use.
| 2. | Select the script and click Open. |
The script is added to your workbench.
Modo allows you to open a macro or script directly from the workbench. Click Edit Workbench, then right-click the macro's or script's button. In the context menu, under Script you have the following options:
• Reveal in File Viewer - Open the file's location in a file browser.
• Open in External Editor - Open the file in a text editor.
• Open Python in Script Editor (Scripts only) - Open the file in Modo's Script Editor.
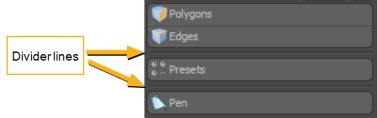
Adding Dividers
You can add horizontal divider lines between the buttons in your workbench. To do this, click the Additional Controls ![]() button, then click Add Divider. A divider line is added to your workbench and you can drag it into place.
button, then click Add Divider. A divider line is added to your workbench and you can drag it into place.
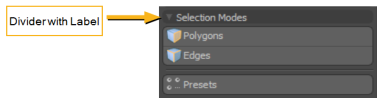
To add a divider with a label, click Add Divider with Label. This adds a divider with a header, and makes the section collapsible.
Note: You can't collapse a section when Edit Workbench is enabled.
Customizing Existing Forms
Using the Form Editor, you can turn any form in Modo into a workbench.
| 1. | Open the Form Editor from the menu bar by clicking System > Form Editor. |
| 2. | In the Form Editor, click a form on the left. |
This opens the form's properties on the right.
| 3. | Under Form Properties at the bottom, enable Customizable Workbench. |
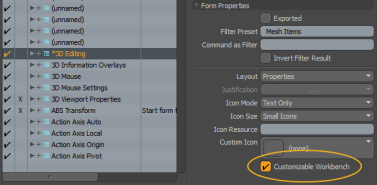
This adds an Edit Workbench button to that form, and you can customize it as described above.