Search is based on keyword.
Ex: "Procedures"
Do not search with natural language
Ex: "How do I write a new procedure?"
Freeze for Procedural Modeling
The Freeze mesh operation is a procedural modeling tool, which rasterizes non-face type polygons into face polygons or specific shapes. This tool works similarly to the traditional Freeze tool.
Note: For more information on the Freeze tool, see Freezing Geometry.
This operation is useful, for instance, when working with text. By default, text in your scene is made up of text polygons. Applying mesh operations to text polygons can produce unexpected results. Therefore, it is better to convert them into traditional polygons, then you can apply mesh operations to them without problems.
In addition to converting text to polygons, you can also use this operation to freeze curves or certain parts of a mesh, similarly to how you would use the non-procedural Freeze tool.
You can add the operation in the Mesh Operations list of the Mesh Ops tab. Click Add Operator, then in the Add Mesh Operation panel, click Edit > Freeze.
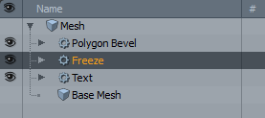
The image below shows the Mesh Operations list with a Text item, a Freeze operation converting it to two-point polygons, followed by a Polygon Bevel.

Freeze Tool Properties
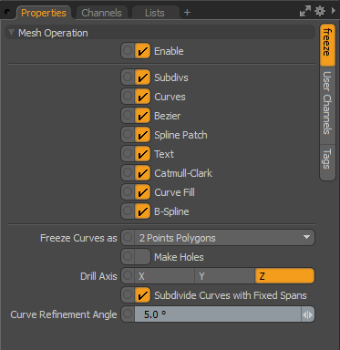
You can specify the polygon types to freeze by toggling the settings in the Freeze operation's Properties panel.

|
Freeze Properties |
|
|---|---|
|
Freeze Curves as |
When any curve type (Curve, Bezier, or B-Spline) is selected for freezing, this option converts the geometry to the selected type. The available options are: • 2 Points Polygons • Faces • Polylines |
|
Make Holes |
When freezing curves as faces with overlapping shapes, especially those created by importing .eps curves from a vector drawing program, enabling this option tells Modo to attempt to drill the overlapping shapes automatically. |
|
Drill Axis |
Depending on the facing direction of the initial curves, you can use this option with the Make Holes command, determining the axis direction of the automatic drill operation. |
|
Subdivide Curves with Fixed Spans |
When enabled, the Freeze command converts curves based on the Mesh Item setting Curve Refinement Angle, generating an identical number of spans between each curve point. Since this value controls how curves are displayed, frozen curves look identical to the viewport display of source curves. When disabled, you can define your own Curve Refinement Angle value, using a more economical adaptive algorithm, which generates more divisions around curved areas and less for the straighter sections. |
|
Curve Refinement Angle |
When the Subdivide Curve with Fixed Spans option is disabled, the Curve Refinement Angle value is used to define the spans that make up the resulting geometry, based on the angle of change between spans. Smaller angles generate more spans, while larger values produce fewer spans, using an adaptive algorithm that generates more divisions around curved areas and fewer for the straighter sections. |
Sorry you didn't find this helpful
Why wasn't this helpful? (check all that apply)
Thanks for taking time to give us feedback.