Search is based on keyword.
Ex: "Procedures"
Do not search with natural language
Ex: "How do I write a new procedure?"
Curve Offset by Mesh
This is a procedural tool that creates parallel curves using the curves in the current mesh or curves in a mesh linked to the operation. It uses a separate mesh surface to determine which way to push the curves. Curves are generated in a direction perpendicular to the closest surface normal of the mesh and to the curve tangent or forward direction.

This mesh operation is used by Modo for generating double stitching. For more information, see Stitch Variants.
Tip: For more information on procedural modeling and mesh operations, see Procedural Modeling.
To use the Curve Offset by Mesh operation:
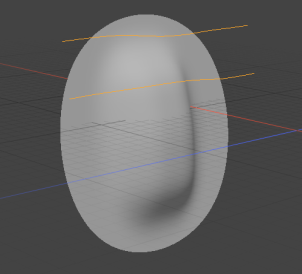
Make sure you have your scene prepared with your mesh and your curve. The example below shows a simple scene with the offset mesh in one mesh layer and a curve in another.

| 1. | Select the mesh layer with your curve in it, and open the Mesh Ops tab on the right panel. |
Tip: If the Mesh Ops tab is not visible on the right panel, click the + button on the right of the tab names, and select Data Lists > Mesh Ops.
| 2. | Click Add Operator, then under Curves, double-click Curve Offset by Mesh. |
The Curve Offset by Mesh operation is added to the Mesh Operations list.
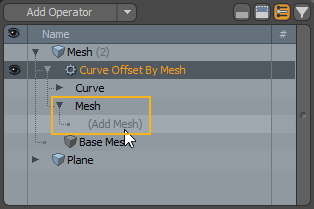
| 3. | To specify what mesh the operation should use to offset the curve, expand it in the list by clicking the small arrow in front of its name. |
This reveals the mesh operation's inputs: Curve and Mesh.
The Curve input is optional. If the curve is in a separate mesh layer from the Curve Offset by Mesh operation, use this input to specify which one. In this example, we've added the operation to the curve's mesh layer, so you don't need to specify the curve.
| 4. | Under Mesh, click (Add Mesh). |

This opens the Add Operation dialog.
| 5. | Double-click the mesh you want to use. |
Parallel curves are created for the curve in your mesh. If you select the offset mesh in Polygons selection mode and apply transforms to it, the curves shift with it.

Curve Offset by Mesh Properties
The Curve Offset mesh operation's properties can be found in the Properties tab on the lower right panel.
| Enable | Toggles curve offset. |
| Use World Transform | When enabled, the mesh operation maintains the world space on the input layer. |
| Remove Original Curve | Hide the original central curve. This doesn't affect curves from a different mesh. |
| Create Positive Side Curve | When enabled, Modo creates the outer curve on the positive side of the central curve. |
| Create Negative Side Curve | When enabled, Modo creates the outer curve on the negative side of the central curve. |
| Offset Radius | The distance between the original curve and the new curves. |
| Point Count | The number of points created on the new curves. |
Sorry you didn't find this helpful
Why wasn't this helpful? (check all that apply)
Thanks for taking time to give us feedback.