Modo VR Additional Features
Annotations
Annotations are a way of leaving temporary notes in a Modo scene for later action.
The items used for annotations are:
• Sketched meshes.
• Snapshot cameras. These can contain a sub-mesh to hold sketched meshes.
Sketch Annotations
When in HMD mode it is not easy to use the keyboard. So to allow notes to be taken the sketch tool has been used to allow sub-meshes to be added for leaving notes. The sketch tool will leave a trail behind when the trigger is held down and the controller moved around. This can be used to place arrows, highlights, or roughly drafted text in the 3D scene.

Snapshot Annotations
Snapshots are cameras that can be placed down in the scene to allow for notes to be made for different viewpoints.
Annotations UI
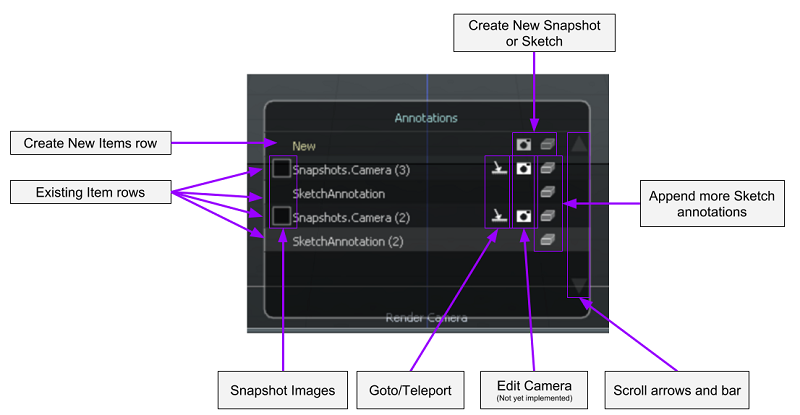
The Annotations UI allows you to create, find, navigate, and amend annotations in the scene.

There are four main parts of the interface:
|
Scrollbar |
Scrolls through the list of items when the list is larger than the panel space. |
|
New Row Icons |
Clicking these creates one of the following: • New camera Snapshot annotation - Creates a camera at the present location. • New Sketch annotation - Immediately goes into Sketch mode, holding the trigger to leave the sketch trail. |
|
Teleport Icon |
Teleports you to the location of the item/camera. |
|
Mesh Icon |
For the item on that row, adds/appends more sketched annotation. Immediately goes into sketch mode. |
Select these by pointing the other controller at the UI and using its trigger to activate.
Locator Tracking
Locator Tracking allows your Modo scene to be affected by your current hand and head positions. This is done by placing named items into your scene and then rigging them to other parts of the scene.
To place and rig a named item:
| 1. | Create an item in the root of the Item Tree, preferably a Locator. |
| 2. | Rename the item to one of the designated names. See the table below. |
| 3. | Go to the LocTrack button set on the hand controllers. |
| 4. | Use the corresponding button to toggle the desired item to actively track. |
See the table below for items and their corresponding buttons.
| Item Name | Button Name | Description |
|---|---|---|
|
LocatorHMDControllerLeft |
Secondary |
Position of the Secondary controller |
|
LocatorHMDHead |
HMD |
Position of your Head |
|
LocatorHMDControllerRight |
Pointer |
Position of the Pointer controller |
Multi-GPU Support
Machines capable of NVIDIA SLI or AMD Crossfire are supported. This allows multiple GPUs to be used together for faster VR rendering.
To use this feature:
| 1. | Install multiple SLI or CrossFire compatible graphic cards into a compatible system. |
| 2. | Install a graphics card driver that supports SLI or CrossFire in OpenGL. |
Note: The OpenGL driver must expose either GL_NV_gpu_multicast or GL_NVX_linked_gpu_multicast extensions. Some drivers only support SLI or CrossFire in DirectX and not OpenGL.
| 3. | Enable SLI or CrossFire in your graphics cards settings. |
Note: Instruction for enabling SLI or CrossFire can be obtained from your graphics driver supplier. This is different for each vendor and can change between driver versions.
| 4. | Run Modo using -gpumulticast on the command line. |
Sorry you didn't find this helpful
Why wasn't this helpful? (check all that apply)
Thanks for taking time to give us feedback.