Search is based on keyword.
Ex: "Procedures"
Do not search with natural language
Ex: "How do I write a new procedure?"
Julienne
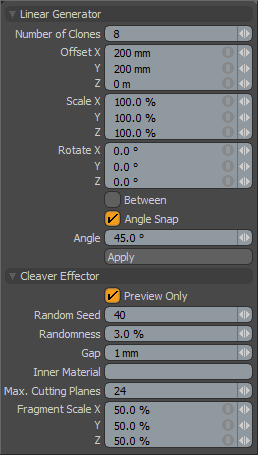
The Julienne tool creates multiple evenly-spaced slices that you can position interactively in the 3D viewport with resulting geometry that contains inner faces. This tool is useful for quickly dicing up a mesh into uniform slices. You can specify the number of slices and their positions by providing Number and Offset values. You can edit the Offset value interactively by dragging in the 3D viewport.
Using the Julienne Tool
The Julienne tool is in the modeling toolbox of the Model and Model Quad interface tabs in the Mesh Edit sub-tab. Mainly, you use the Julienne tool interactively. Once you click the tool's icon, drag in the 3D viewport. When you click in the viewport initially, you set the origin for the tool, which is relative to the Work Plane, and dragging determines the offset. By off-handle dragging in the viewport, you interactively adjust the final angle and positions of the slices.
Julienne Tool Properties

|
Number of Clones |
Determines the total number of possible slices. Depending on the origin and Offset positions, not all slices intersect with the target mesh. |
|
Offset X/Y/Z |
Determines the distance from the initial origin as an offset. These values either determine the second slice in the arrangement of slices or the final slice when you enable Between. |
|
Size X/Y/Z |
Determines the scaling of the cutting planes. |
|
Rotate X/Y/Z |
Determines the rotations of the cutting planes. |
|
Between |
When enabled, spaces the slicing planes evenly between the origin and the Offset position. When disabled, the cutting planes extend beyond the Offset. |
|
Angle Snap |
When enabled, snaps the slices gently when the angle is close to the value specified. |
|
Angle |
Specifies the angle for which snapping occurs. This only applies when you enable Angle Snap. |
|
Cleaver Effector - The Cleaver effector cuts apart geometry by using a series of recursive Boolean operations. When used with an associated generator in the Tool Pipe (such as the Linear generator), Modo ignores the randomness options. |
|
|
Preview Only |
When enabled, offers a simplified GL preview of the final cuts to speed up the interactivity of the tool. (Modo doesn't actually cut the geometry.) To actually create the cuts, disable this option before dropping the tool. |
|
Random Seed |
Determines the initial value for the random number generator. Each seed produces its own unique results. |
|
Randomness |
Determines the strength of jitter values applied to the cutting planes when not used with a generator. |
|
Gap |
Determines the thickness of the cutting planes. This is the amount of space between surfaces after the cut is complete. |
|
Inner Material |
Defines a name that Modo applies as a material tag to the interior cut areas of the mesh. |
|
Max. Cutting Planes |
Specifies the maximum number of total cutting planes. |
|
Fragment Scale X/Y/Z |
Controls the relative separation of the planes in the various dimensions. When not used with a generator, Modo makes chunks that are long and thin or flat instead of roughly cubic based on these values. |
Sorry you didn't find this helpful
Why wasn't this helpful? (check all that apply)
Thanks for your feedback.
If you can't find what you're looking for or you have a workflow question, please try Foundry Support.
If you have any thoughts on how we can improve our learning content, please email the Documentation team using the button below.
Thanks for taking time to give us feedback.