Search is based on keyword.
Ex: "Procedures"
Do not search with natural language
Ex: "How do I write a new procedure?"
Binding and Setup Mode
Binding
Binding is the process of connecting a skeleton made with the Skeleton tool and attaching it to the target geometry so that it deforms when you manipulate the skeleton. There are a couple requirements that need to be met prior to running the command. Once the geometry is ready to be animated, create a reasonable skeleton with an appropriate hierarchy. Modo creates the hierarchy automatically when you draw the skeleton. See the Skeleton Tool topic for more information.
| 1. | In Items mode, select the target Mesh Item(s) and the root of the skeleton's hierarchy. |
| 2. | Enter the Setup action state by clicking the Setup |
Modo indicates the Setup action state by a yellow outline around the viewport when that state is enabled.
| 3. | From within the Setup action state, find the Bind tool command in the toolbox on the Deformers sub-tab. Clicking the button activates the Bind process and opens a dialog box with several options for binding the skeleton. |
|
Option |
Description |
|---|---|
|
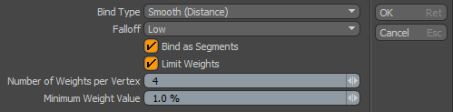
Bind Type |
By default, the binding process treats the hierarchy as individual segments between the items. Modo assigns weights to vertices along the line between an item and its child (similar to a bone). When an item has multiple children, Modo treats them as a single segment. • Rigid - This is the simplest of all binding methods. Modo assigns a vertex with a 100% weight to the closest segment in the hierarchy (or to the closest joint when Bind as Segments is disabled). • Smooth (Distance) - Produces a smooth, graduated transition between segments based on its distance from the segment. • Smooth (Visible) - Produces a smooth, graduated transition similar to the Distance option, but Modo only assigns weighting to vertices that are visible to the segment. This reduces or eliminates cross talk between neighboring segments (such as with legs or with fingers). However, it does require that you have the Skeleton contained entirely within the volume of the geometry. • Heat - This method takes into account the topology of the mesh and the relative positions of the joints. It often produces superior results to the other methods, but the target mesh must conform to a number of requirements: • The mesh must form a volume although Modo does support holes (such as eye sockets). • The target mesh must be polygonal. No single vertices, floating edges, or curves can be present. • No shared vertices, edges, or polygons (non-manifold surfaces) are allowed between multiple components. • All joints must be contained within the volume of the mesh. When applying Heat weighting with the Bind command, if Modo encounters any errors, it reports the error with a message. You can resolve most issues with the geometry by applying the Mesh Cleanup command. Modo indicates the illegal geometry when you exit the command to target the area for you to repair. Modo may also display a Solver Error. This occurs if there are multiple mesh volumes in the same Mesh Item layer, especially if they overlap. For example, if you have two primitive spheres in the same layer, they trigger this error. Often you can fix these solver errors by only weighting the main mesh volume (for example, the skin of a character) and placing other elements into another layer (such as the eyes, hair, and clothing) before weighting. |
|
Falloff |
Determines the attenuation amount between neighboring Weight Maps when using either of the the Smooth Bind types. Specifying Low produces a softer, more gradual transition between joint weights; specifying High produces a more abrupt transition; and specifying Medium is a transition between the two extremes. |
|
Bind as Segments |
When disabled, Modo calculates the weighting as a radius around each joint. When enabled, Modo calculates the weighting along the segment between a joint and its child. |
|
Limit Weights |
When enabled, you can limit the number of joints that influence a weight value during the Bind process. (This is useful for Unity, which can handle a maximum of four joints per vertex.) |
|
Number of Weights per Vertex |
Determines the maximum number of influencing joints when you enable Limit Weights. Modo passes this value on to the Normalizing folder as the Max Sources attribute where you can adjust it later. |
|
Minimum Weight Value |
Ignores any weight values below this threshold. This is useful when cleaning up Heat Binding, which tends to generate many small weight values. |
| 4. | After setting up the binding, click OK. |
Modo then initiates a series of actions automatically:
• The first is the weighting of the skeleton to the geometry. Each joint has an associated Weight Map created based on the Bind Type and its settings.
• Next, Modo assigns a series of deform influences to each joint of the skeleton and then generates and assigns an associated Weight Map to each.
• Finally, Modo links each influence automatically to its originating joint and places the entire hierarchy of deformers into a Normalizing folder, where Modo evaluates all the influences as a single unified deformer.
| 5. | After running the Bind command, exit Setup mode to begin to deform and animate the character. |
Further refinement is possible. For example, if you wish to fine-tune the automatically created weights, use the Weighting tools in the Weighting sub-tab of the relevant toolbox.
Setup
If you are unfamiliar with animation and rigging, you may not know why you need to enter a Setup mode to bind a skeleton to the geometry or to set up Inverse Kinematics (IK).
When the binding takes place, items in the Setup action state are understood by Modo to be in their resting or undeformed position. By binding in the Setup action state, you define the initial position of the individual joints and zero this position so all joints have the same starting value. The same occurs with IK because it defines the base position for segments along the chain. When you add a task or goal, the IK solver knows where to begin its calculations. By having a specific Setup mode, you have an easy way to get an animated or deformed model back into its resting position for further refinement without having to remove or disable any animation already applied to the geometry.
Tip: You can also use the Setup action state to define resting positions for Using Falloffs when used as deformers. Then Modo knows what areas of the mesh should be under the influence of the falloff.
Sorry you didn't find this helpful
Why wasn't this helpful? (check all that apply)
Thanks for your feedback.
If you can't find what you're looking for or you have a workflow question, please try Foundry Support.
If you have any thoughts on how we can improve our learning content, please email the Documentation team using the button below.
Thanks for taking time to give us feedback.